


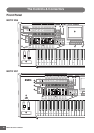


The Controls & Connectors
MOTIF XS Owner’s Manual
14
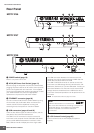
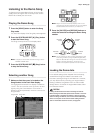
% OCTAVE [UP] and [DOWN] buttons (pages 91,
92, 138, 251 and 260)
Use these buttons to change the note range of the
keyboard. To restore the normal octave setting, press both
buttons simultaneously.
^ SEQ TRANSPORT buttons (pages 21, 178 and
208)
These buttons control recording and playback of the Song/
Pattern sequence data.
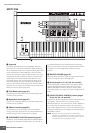
[P] (Top) button
Instantly returns to the beginning of the current Song or
Pattern (i.e., the first beat of the first measure).
[G] (Reverse) button
Press briefly to move back one measure at a time, or hold to
continuously rewind.
[H] (Forward) button
Press briefly to move forward one measure at a time, or hold to
continuously fast-forward.
[I] (Record) button
Press this to enable recording (Song or Pattern phrase). (The
indicator lights.)
[J] (Stop) button
Press to stop recording or playback.
[F] (Play) button
Press to start playback from the current point in the Song or
Pattern. During recording and playback, the indicator flashes
at the current tempo.
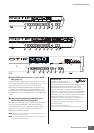
& LCD Display
The large backlit LCD displays the parameters and values
related to the currently selected operation or mode.
* [F1] – [F6] (Function) buttons (page 81)
These buttons located directly below the LCD display call
up the corresponding functions indicated in the display.
( [SF1] – [SF5] (Sub Function) buttons (page 81)
These buttons located directly below the LCD display call
up the corresponding sub functions indicated in the
display. These buttons can be also used to call the
Arpeggio type in some displays of the Play mode, Edit
mode and Record mode. These buttons can be also used
as Scene buttons (pages 179, 182, 209 and 211) in the
Song Play/Song Record/Pattern Play/Pattern Record
modes.
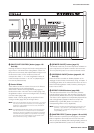
º Data dial (page 81)
For editing the currently selected parameter. To increase
the value, turn the dial right (clockwise); to decrease the
value, turn the dial left (counter-clockwise). If a parameter
with a wide value range is selected, you can change the
value in broader strokes by quickly turning the dial.
¡ [INC/YES] button (page 81)
For increasing the value of the currently selected
parameter. Also use it to actually execute a Job or a Store
operation.
™ [DEC/NO] button (page 81)
For decreasing the value of the currently selected
parameter. Also use it to cancel a Job or a Store operation.
n You can also use the [INC/YES] and [DEC/NO] buttons to
quickly move through parameter values in 10-unit jumps,
especially those with large ranges. Simply hold down one of
the buttons (of the direction you want to jump), and
simultaneously press the other. For example, to jump in the
positive direction, hold down the [INC/YES] button and press
[DEC/NO].
£ Cursor buttons (page 81)
The cursor buttons move the “cursor” around the LCD
display screen, highlighting and selecting the various
parameters.
¢ [EXIT] button (page 55)
The menus and displays of the MOTIF XS are organized
according to a hierarchical structure. Press this button to
exit from the current display and return to the previous level
in the hierarchy.
∞ [ENTER] button
Use this button to actually enter a number when selecting a
Memory or Bank for Voice or Performance. Also use this
button to execute a Job or a Store operation.
§ MODE buttons (page 55)
These buttons select the MOTIF XS operating modes (e.g.,
Voice mode).
¶ Bank buttons (pages 23 and 88)
Each button selects a Voice or Performance Bank. When
the [CATEGORY SEARCH] button is turned on, these
buttons can be used to select the Main category (printed
below each button). When the [TRACK] button is turned on
in the Pattern mode, these lower buttons are used to select
the desired Section from I – P.
• Group [A] – [H] buttons (pages 23 and 88)
Each button selects a Voice or Performance Group. When
the [CATEGORY SEARCH] button is turned on, these
buttons can be used to select the Sub category. When the
[TRACK] button is turned on in the Pattern mode, these
buttons are used to select the desired Section from A – H.
ª Number [1] – [16] buttons (pages 23 and 88)
Use of these buttons differs depending on the on/off status
of the [TRACK], [MUTE], [SOLO] and [PERFORMANCE
CONTROL] buttons.