


MOTIF XS Owner’s Manual
Using as a Master Keyboard (Master mode)
253
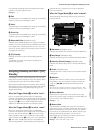
Voice mode
Song mode
Pattern mode
Mixing mode
Master mode
Utility mode
File mode
Performance
mode
Sampling
mode 1
Sampling
mode 2
Reference
Master Edit
The Master Edit mode lets you create your own original Master programs—containing up to eight different Zones (keyboard
areas)—by editing the various parameters. To enter the Master Edit mode, press the [EDIT] button in the Master Play mode.
Press the [EXIT] button to return to the original display.
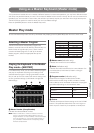
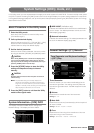
Common Edit and Zone Edit
In the Master mode, you can divide the keyboard into (up
to) eight independent areas (called “Zones”). Different
MIDI channels and different functions of the Knobs and
Control Sliders can be assigned to each Zone. This makes
it possible to control several Parts of the multi-timbral tone
generator simultaneously by a single keyboard or to control
Voices of an external MIDI instrument over several different
channels in addition to the internal Voices of this
synthesizer itself—letting you use the MOTIF XS to
effectively do the work of several keyboards. You can set
the parameters related to the eight Zones in the Master Edit
mode and store the settings as a User Master.
There are two types of Master Edit displays: those for
editing parameters common to all eight Zones and those
for editing individual Zones.
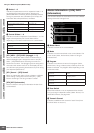
Master Edit Procedure
1
Press the [MASTER] button to enter the Master
Play mode, then select a Master.
2 Press the [EDIT] button to enter the Master
Edit mode.
3 Set the Zone Switch parameter to “on” in the
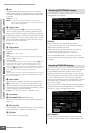
Other display as necessary.
4 Call up the Common Edit display or Zone Edit
display.
To call up the Common Edit display, press the
[COMMON EDIT] button. You can specify the mode
and program number called up when the Master is
selected, and the Master name in the Common Edit
mode.
To call up the Zone Edit display, press one of the
Number buttons [1] – [8] to select the Zone to be
edited. Here you can set various parameters such as
the keyboard range and MIDI Transmit Channel for
each Zone in the Zone Edit mode.
5 Call up the Edit display including the
parameters you wish to edit by pressing the
[F1] – [F5] buttons and [SF1] – [SF2] buttons.
For information about the parameters, see pages 254
and 255.
6 Move the cursor to the desired parameter.
7 Edit the value by using the [INC/YES], [DEC/
NO] buttons and the data dial.
8 Repeat steps 4 – 7 as desired.
9 Enter a name for the Master in the Name
display (page 254) of Common Edit.
10 If you wish to store the edited Master, press
the [STORE] button to call up the Store
window (page 254).
For detailed instructions on storing, see page 254.
The edited Master will be lost when selecting a different
Master, calling up a different mode, or turning the power off.
Make sure to store the Master data to internal memory by
pressing the [STORE] button before selecting a different
Master, calling up a different mode, or turning the power off.
n Save the edited and stored Master data to a USB storage
device or to a computer connected via network to the
MOTIF XS as necessary. Keep in mind that edited Master
data is stored to internal User memory (Flash ROM) and is
maintained even when power is turned off. Therefore it is
not necessary to save the data to an external device;
however, we still recommend that you save or archive all
important data to an external device. Refer to page 278
for details.
PA RT SELECT ARP ON/OFF
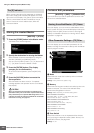
123456 87COMMON EDIT
Common Edit display
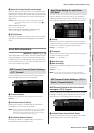
Zone Edit display
CAUTION