


Pattern Playback
MOTIF XS Owner’s Manual
216
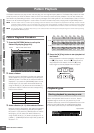
Voice mode Song mode Pattern mode Mixing mode Master mode Utility mode File mode
Performance
mode
Sampling
mode 1
Sampling
mode 2
Reference
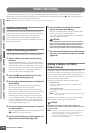
This Job operation overwrites any data previously existing in the
destination Song and the Undo/Redo (page 223) Job cannot be
used after executing this Job. Important data should always be
saved to a USB storage device connected to the USB TO DEVICE
terminal or to a computer connected to the same network as the
MOTIF XS (page 278).
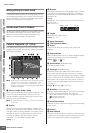
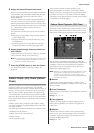
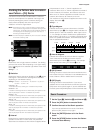
[SF4] Insert
From this display, you can insert a new event to the Pattern
Chain. After setting the following parameters, press the
[F6] Set button or [ENTER] button to actually insert the
event.
1 Event Type
Determines the event type to be inserted.
Settings: Time Signature, Section, end, Tempo Change, Track Mute
end
Indicates the end position of the Pattern Chain.
2 Inserting location
Specifies the location at which the new event will be
inserted.
Settings:
MEAS (Measure): 001 – 999
BEAT: 01 – 16 (depends on the meter)
CLOCK: 000 – 479 (depends on the meter)
3 Value of the selected event type
Enters the value of the event to be inserted. The values
available differ depending on the selected Event Type (1).
Settings:
Time Signature: 1/16 – 16/16, 1/8 – 16/8, 1/4 – 8/4
Section: A – P, end (end of the data)
Tempo Change: 005.0 – 300.0
Track Mute: m (mute on), blank (mute off)
[SF5] Delete
Deletes the currently selected event. This button is not
available when the cursor is located at the Time Signature
event, Tempo Change or top/bottom of the data.
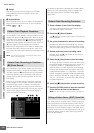
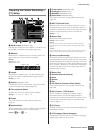
1 Select a Pattern on the Chain Play display.
This step is necessary because each Pattern has its
own dedicated Pattern Chain data.
2 Press the [EDIT] button to call up the Chain
Edit display.
3 Edit the already-recorded events.
Move the cursor to each of parameters, then set the
value by using the data dial, [INC/YES] and [DEC/NO]
buttons. To make it easier to find desired parameters,
use the View Filter display called up via the [SF1]
button. You can use the Copy function called up via the
[SF2] button to copy the events from a specified range
to another range.
If you wish to delete the event, move the cursor to the
event to be deleted then press the [SF5] button.
If you wish to insert a new event, press the [SF4] button
to call up the Insert display. From this display, you can
input the events one by one.
4 Convert the created Pattern Chain data to a
Song.
By using the Convert To Song display called up via the
[SF3] button, you can convert the created Pattern
Chain data to MIDI sequence data and copy the
converted data to a specified Song. This function is
useful for quickly creating backing and accompaniment
parts for Song data.
5 Store the created Pattern Chain data to internal
User Memory.
From the Store window called up via the [STORE]
button, you can store the current Pattern including the
created Pattern Chain data to internal memory. After
storing the Pattern data, the Pattern Chain included in
the Pattern is maintained even if the power is turned off.
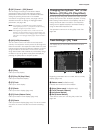
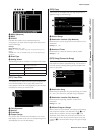
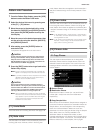
1 From the Chain Edit display, press the [SF4]
Insert button to call up the Insert window.
2 Specify the event type to be inserted, the
insertion point (measure, beat, and clock), and
parameter value of the event.
3 Press the [F6] Set button to insert the specified
event at the specified location.
You can continue inserting new events since the Insert
Event window remains open. Press the [ENTER] button
to actually insert the event and close the Insert window.
4 Press the [EXIT] button to go back to the Chain
Play display.
Pattern Chain Edit Procedure
CAUTION
1
2
3
Entering New Events