


Song Recording
MOTIF XS Owner’s Manual
189
Voice mode
Song mode
Pattern mode
Mixing mode
Master mode
Utility mode
File mode
Performance
mode
Sampling
mode 1
Sampling
mode 2
Reference
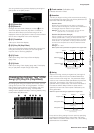
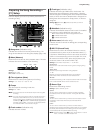
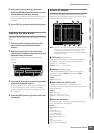
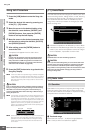
Arpeggio Settings—[F2] Arpeggio
From this display you can set various Arpeggio-related
parameters for the Song recording.
Parameters 1 – & are same as the ones in the Arpeggio
Main display (page 101) in the Voice Common Edit mode.
* Voice with ARP (Voice with Arpeggio)
Each Arpeggio type is assigned a specific Voice best
suited to the type. When an Arpeggio type has been
assigned to a recorded track, this parameter determines
whether or not the Voice assigned to the Arpeggio type will
also be used for the recorded track. When set to “on,” the
appropriate Voice is assigned to the recorded track in
place of the currently assigned Voice. When set to “off,” the
appropriate Voice is not assigned to the recorded track.
The currently assigned Voice is maintained. The name of
the Voice registered to the Arpeggio Type is shown at the
right side.
Settings: off (not copied), on (copied)
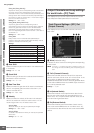
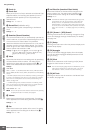
The Arpeggio type set in the Arpeggio display of the Song
Record can be called up together with the Song Scene via
the [SF1] Scene 1 – [SF5] Scene 5 buttons in the Setup
display (page 187) and the Track View display (page 181).
The 8th note icon at right of Scene1 – 5 in the tab indicates
that the Song Scene is registered to the corresponding
button. If the Arpeggio Type is set to “off” in the Arpeggio
display of the Song Record, pressing the corresponding
Sub Function button in the Setup display/Track View
display will not change the Arpeggio type even if the 8th
note icon is shown.
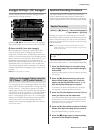
Realtime Recording Procedure
This section explains how to record your performance
using the Realtime Recording features. Please keep in
mind that the procedure differs depending on the Record
Type and Record Track set from the Record Setup display.
[SONG] ➞ [I] (Record) ➞ Record track selection
➞ Type=replace ➞ [F] (Play)
By using this method, any previous data in the recorded
track will be erased (overwritten) and replaced by the new
data. The first recording is lost, and the new one takes its
place. This is handy when you need to re-record the same
Part several times.
n If you accidentally overwrite important data when using
Replace Recording, cancel the recording by using the Undo/
Redo Job (page 196).
This section covers how to record your keyboard
performance data to tracks 1 – 16 with Replace Recording.
1 Press the [SONG] button to call up the Song
Play display (page 178), then select a Song to
be recorded.
Select an empty Song if you wish to create a new Song
from scratch.
2 Press the [I] (Record) button to call up the
Record Setup display (page 187). From this
display, set the Record track to one of 1 – 16
then set the Recording type to “replace.”
If necessary, set various parameters such as tempo,
time signature, measure, quantize, and voice.
3 Press the [F5] Click button to turn the Click on
when you wish to use the metronome.
In the Click display (page 270) called up via the [SEQ
SETUP] button, you can make various settings for the
metronome click, such as the note resolution, volume,
and lead-in count for recording.
4 Press the [F] (Play) button so that its indicator
flashes, then start recording after the count-in.
Play the keyboard and/or controller to record.
5 Press the [J] (Stop) button to stop recording
and return to the Song Play display.
Calling up the Arpeggio Type by using the
[SF1] Scene 1 – [SF5] Scene 5 buttons
1
2
6
3
4
5
*
!
@
#
$
)
9
%
^
8
7
Replace Recording
Recording Procedure for individual tracks
1 – 16