


Voice mode Song mode Pattern mode Mixing mode Master mode Utility mode File mode
Performance
mode
Sampling
mode 1
Sampling
mode 2
Reference
Creating a Voice/Performance by Using the Sampling Function
MOTIF XS Owner’s Manual
168
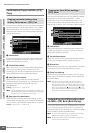
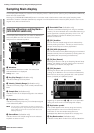
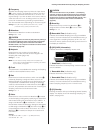
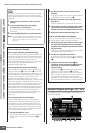
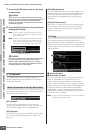
Sample Playback settings—[F1] Trim
This display lets you set the playback range and loop
range of the Sample.
A convenient Extract function lets you delete unneeded
portions of the Sample prior to the start point and after
the end point, allowing you to save memory for additional
Sampling.
1 Press the [F1] Trim button to call up the Trim
display.
2 Press the [ENTER] button. (The display
prompts you for confirmation.)
If you wish to cancel the operation, press the [DEC/
NO] button.
3 Press the [INC/YES] button to execute Extract.
n The data deleted via the Extract operation cannot be
recovered. Before executing the Extract, you may want
to back up this Sample by using the Copy Job
(page 172).
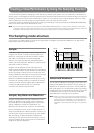
Tips for editing the Samples
How to play the Sample (Play Mode settings)
There are two methods for playing back the Sample: One
shot and Loop. Loop lets you play the specified range of
the Sample repeatedly in a loop. One Shot, on the other
hand, lets you play the entire Sample only once.
You’ll need to determine which type (Loop or One Shot) is
used by setting the Play Mode parameter in the
Parameter display (page 170).
Fine-tuning playback of One Shot Samples
You can determine the playback range of the Sample by
setting the Start Point (
6
) and End Point (
8
) in the Trim
display (page 168). These parameters effectively let you
mute unnecessary or unwanted audio from the beginning
and end of your Sample. To cut sound at the end of
playback, decrease the End Point value, moving it
leftward on the wave display. Similarly, to cut sound at the
beginning of playback, increase the Start Point value,
moving it rightward on the wave display. In general, you’ll
want to set the Start Point so that the beginning of the
Sample plays back immediately when triggered. Use the
[SF1] Audition button to check playback of the Sample,
that it sounds smooth and natural. After setting and
confirming the Start/End Points, trim them permanently
from the Sample by using the Extract operation
(page 177).
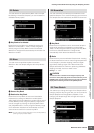
Fine-tuning playback of Loop Samples
Setting the Start and End Points in a Loop Sample is
generally more crucial and painstaking than with One
Shot Samples. The Start and End Points must be set
accurately to ensure that the Loop plays back smoothly
and continuously without stutters or glitches. You’ll also
need to make sure (with rhythmic loops) that the Loop is
in perfect rhythm and no beats are lost.
1 Set the Play Mode to “loop.”
Press the [F2] Param button to call up the Parameter
display (page 170) then set the Play Mode (6) to
“loop.”
Hint
2 Set the Start Point to the 1st beat of the 1st
measure.
Press the [F1] Trim button to call up the Trim display
(page 168) then set the Start Point (6).
3 Set the Loop Point to the value same as the
Start Point.
Press the [SF2] button so that the LP=ST is shown.
4 While holding the [SF1] Audition button, adjust
the End Point so that looped playback of the
Sample is smooth and matches the beat timing.
5 Execute the Extract operation (page 177).
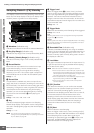
How to set the tempo of the Sample
If you do not know the tempo of the Sample containing
the rhythm pattern, follow the instructions below.
1 While holding the [SF1] Audition button, adjust
the Start Point and End Point so that looped
playback of the Sample is smooth and matches
the beat timing.
Make sure to also use the Extract operation to delete
unnecessary parts from the Sample.
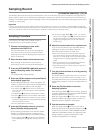
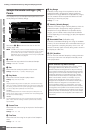
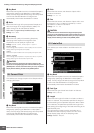
2 Set the time signature and measure.
Press the [F1] Trim button to call up the Trim display
(below) then set the time signature ()) and measure
(!).
3 Increase or decrease the Tempo (9) as
necessary so that the End Point (8) becomes
equivalent to the end point applied to the
original Sample.
Set the Tempo (9) to a large value then decrease it
gradually so that the End Point (8) increases
gradually. Once you reach a certain value, the End
Point no longer increases, even when you decrease
the Tempo. The resulting value is the End Point
applied to the original Sample. The final Tempo value
is the most appropriate tempo for Sample playback.
1
2
4
5
6
7
8
9
)
!
º
@
* # $ % ^ &(
3