


Song Recording
MOTIF XS Owner’s Manual
191
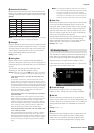
Voice mode
Song mode
Pattern mode
Mixing mode
Master mode
Utility mode
File mode
Performance
mode
Sampling
mode 1
Sampling
mode 2
Reference
6 Press the [J] (Stop) button to stop recording
and return to the Song Play display.
n You can edit the Track on/off and the Scene change
events from the Song Edit display for the Tempo track
(page 192).
To temporarily disengage the record mode and enter the
Rehearsal mode, simply press the [I] (Record) button
during realtime recording. The [I] (Record) indicator
flashes and playback will continue uninterrupted but no
data will be recorded. This convenient Rehearsal mode
feature lets you easily and temporarily disable recording in
order to practice a Part or try out various ideas (while
listening to the other tracks) without actually recording. To
return to the record mode press the [I] (Record) button
again so that the [I] (Record) indicator lights continuously.
[SONG] ➞ [I] (Record) ➞ Record track selection
➞ Type=overdub ➞ [F] (Play)
This method allows material to be added to existing
material on a track. The first recording is kept, and the new
one is added. This makes it easy to create Parts by
recording them a little at a time.
The Overdub Recording procedure is almost same as the
Replace except that the Record type is set to “overdub.”
n When the Record Track (5) is set to “Tempo Track” or “Scene
Track,” “overdub” cannot be selected here.
[SONG] ➞ [I] (Record) ➞ Record track selection
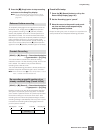
➞ Type=punch ➞ [F] (Play)
Realtime recording can also be done between specified
start (punch-in) and end (punch-out) points. This allows
you to record a specified section of a previously-recorded
track without having to re-record the entire track. Start
recording with this method and playback begins. Actual
recording will begin automatically when the punch-in point
is reached and recording will be disengaged when the
punch-in point is reached.
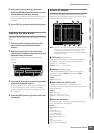
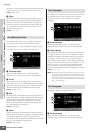
Punch In/Out setup
1 Press the [I] (Record) button to call up the
Record Setup display (page 187).
2 Set the Recording type to “punch.”
3 Move the cursor to the punch in and punch
out, then set their points respectively by
entering measure and beat.
Except for setting the punch in and punch out, perform the
same procedure as the Replace Recording procedure.
Rehearsal before recording
Overdub Recording
Re-recording a specific section of an
already-recorded Song (Punch In/Out)
Recording start Punch In Punch Out
Recording stop
Playback only Playback only
Replace Recording
(Overwriting)