


Creating a Voice/Performance by Using the Sampling Function
MOTIF XS Owner’s Manual
169
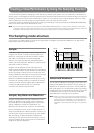
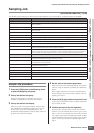
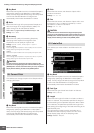
Voice mode
Song mode
Pattern mode
Mixing mode
Master mode
Utility mode
File mode
Performance
mode
Sampling
mode 1
Sampling
mode 2
Reference
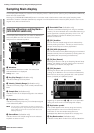
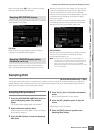
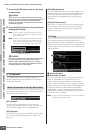
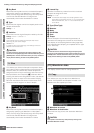
1 Waveform (Indication only)
Indicates the number and name of the selected Waveform.
2 Key (Key Range) (Indication only)
Indicates the key range of the currently selected Key Bank.
3 Velocity (Velocity Range) (Indication only)
Indicates the velocity range of the currently selected Key
Bank.
4 Track (Indication only)
Indicates the track of the current Song/Pattern. This is
available only when entering the Sampling mode from the
Song/Pattern mode.
5 Measure (Indication only)
Indicates the measure number of the selected Song/
Pattern. This is available only when entering the Sampling
mode from the Song/Pattern mode.
6 Start Point
Determines the Start point for Sample playback. The part
at the left side of this point will not be played back. When
pressing the [SF2] button, the value of the Loop Point (7)
is copied to the Start Point.
Settings: 0000000 – End point
7 Loop Point
Determines the Loop point at which the loop playback starts.
When the Play mode is set to “loop,” the Sample is played
back between this Loop point and the End point (
6
).
Settings: 0000000 – End point
8 End Point
Determines the End point for Sample playback. The part at
the right side of this point will not be played back. The End
Point (
8
) will be automatically determined so that the length
between the Start Point and the End Point matches the
settings of the Tempo (
9
), Meter (
)
), and Measure (
!
).
Settings: 0000000 – (depending on the Sample’s length)
9 Tempo
Determines the Tempo of Sample playback. Setting the
Tempo changes the End Point (8) so that the length
between the Start Point and the End Point matches the
settings of the Meter and Measure.
Settings: 5.0 – 300.0
) Meter
Determines the meter (time signature) of Sample playback.
Setting the Meter changes the End Point (8) so that the
length between the Start Point and the End Point matches
the settings of the Tempo and Measure.
Settings: 1/16 – 16/16, 1/8 – 16/8, 1/4 – 8/4
! Measure
Determines the Sample length for playback based on
measure and beat values, an intuitive and musically useful
way to set Sample playback. Setting the Measure changes
the End Point (8) so that the length between the Start Point
and the End Point matches the settings of the Tempo and
Meter.
Settings:
Measure: 000 – 032
Beat: 00 – 15 (Varies depending on the Meter setting.)
n The Measure setting here indicates the length between the
Start Point and End Point of the sample. When you wish to play
two measures beginning from the Start Point of the sample, set
the Measure parameter to “002:00.”
@ Recordable Time (Indication only)
Indicates the available Sampling time using the available
memory. The time indicated here is calculated assuming a
mono signal with a sampling frequency of 44.1 kHz. The
amount of memory space currently being used is shown in
the display as a blue line.
# [SF1] Audition
You can hear the selected Sample by holding this button.
This lets you check whether the Sample has been edited
appropriately or not.
$ [SF2] LP=ST
When the menu indication here is “LP=ST,” the Start (Start
Point) and the Loop (Loop Start Point) will share the same
address, meaning that both of them will be changed
simultaneously, even if just one of them is changed.
Pressing the [SF2] button in this condition changes the
menu from “LP=ST” to “LP≠ST.” When the menu indication
here is “LP≠ST,” the Start (Start Point) and the Loop (Loop
Start Point) can be changed independently. When pressing
the [SF2] button in this condition, the address value of the
Start will be copied to the one of the Loop, with the result
that both of them share the same address value. The menu
indication also changes from “LP≠ST” to “LP=ST.”
% [SF3] Display
Pressing the [SF3] button adjusts the zoom level so that the
entire wave, including the Start Point and End Point, is
shown on the display.
^ [SF4] Zoom Out
& [SF5] Zoom In
Press the [SF4] and [SF5] buttons to zoom in and out of the
wave display.
* [F1] Trim
Pressing this button returns from the previous display to the
Trim display.
( [F2] Param (Parameter)
Pressing this button calls up the display that lets you set
the Sample-related parameters and Key Bank range.
º [SF6] NUM
When “NUM” is shown in the tab, you can use the [F1] –
[F6] buttons and the [SF1] – [SF5] buttons as the numeric
key pads by pressing the [SF6] button.