


Step 5: Creating a Pattern
MOTIF XS Owner’s Manual
41
Start Guide
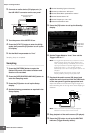
10 Start the CD player.
Since the Trigger Level is set to “1” here, sampling
will begin automatically as soon as the audio signal is
input from the CD player. In this example, record a
one-measure drum pattern from the CD.
11 Press the [F6] button to stop sampling, then
stop the CD player.
The wave of the recorded audio signal will be shown
on the display.
12 Press the [SF1] button to hear your newly
recorded sound.
The start point of the recorded Sample will probably be at
the correct place—the first beat of the measure—since
Sampling start was set to begin automatically with the
Trigger Level setting. However, the end point may not be at
the end of the measure as desired, since Sampling was
stopped manually. Accordingly, you may need to edit the
End Point of the recorded sample so that playback of the
recorded sample properly matches the beat timing.
1 Press the [SF2] button once or twice so that
the LP=ST is shown.
2 Move the cursor to the End Point then adjust
the value by using the data dial.
Press the [SF1] button to hear the sample. Adjust the
End Point so that the Sample plays back smoothly and
continuously without stutters, glitches or problems in
timing.
3 After setting the Ending Point, press the
[ENTER] button to delete unnecessary data
(located after the End point).
After the display prompts you for confirmation, then
press the [INC/YES] button to execute the Extract
operation.
n Many commercially available sample/loop CDs include
information on the tempo, measure and meter of specific
loops. If this information is available, enter the appropriate
values to the parameters above.
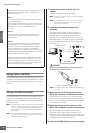
Next, let’s use the Slice function to match the recorded
sample with the tempo. This Slice feature lets you
automatically divide the recorded sample into separate
“slices.” These slices are then assigned to successive
notes and arranged as MIDI data. This lets you manipulate
the component parts of your sample loops as MIDI data,
and gives you the power to easily change tempo and even
the rhythmic feel, without disturbing the pitch or sound
quality.
n Before executing the Slice operation, you’ll need to accurately
adjust the length of the sample by adjusting the End Point.
1
Press the [F6] button to call up the Slice display.
2 Set the following parameters on the Slice
display.
Since the recorded sample is a one-measure drum
pattern in 4/4 time, set the parameters below as shown.
2-1 Set the Slice Type to “beat1.”
2-2 Set the Measure to “1.”
2-3 Set the Sensitivity to “4.”
3 Press the [SF4] button to execute the Slice
operation.
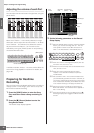
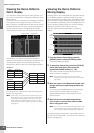
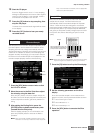
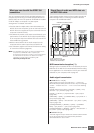
Sample Edit Setting the End Point of the
Recorded Sample
End
Point
Tempo
Measure
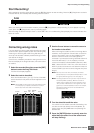
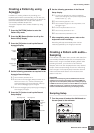
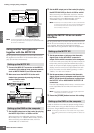
Sample Edit Slice
Sample
Slice the Sample and assign the
sliced Samples to specified keys
(notes) to create a Sample Voice.
MIDI data