


Audio Recording to Song/Pattern (Sampling mode)
MOTIF XS Owner’s Manual
246
Voice mode Song mode Pattern mode Mixing mode Master mode Utility mode File mode
Performance
mode
Sampling
mode 1
Sampling
mode 2
Reference
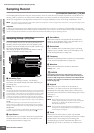
8 Key
Indicates the Key Bank (page 244) set in the Sampling
Record Setup display. The Key Bank can be changed both
here and in Sampling Edit (page 250) after the Recording
is finished.
Settings: C -2 – G8
n You can also set the Key directly from the keyboard, by
holding down the [SF6] KBD button and pressing the desired
key. For details, see page 82.
9 Trigger Level
When the Trigger Mode ()) is set to “level,” you’ll also
need to set the Trigger Level. Sampling (Recording) will
begin as soon as an input signal exceeding the specified
trigger level is received. The level set here will be indicated
as a red triangle in the level meter. For best results, set this
as low as possible to capture the entire signal, but not so
low as to record unwanted noise.
Settings: 000 – 127
) Trigger Mode
Determines the method by which Sampling will be
triggered.
Settings: level, meas, manual
level
Sampling starts as soon as an input signal exceeding the specified
trigger level (9) is received.
meas (measure)
This should be set together with the Punch In/Out measure (!). After
the [F6] Start button is pressed, actual sampling will begin at the
specified Punch In measure, and end at the specified Punch Out
measure. Sampling will also stop when the Song/Pattern is stopped by
pressing the [J] (Stop) button. This method lets you recording the
audio signal while monitoring the sound of other Tracks.
manual
Sampling starts soon after you press the [F6] REC button. This setting
lets you start Sampling at the desired timing regardless of the input
level from audio source.
! Punch In/Out
This parameter is available only when the Trigger Mode
()) is set to “meas.” The Punch In value determines the
measure number at which sampling starts automatically
while the Punch Out value determines the measure number
at which sampling stops automatically.
Settings: 001 – 999 (Song mode), 001 – 256 (Pattern mode)
@ Level Meter
# Recordable Time (Indication only)
Refer to the description of the same-named parameter on
page 165.
$ [SF1] Confirm
This is available when Recording Type in the Setup display
(page 244) is set to “sample” or “sample+note.”
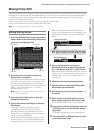
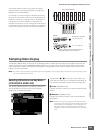
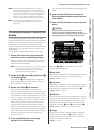
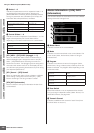
% [F5] Start
Press this button to start Sampling.
During Sampling, a graphic representation of the recorded
audio appears in the display.
[F6] Stop
Press this button to stop Sampling (Recording).
In each of the following cases, the “FINISHED” display
appears after Sampling is finished.
• When Recording Type (page 244) is set to “sample” or
“sample+note” and [SF1] Confirm is turned on
• When Recording Type (
page 244
) to “slice+seq”
From the FINISHED display, you can listen to the just-
recorded Sample by pressing the [SF1] button. See below
for details.
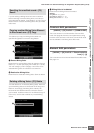
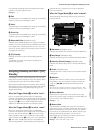
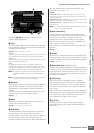
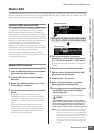
When [F2] Confirm is turned on before the Sampling starts,
the FINISHED display below appears as soon as the
Sampling is finished. From this display, you can hear and
confirm the Sample by pressing the [SF1] Audition button.
If you are satisfied with the sound, press the [ENTER]
button to fix the Sampling result as Sample data. If you are
not satisfied with the Sampling result, press the [EXIT]
button then try again.
When [F2] Confirm is turned off before Sampling starts, the
Sampling operation will automatically fix the Sample data
and return to the Setup display (page 244).
[SF1] Audition
You can hear the recorded Sample by holding this button.
This lets you hear precisely how the Sample is played back.
Sampling RECORDING display
Sampling FINISHED display