


Voice mode
Song mode
Pattern mode
Mixing mode
Master mode
Utility mode
File mode
Performance
mode
Sampling
mode 1
Sampling
mode 2
Reference
Audio Recording to Song/Pattern (Sampling mode)
MOTIF XS Owner’s Manual
247
n When Recording Type (
page 244
) is set to “sample” or
“sample+note” and [SF1] Confirm is turned off, stopping
Recording will automatically fix the just-recorded Sample data
and the instrument will return to the Setup display (page 244).
Please note that the instrument returns to the STANDBY
display as soon as Sampling is finished if Record Next is
turned on in the Setup display before the Sampling operation.
n When Recording Type (
page 244
) is set to “slice+seq,”
stopping Recording calls up the Record Trim display
(page 247).
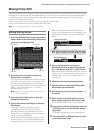
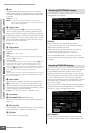
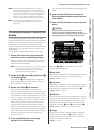
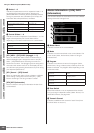
Trimming the Sample—Record Trim
display
When Recording Type (page 244) is set to “slice+seq,”
stopping Recording (and subsequently fixing the sampled
data when Confirm is turned on) calls up this display. From
this display, you can delete unwanted portions of the
Sample, located ahead of the Start point and located after
the End point). Press the [EXIT] button to go back to the
Setup display.
The procedure in the Record Trim display is as follows.
1 Set the Start Point to the point at which the
actual sound of the recorded Sample starts.
You can use the [SF1] Audition button to listen to the
Sample and [SF4] Zoom Out/[SF5] Zoom In button to
view the wave of the Sample.
n By pressing the [SF6] NUM button, you can use the [SF1]
– [SF5] and [F1] – [F6] buttons as number buttons.
Pressing the [EXIT] button return their buttons to the
original status. For details, see page 81.
2 Set the Tempo (9), Meter ()), and Measure (!)
for Sample playback.
The End Point (8) will be automatically changed so
that the length between the Start Point and the End
Point matches the settings here.
3 Set the Loop Point (7) as necessary.
When the menu indication of the [SF2] button is
“LP=ST,” the Start (Start Point) and the Loop (Loop Start
Point) will share the same address, meaning that both
of them will be changed simultaneously, even if just one
of them is changed. Pressing the [SF2] button in this
condition changes the menu from “LP=ST” to “LP≠ST.”
When the menu indication here is “LP≠ST,” the Start
(Start Point) and the Loop (Loop Start Point) can be
changed independently. When pressing the [SF2]
button in this condition, the address value of the Start
will be copied to the one of the Loop, with the result that
both of them share the same address value. The menu
indication of the [SF2] button also changes from
“LP≠ST” to “LP=ST.”
4 Press the [ENTER] button. (The display
prompts you for confirmation.)
If you wish to cancel the operation, press the [DEC/NO]
button.
5 Press the [INC/YES] button to execute the
Extract operation to delete unwanted portions
of the Sample.
6 Press the [F6] Slice button to call up the Slice
display.
The data deleted via the Extract operation cannot be
recovered. If you have accidentally deleted a necessary
portion of the Sample, press the [EXIT] button to return to the
Setup display, then execute the Sampling operation again.
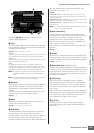
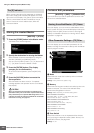
Parameters 1 – 5 are the same as the ones in the
Standby display (page 245).
6 Start Point
Determines the Start point for Sample playback. The part
at the left side of this point will not be played back.
Settings: 0000000 – End point
7 Loop Point
Determines the Loop point at which the loop playback starts.
When the Play mode is set to “loop,” the Sample is played
back between this Loop point and the End point (
6
).
Settings: 0000000 – End point
8 End Point
Determines the End point for Sample playback. The part at
the right side of this point will not be played back. The End
Point will be automatically determined so that the length
between the Start Point and the End Point matches the
settings of the Tempo (
9
), Meter (
(
), and Measure (
!
).
Settings: 0000000 – (depending on the Sample’s length)
9 Tempo
Determines the Tempo of Sample playback. Setting the
Tempo changes the End Point (8) so that the length
between the Start Point and the End Point matches the
settings of the Meter and Measure.
Settings: 5.0 – 300.0
CAUTION
1
2
4
5
6
7
8
9
)
!
(
@
3
# %$ ^ & *