


Song Job
MOTIF XS Owner’s Manual
196
Voice mode Song mode Pattern mode Mixing mode Master mode Utility mode File mode
Performance
mode
Sampling
mode 1
Sampling
mode 2
Reference
Song Job Procedure
1
Press the [JOB] button to enter the Song Job
mode.
2 Select the desired Job menu by pressing one
of the [F1] – [F6] buttons.
3 Move the cursor to the desired Job by using
the data dial, cursor buttons, [INC/DEC] and
[DEC/NO] buttons, then press the [ENTER]
button to call up the Job display.
4 Move the cursor to the desired parameter, then
set the value by using the data dial, [INC/YES]
and [DEC/NO] buttons.
5 After setting, press the [ENTER] button to
execute the Job.
“Completed” will appear when the Job is done.
In some Jobs, the operation overwrites any data previously
existing in the destination memory. Important data should
always be saved to a USB storage device connected to the
USB TO DEVICE terminal or to a computer connected to the
same network as the MOTIF XS (page 278).
6 Press the [EXIT] button twice to go back to the
Song Play display.
n If there is no data in the specified range, “No Data” will appear
on the display and the Job cannot be executed. If you make a
mistake or want to compare the sound of the data before and
after executing a Job, press the [F1] button to use the Undo/
Redo function.
Even if a Job operation has been completed, selecting a different
Song or turning the power off without storing will erase the Song
data. Make sure to store the Song data to internal memory by
pressing the [STORE] button before selecting a different Song or
turning the power off.
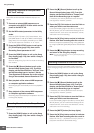
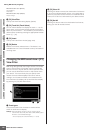
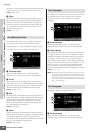
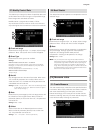
n In some Jobs, you need specify the range (start point and end
point as illustrated below) to which the Job is applied. Keep in
mind that the end point itself is not included in the range. The
actual range to which the Job is applied is from the start point
to the point that is one clock less than the end point. This rule
applies to cases in which you specify only the Measure;
however, the example illustration below shows specifying the
Measure, Beat and Clock.
n Some of the Jobs which enable you to copy the Sample Voice
from the source to the destination execute the actual copy
operation only when the Bank Select and Program Change
events which specify the Sample Voice are recorded in the
source Track.
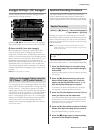
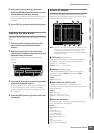
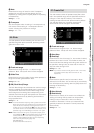
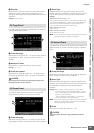
[F1] Undo/Redo
The Undo Job cancels the changes you made in your most
recent recording session, editing session, or Job, restoring
the data to its previous state. This allows you to recover
from accidental data loss. Redo is available only after
using Undo, and lets you restore the changes you made
before undoing them.
1
Indicates the operation to be affected by Undo or Redo.
2 Indicates the Undo/Redo target. When the changes you
made in your most recent operation cannot be a target
of the Undo/Redo, “Impossible” is shown here.
Undo/Redo does not work with Mixing operations.
Even if you have stored Song data, you can recall the data which
was lost via the most recent operation by executing Undo. Make
sure to execute the Undo/Redo operation before changing the
song number or leaving the Song mode. This is because the Undo/
Redo cannot be executed after changing the song number or
leaving the Song mode.
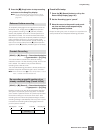
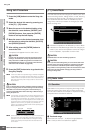
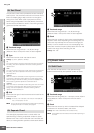
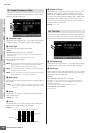
[F2] Note Jobs
Quantization is the process of adjusting the timing of note
events by moving them closer to the nearest exact beat.
You can use this feature, for example, to improve the timing
of a performance recorded in real time.
1 Track and range
Determines the track (01 – 16, all) and range (Measure :
Beat : Clock) to which the Quantize is applied.
CAUTION
CAUTION
Start point
End point
01: Quantize
1
2
CAUTION
CAUTION
1
2
3
4
5