


Installing Optional Hardware
MOTIF XS Owner’s Manual
296
Appendix
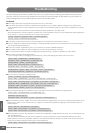
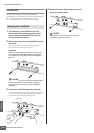
4 Insert the two DIMMs into the DIMM sockets.
Location for DIMM installation
Installing the DIMM modules to the sockets
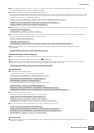
4-1 Press the ejector levers to the outside of the
socket.
4-2 Insert the DIMM vertically in the socket.
Press the DIMM in firmly until it “snaps” or locks in
place.
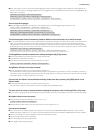
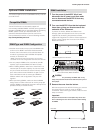
Confirm whether or not both the levers are firmly
locked.
5 Re-install the cover you removed in step 3, in
reverse order.
6 Check that the installed DIMMs are functioning
properly.
Set the MOTIF XS right-side up, and connect the power
cord to the rear-panel AC IN jack and an AC outlet. Turn
on the power, go to the Sampling display by pressing
the [INTEGRATED SAMPLING] button, and press the
[F6] Rec button then [SF6] INFO button (page 165). If
the DIMMs have been installed properly, the
appropriate available memory size is indicated in the
display.
n NOTE If the DIMMs have not been installed properly, the
MOTIF XS may freeze when you press the [INTEGRATED
SAMPLING] button. If this occurs, turn the power off,
perform the instructions above again, and make sure to
install the DIMMs firmly in step 4.
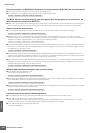
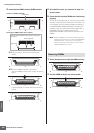
1 Press the ejector lever until the DIMM unlocks.
2 Pull the DIMM vertically out of the socket.
DIMM sockets
Make sure that the DIMM module is aligned correctly before
you install it.
Notch for alignment
Ejector lever
Removing DIMMs