


Pattern Recording
MOTIF XS Owner’s Manual
219
Voice mode
Song mode
Pattern mode
Mixing mode
Master mode
Utility mode
File mode
Performance
mode
Sampling
mode 1
Sampling
mode 2
Reference
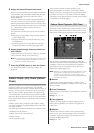
Preparing the Pattern Recording—
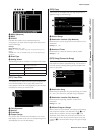
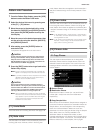
[F1] Setup
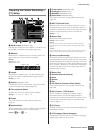
1 Pattern name (Indication only)
Indicates the name of the current Pattern. The Pattern can
be selected in the Pattern Play display (page 210).
2 Measure
Determines the measure from which recording starts. This
also indicates the current location of recording.
Settings:
Measure: 001 – 256
Beat: Indication only
3 Length
Determines the Pattern Length. This also represents the
length of the Phrase created via Recording procedure.
Settings: 001 – 256
4 Section (Indication only)
Indicates the Section to be recorded. The Section can be
set from the Pattern Play display (page 210).
5 Time signature (Meter)
Specifies the meter (time signature) for the Pattern.
Settings: 1/16 – 16/16, 1/8 – 16/8, 1/4 – 8/4
6 Tempo
This is the same as in the Song Record mode. See
page 187.
7 Keyboard Start
When Keyboard Start is set to on, Pattern recording begins
as soon as you press a key on of the keyboard.
Settings: (on), (off)
8 Track number (Indication only)
9 Track type (Indication only)
) Mute/Solo (Indication only)
! Voice Name (Indication only)
These are the same as in the Song Record mode. See
page 187.
@ REC TR (Record Track)
Determines the track to be recorded. Move the cursor to
the desired track or press any of the Number buttons [1] –
[16] with the TRACK lamp turned on so that the red circle is
shown in the corresponding column of the REC TR.
Settings: 1 – 16
# Record Type
Determines the Recording method.
Settings: replace, overdub
replace
You can use this method when you want to overwrite an already
recorded track with new data in real time. The original data will be
erased.
overdub
You can use this method when you want to add more data to a track that
already contains data. Previously recorded data will be maintained.
$ Loop (Loop Recording)
Determines whether the Recording is looped or not when
executing Realtime recording. When set to on, the phrase
will play repeatedly during real-time recording. This can be
handy when recording drum Parts with the Recording type
set to “overdub,” allowing you to add different instruments
on each pass. When set to off, recording stops after one
pass through the phrase.
% Record Part
^ Quantize (Record Quantize)
& Voice
* Volume
( Pan
º Ins Effect Sw (Insertion Effect Switch)
These are the same as in the Song Record mode. See
page 188.
¡ [SF1] Scene1 – [SF5] Scene5
You can change the settings of the Pattern-related
parameters (Pattern Scene) and Arpeggio-related
parameters by pressing these buttons. For details, refer to
the description of the same buttons in the Pattern Play
mode on page 211.
™ [F1] Setup
Pressing this button returns from the previous display to the
Record Setup display.
£ [F2] Arpeggio (Record Arpeggio)
The operation is same as the one in the Record Arpeggio
display (page 189) in the Song mode.
4! @5 12
3
7
#
$
%
^
&
*
(
º
8
9
)
6
™£ ¢ ∞
¡
Measure LengthBeat