


Voice mode
Song mode
Pattern mode
Mixing mode
Master mode
Utility mode
File mode
Performance
mode
Sampling
mode 1
Sampling
mode 2
Reference
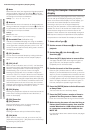
Audio Recording to Song/Pattern (Sampling mode)
MOTIF XS Owner’s Manual
245
the note data for playing back the Sample Voice will be
created in the Track specified here.
Settings: 01 – 16
9 Part
This parameter is not available when entering the Sampling
mode from the Song mode/Pattern mode.
) Voice
This parameter is not available when entering the Sampling
mode from the Song mode/Pattern mode.
! Drum Key
This parameter is not available when entering the Sampling
mode from the Song mode/Pattern mode.
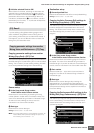
@ Recordable Time (Indication only)
Indicates the available Sampling time using the available
memory. The time indicated here is calculated assuming a
mono signal with a sampling frequency of 44.1 kHz. The
amount of memory space currently being used is shown in
the display as a blue line.
# [F6] Standby
Pressing this button to call up the Sampling Standby
display.
This display is used for executing the Sampling. For
details, see page 245.
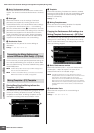
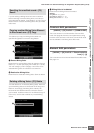
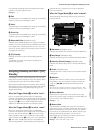
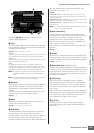
Sampling Standby and Start—[F6]
Standby
This display is used for starting Sampling. Press the [F6]
button from the Setup display to call up this display. Press
the [EXIT] button to go back to the Setup display.
After setting the parameters as necessary, press the [F5]
Start button to start the Sampling procedure. Note that the
actual Sampling start timing differs depending on the
Trigger Mode setting.
When the Trigger Mode ()) is set to “level”:
Even if you press the [F5] Start button, the WAITING
indication just appears on the display and actual Sampling
does not start. When audio signal exceeding the specified
Trigger Level (9) is input, the RECORDING indication
replaces the WAITING indication and Sampling starts.
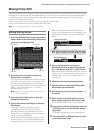
When the Trigger Mode ()) is set to “meas”:
Even if you press the [F5] Start button, the WAITING
indication just appears on the display and actual Sampling
does not start. Set the Measure (5) at which the Song/
Pattern playback starts, input a measure number larger
than the Measure value (5) to the Punch In/Out parameter
(!), then press the [F] (Play) button to start playback.
After starting playback, actual sampling will begin at the
specified Punch In measure, and end at the specified
Punch Out measure.
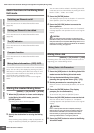
When the Trigger Mode (
)
) is set to “manual”:
Actual Sampling (Recording) starts when you press the
[F5] Start button.
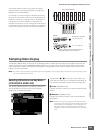
1 Waveform (Indication only)
Indicates the number and name of the selected Waveform.
2 Key Range (Indication only)
Indicates the key range of the currently selected Key Bank.
3 Velocity (Velocity Range) (Indication only)
Indicates the velocity range of the currently selected Key
Bank.
4 Track (Indication only)
Indicates the track number to which the recorded Sample
is assigned.
5 Measure
Indicates the measure number of the currently selected
Song/Pattern. You can change the measure number by
using the [G]/[H] (Reverse/Fast Forward) buttons.
Settings:
When entering the Sampling mode from the Song mode: 001 – 999
When entering the Sampling mode from the Pattern mode: 001 – 256
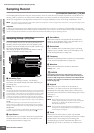
6 Record Monitor
Determines the output level of the monitor for the input
signal. This monitor signal is output from the PHONES jack
or the OUTPUT R and L/MONO jacks.
Settings: 0 – 127
7 Record Gain
This parameter is available only when the Input Source
(page 244) is set to “resample.” Determines the recording
gain when resampling. The higher the value, the greater
the volume of the resampled sound. Before executing the
Sampling (Recording) operation, you can set the
appropriate gain by checking the volume via the Level
Meter (@) while playing the keyboard.
Settings: -12dB, -6dB, +0dB, +6dB, +12dB
1
2
3
6
7
4
5
8
9
)
!
#
@
$ %