


Song Recording
MOTIF XS Owner’s Manual
190
Voice mode Song mode Pattern mode Mixing mode Master mode Utility mode File mode
Performance
mode
Sampling
mode 1
Sampling
mode 2
Reference
The sequence data transmitted from an external MIDI
instrument can be recorded simultaneously up to 16
tracks.
1 Connect an external MIDI sequencer or a
computer to the MOTIF XS then switch on the
power to the MOTIF XS.
2 Set the MIDI related parameters in the Utility
mode.
Press the [UTILITY] button, [F5] Control button, then
[SF2] MIDI button to call up the MIDI Control display
(page 267). From this display, set MIDI sync to “MIDI,”
then set the Sequencer Control to “in” or “in/out.”
3 Press the [SEQ SETUP] button to call up the
[F1] Click display (page 270), then set the
Recording Count parameter to “off.”
4 Press the [SONG] button to call up the Song
Play display (page 178), then select a Song to
be recorded.
Select an empty Song if you wish to create a new Song
from scratch.
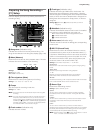
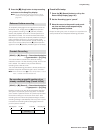
5 Press the [I] (Record) button to call up the
Record Setup display (page 187). From this
display, set the Record track to “All Track” then
set the Recording type to “replace.” Set the
Time Signature to the same one as the original
Song to be recorded, then set Quantize to “off.”
6 Start playback of the external MIDI sequencer
or computer application software.
Recording begins automatically as soon as playback
starts.
7 Stop playback of the external MIDI sequencer
or computer application software.
Recording stops automatically and operation returns to
the Song Play display.
Here’s how to record the Tempo data to the Tempo track in
real time.
1 Press the [SONG] button to call up the Song
Play display (page 178), then select a Song to
be recorded.
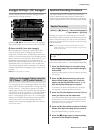
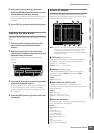
2 Press the [I] (Record) button to call up the
Record Setup display (page 187). From this
display, set the Record track to “Tempo Track”
then set the Recording type to “replace.”
If necessary, set various parameters such as tempo,
time signature, measure, quantize.
3 Press the [F5] Click button to turn the Click on
when you wish to use the metronome.
In the Click display (page 270) called up via the [SEQ
SETUP] button, you can make various settings for the
metronome click, such as the note resolution, volume,
and lead-in count for recording.
4 Press the [F] (Play) button so that its indicator
flashes, then start recording after the count-in.
Enter the tempo at the desired timing during playback
by using the [DEC/NO]/[INC/YES] buttons and the Data
Dial.
5 Press the [J] (Stop) button to stop recording
and return to the Song Play display.
n You can edit the tempo from the Song Edit display for the
Tempo track (page 192).
Here’s how to record the Track Mute on/off events and
Scene changing timing events to the Scene track in real
time.
1 Press the [SONG] button to call up the Song
Play display (page 178), then select a Song to
be recorded.
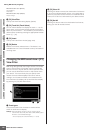
2 Press the [I] (Record) button to call up the
Record Setup display (page 187). From this
display, set the Record track to “Scene Track”
then set the Recording type to “replace.”
If necessary, set various parameters such as tempo,
time signature, measure, quantize.
3 Press the [F5] Click button to turn the Click on
when you wish to use the metronome.
In the Click display (page 270) called up via the [SEQ
SETUP] button, you can make various settings for the
metronome click, such as the note resolution, volume,
and lead-in count for recording.
4 Press the [MUTE] button (the lamp lights).
5 Press the [F] (Play) button so that its indicator
flashes, then start recording after the count-in.
Press one of he [1] – [16] buttons or the [F1] Scene 1 –
[F5] Scene 5 buttons at the desired timing.
Recording Procedure for multiple tracks
(“All Track” setting)
Recording Procedure for the Tempo Track
Recording Procedure for the Scene Track