


Multi Pro 5700–D
Page 5 – 29
Electrical System
Cruise Control Coil
Removal (Fig. 48)
1. Set parking brake, turn ignition off and remove key.
2. Remove hex nut and lock washer that secure shaft
to machine frame. Remove shaft with collar, flange
bushing, plate, and compression spring.
3. Unplug cruise control coil connector from machine
wiring harness. Remove four (4) cap screws, lock wash-
ers, and hex nuts that secure coil to frame. Remove
cruise control coil.
Installation (Fig. 48)
1. Attach cruise control coil to frame using four (4) cap
screws, lock washers and hex nuts.
2. Position compression spring, plate, and flange bush-
ing to machine making sure to align plate slot with post
on traction pedal. Apply anti–seize lubricant to shaft and
insert shaft with collar. Secure shaft to frame with hex
nut and lock washer.
3. Plug cruise control coil connector into machine wir-
ing harness.
4. Check that gap between cruise coil and plate is
approximately 3/32” (2.4 mm). If gap is incorrect, loosen
set screw in collar and slide collar on shaft to allow prop-
er gap. Tighten set screw to secure collar on shaft.
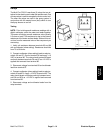
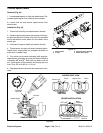
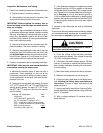
1. Cruise control coil 2. Traction pedal
Figure 47
1
2
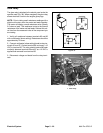
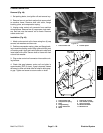
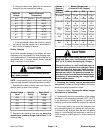
1. Cruise control coil
2. Compression spring
3. Plate
4. Flange bushing
5. Collar w/setscrew
6. Shaft
7. Cap screw (4 used)
8. Lock washer (4 used)
9. Hex nut (4 used)
10. Shaft lock washer
11. Shaft hex nut
Figure 48
1
8
11
9
10
2
3
4
Anti–seize
Lubricant
6
5
7
Electrical
System