


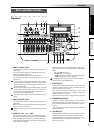
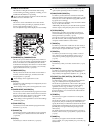
8
7 [TRACK STATUS] keys
These keys are used to switch each track between play/
record or mute states. The status of the track will alter-
nate each time you press the key.
PLAY (LED lit green):
The track can be played.
REC (LED lit red):
The track can be recorded. When
recording from the analog/digital inputs, you can select
up to four tracks for recording (two tracks in Modeling
mode).
INPUT (LED lit orange):
The track can receive an exter-
nal audio signal. This state can be selected only while
stopped.
Select this when you want to perform while listening to
other tracks so that you can rehearse before recording,
or if you want to mix an external input source with the
playback.
MUTE (LED dark):
The track is muted (silent).
The states that can be selected will depend on the state
and settings of the recorder.
While stopped:
PLAY
→ INPUT → REC → MUTE →
PLAY
While recording or playing: PLAY ↔ MUTE, INPUT ↔
MUTE
Modeling mode: PLAY → REC → MUTE → PLAY
These settings can be paired, or registered in a scene.
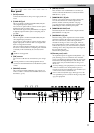
8[PAN] knobs (Ch1...6), [BALANCE] knobs (Ch7...12)
For each channel, these knobs adjust the position (pan)
or left/right balance of the stereo signal to the master
LR bus (→p.37).
For channels 1–6 for which pairing is “Off,” these knobs
control panning to the master LR bus.
For channels 1–6 for which pairing is “On” and for
channels 7–12, these knobs control the left/right balance
of the stereo signal to the master LR bus.
These settings can be paired, or registered in a scene.
When recording to channels that have a balance setting,
you must set the knob to “CNT.”
9 [CHANNEL] faders (Ch1...6, Ch7/8...11/12)
These faders adjust the recording/playback volume of
each channel (→p.37).
Channels 7–12 are stereo faders.
These settings can be paired, or registered in a scene.
• For channels whose [TRACK STATUS] is PLAY, the
fader adjusts the playback volume.
• For channels whose [TRACK STATUS] is REC, the
fader adjusts the recording level of the external audio
source or the rhythm.
• For channels whose [TRACK STATUS] is INPUT, the
fader adjusts the recording level of the external audio
source.
Faders that adjust the recording level will function dif-
ferently depending on whether an external input is be-
ing recorded or bounce recording is being performed.
• When recording an external input (i.e., when the
[BOUNCE] “RecMode” tab page “Select RecMode”
parameter is set to “Input”), the channel fader
adjusts the recording level.
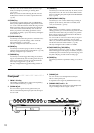
10 [MASTER] fader
This fader adjusts the overall volume of all channels.
The volume adjusted by this fader is output from the
[MASTER OUT L/R] jacks and the [S/P DIF OUT] jack.
• When recording an external input (i.e., when the
[BOUNCE] “RecMode” tab page “Select RecMode”
parameter is set to “Input”), the master fader adjusts
the volume level of the master LR bus.
• When bounce-recording (i.e., when the [BOUNCE]
“RecMode” tab page “Select RecMode” parameter is
set to “Bounce”), the master fader adjusts the record-
ing level to the track(s) whose [TRACK STATUS] is
REC.
11 [REW] key
This key changes the location to an earlier time (rewind)
while stopped or moving.
If you hold down the [STOP] key and press the [REW]
key, you will move to the previous-numbered song (if
you are already at the beginning of the song) or to the
beginning of the current song (if you are in the middle
of the song).
12 [FF] key
This key changes the location to a later time (fast-for-
ward) while stopped or playing.
If you hold down the [STOP] key and press this key, you
will move to the end of the current song (if not already
at the end) or to the beginning of the next song (if you
are already at the end of the current song).
If the Scrub function is on, you can press this key to per-
form Slow Play (→p.34).
13 [STOP] key
This key stops recording or playback, halting the
recorder.
14 [PLAY] key
This key plays tracks whose [TRACK STATUS] is PLAY.
For tracks whose [TRACK STATUS] is REC, pressing the
[REC] key and then this key will begin recording.
The LED of this key will light while the recorder is
recording or playing.
If the Scrub function is on, pressing this key will per-
form Play From, and pressing this key while holding
down the [STOP] key will perform Play To. (→p.34)
15 [REC] key
Press this key to enter record-ready mode (the LED will
blink). In order to enter record-ready mode, one or more
tracks must be set to a [TRACK STATUS] of REC. When
you press the [PLAY] key, the LED will light and record-
ing will begin.
If the foot switch function (→p.101) is set to “PunchIn
Out”, the foot switch will perform the same function as
the [REC] key.
16 [VALUE] dial
Use this dial to edit values or to move the current loca-
tion.
If the Scrub function is on, turning this dial will play the
track at the corresponding speed.
17 [CURSOR] keys
These keys move the cursor. They are also used to adjust
the contrast (brightness) of the display.
18 [POWER] key
This key turns the power on/off. (→p.15)
19 MIDI indicator
This indicator will light when a MIDI message is
received at the MIDI IN connector.