


Operation
53
Song and Locate
MixerEffects
Modeling mode
Rhythm
The Recorder
MasteringDataDriveUSBMIDIUpgrading
the system
1. Recording
You can connect audio sources such as guitar and keyboard
to the input jacks, make mixer settings to assign these audio
input sources to tracks of the recorder, and then record them.
The D1200 has twelve recording/playback tracks, and each
of the twelve tracks has eight virtual tracks.
The following pages explain how to record audio on these
tracks.
1-1. Basic recording
Here’s how to record the audio signal that you specified in
“1. Inputting audio to the mixer” (→p.35).
If you want to create a new song for recording, set refer
to “1-1. Creating a new song” (→p.31).
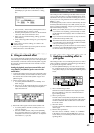
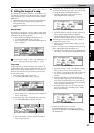
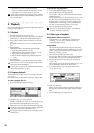
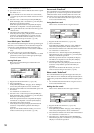
1 Check the recording mode.
Access the [BOUNCE] “RecMode” tab page. Set “Select
RecMode” to “Input” (=record the input audio).
2 Press the [TRACK STATUS] key for the track that you
want to record, to set the status to REC (LED lit red).
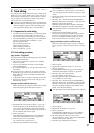
3 Use the [CHANNEL] fader to set the recording level.
•Press the [METER/TRACK VIEW] key.
• Select the “ ” button and press the [ENTER] key to
select “PostFaderLev,” and press the [YES/OK] key.
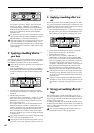
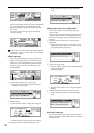
• Slowly raise the [CHANNEL] fader, and the level
meter of the input channel will move according to
the level of the input signal. Adjust the level to be as
high as possible without allowing the level bar to
reach “CLP.”
4 Move the counter location to the point in the song where
you want to begin recording. (→p.32)
Start recording from the beginning of the song
(“001.01.000” or “000:00.000”).
5 Press the [REC] key (the [REC] and [PLAY] LEDs will
blink).
6 Press the [PLAY] key (the [REC] and [PLAY] LEDs will
light).
Begin performing on your instrument.
7 When you are finished performing, press the [STOP]
key (the [REC] and [PLAY] LEDs will go dark).
Listen to the playback to verify that your performance
was recorded correctly.
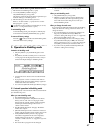
1-2. Switching the virtual track for recording
The D1200 has twelve tracks, and each of these provides
eight virtual tracks, labeled a-h.
For example when you record a solo part, you can record
two or more “takes,” each on their own virtual track, and se-
lect the best one later. Or when bounce-recording (ping-
pong recording), you can specify two unrecorded virtual
tracks as the recording-destination, allowing you to combine
twelve tracks of data into two tracks without erasing any ex-
isting tracks. (→p.64)
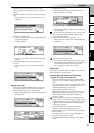
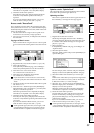
Recording on a different virtual track
1 Select a virtual track.
In the [TRACK] “Vtr1–6” or “Vtr7–12” tab page, select
the track that you want to record, and turn the [VALUE]
dial to select an unrecorded virtual track.
2 Adjust the recording level of the input device, and
record.
Refer to “1-1. Analog input” (→p.35).
1-3. Recording while you listen to other tracks
play
The process of recording while you listen to other tracks play
is called “overdubbing.” For example you can use this to
record a solo while listening to previously-recorded backing
tracks.
1 Check the recording mode.
Access the [BOUNCE] “RecMode” tab page. For “Select
RecMode,” choose “Input” (= record the audio input).
2 Use the [CHANNEL] fader to set the recording level.
Refer to “1-1. Basic recording.”
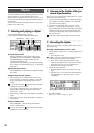
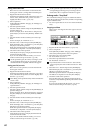
The Recorder
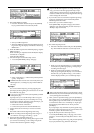
Input1
Ch1: Track 1
Ch2: Track 2
Ch3: Track 3
Ch4: Track 4
Ch5: Track 5
Ch6: Track 6
Ch7: Track 7
Ch8: Track 8
Ch9: Track 9
Ch10: Track 10
Ch11: Track 11
Ch12: Track 12
Input2
Input3
Input4
Digital In
L
R
L
R
CD
L
R
Dr
[INPUT/OUTPUT/SOLO]
“Ch1-6”, “Ch7-12”
CDRW-1
Selected track
Recorded track
The Recorder