Operation
59
Song and Locate
MixerEffects
Modeling mode
Rhythm
The Recorder
MasteringDataDriveUSBMIDIUpgrading
the system
When the operation has been completed, the display
will indicate “Completed.” Press the [YES/OK] key.
5 Check the results of the operation.
Press the [IN/LOC1] key, and play back from the IN
location to verify that the operation did what you
expected.
If you are not satisfied with the results, you can use
Undo to return to the previous state. (→p.126)
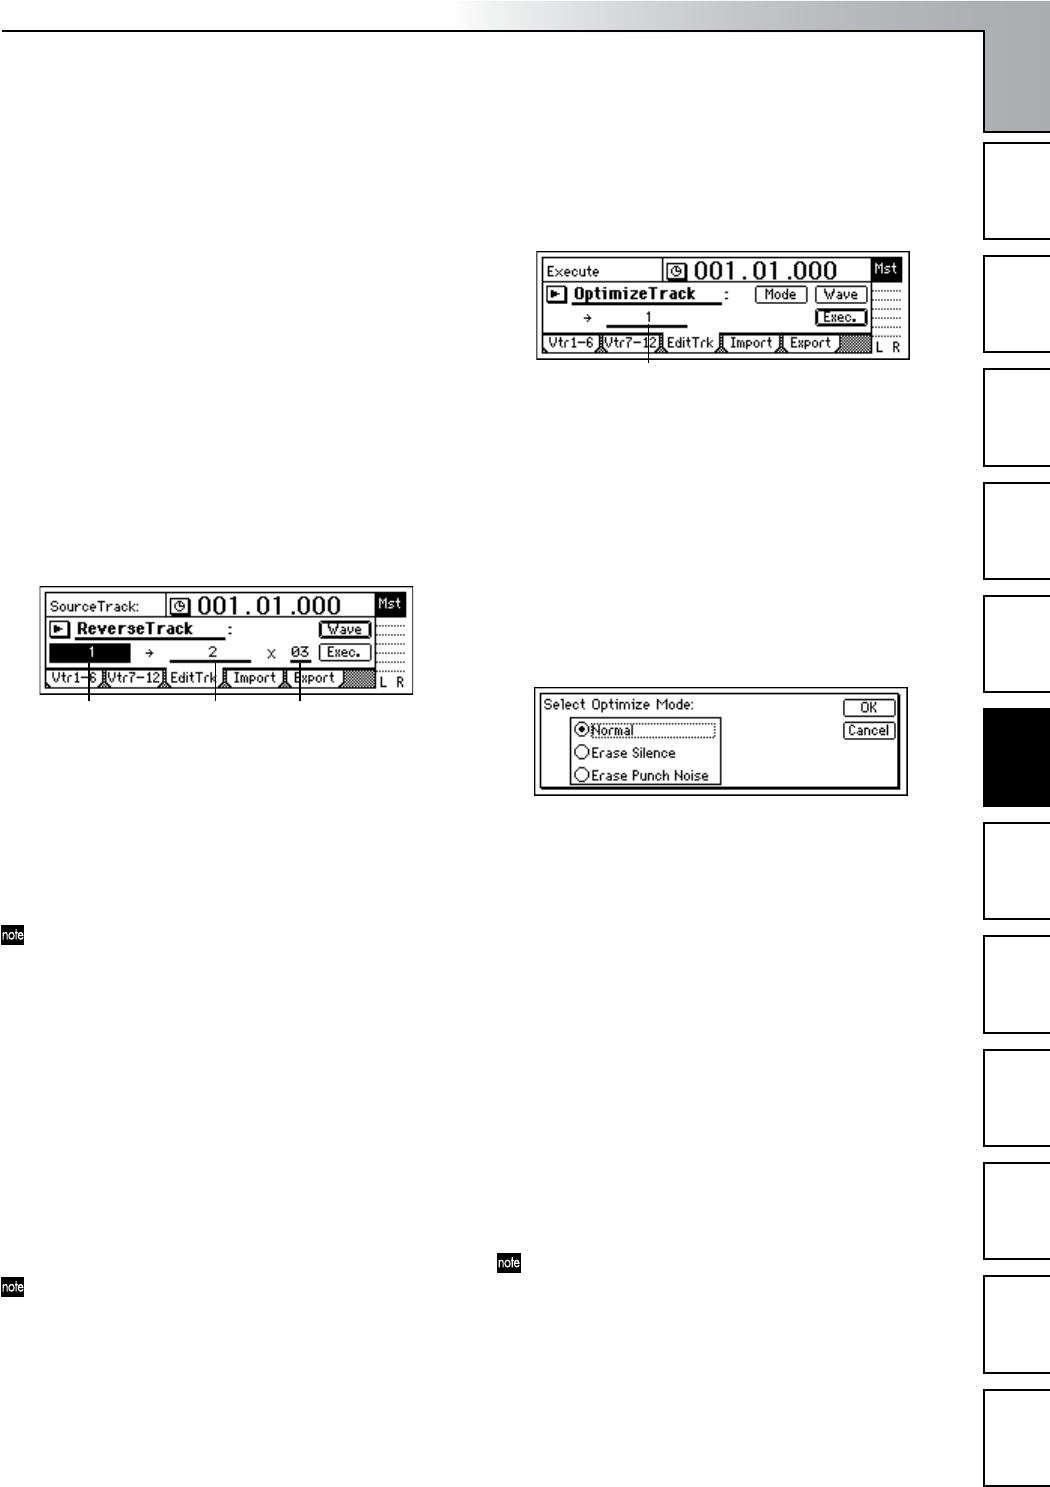
Reverse a track: “ReverseTrack”
This command copies the data in the specified region (IN–
OUT) of the track “in reverse” (i.e., so that the data will play
backward) and places it at the TO location, either in the same
track or in another track.
• The data of the IN–OUT region can be copied one or
more times in succession by a single operation.
•You can copy just one track, or multiple tracks of data at
the same time.
Copying track data in reverse
Here’s how the IN–OUT region of track 1 can be copied
in reverse three times starting at the TO location of track
2.
1 Register the IN, OUT, and TO locations. (→p.33, 118)
2 Select “ReverseTrack.”
In the [TRACK] “EditTrk tab page, select “EditType”
and use the [VALUE] dial to choose “ReverseTrack.”
3 Select the reverse-source track number.
Use “SourceTrack” to select track “1.”
4 Select the reverse-destination track number.
Use “DestTrack” to select track “2.”
If you selected two or more tracks for “SourceTrack,”
you must specify the same number of tracks for “Dest-
Track.”
5 Specify the number of times that the data will be copied.
Set “Times” to “3.”
6 Select the “Exec.” button and press the [ENTER] key.
When the display asks “AreYouSure?,” press the [YES/
OK] key to execute the operation.
When the operation has been completed, the display
will indicate “Completed.” Press the [YES/OK] key.
7 Check the results of the editing operation.
Press the [TO/LOC3] key, and play back from the TO
location to verify that the operation produced the results
you expect.
If you are not satisfied with the results, you can use
Undo to return to the previous state. (→p.126)
As the specified region (IN–OUT) is set longer, it will
correspondingly take longer for processing to be fin-
ished and for the “Completed” indication to appear..
Optimize a track: “OptimizeTrack”
This command removes noise and optimizes the recorded
track data in the specified region (IN–OUT).
Optimizing track data
Here’s how to optimize the IN–OUT region of track 1 so
that “DiskBusy” warnings will no longer appear.
1 Register the IN and OUT locations.
Set the IN point slightly ahead of where “DiskBusy”
warnings start being displayed, and set the OUT point
to a location where these warnings are no longer dis-
played. (→p.33, 118)
2 Select “Optimize.”
In the [TRACK] “EditTrk” tab page, set “EditType” to
“OptimizeTrack.”
3 Select the optimize mode.
Select the “Mode” button and press the [ENTER] key to
open the dialog box.
For this example, select “Normal” and press the [YES/
OK] key to return to the [TRACK] “EditTrk” tab page.
4 Select the number of the track that you want to opti-
mize.
Find the track whose data you suspect to be fragmented
(here we will assume it is track 1), and set “DestTrack”
to that track number (“1” in this example).
5 Select the “Exec.” button and press the [ENTER] key.
When the display asks “AreYouSure?,” press the [YES/
OK] key to execute the operation.
When the operation has been completed, the display
will indicate “Completed.” Press the [YES/OK] key.
6 Check the results of the operation.
Press the [IN/LOC1] key, and play back from the IN
location. If “Disk Busy” warnings are no longer dis-
played, and the data plays correctly, the data has been
optimized successfully.
If you are not satisfied with the results, you can use
Undo to return to the previous state. (→p.126)
As the specified region (IN–OUT) is set longer, it will
correspondingly take longer for processing to be fin-
ished and for the “Completed” indication to appear.
DestTrack TimesSourceTrack
DestTrack
The Recorder


