


Reference
113
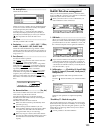
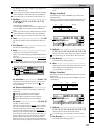
COUNTERMODELING
INSERT
EFFECT
EQ
MASTER
EFFECT/
AUX SEND
FINAL
EFFECT
BOUNCECDTUNERRHYTHM
INPUT/
OUTPUT/
SOLO
SYSTEM/
USB
TRACKSONG
IN/LOC1,
…END/LOC4
MARKSCENE
AUTO
PUNCH
TRIGGERSCRUB
METER/
TRACK VIEW
UNDO LOOP
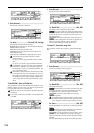
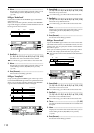
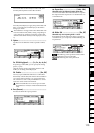
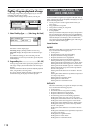
EditType: “FadeTrack”
Fades-in or fades-out the track data in the IN–OUT region of
the destination track. The level of the audio data in the IN–
OUT region will fade smoothly toward the OUT time.
This operation will overwrite the destination track.
2. DestTrack..........................................................
[1...12, 1–2...11–12, 1–4...9–12, 1–6, 7–12, 1–12]
Selects the destination track.
For a 24-bit song, you will be able to select tracks 1–6.
3. Exec.(Execute)...................................................
Executes the track editing operation.
4. Wave................................................................
Displays the waveform of the track audio. Here you can
set the editing locations (IN, OUT) more precisely.
(→p.108)
5. MODE...............................................................
Selects the fade curve for the fade-in or fade-out.
5a. SelectFadeMode................................. [A...F]
A: This curve is suitable for a conventional fade-in.
B: This curve is suitable for creating a cross-fade by per-
forming a fade-in and fade-out on two tracks at the
same time location.
C: This curve inverts curve A, lengthening the time that
the sound is heard.
D: Fade-out using curve A.
E: Fade-out using curve B.
F: Fade-out using curve C.
Press the [YES/OK] key to confirm the fade mode you
selected.
Press the [NO/CANCEL] key to cancel your selection.
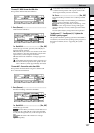
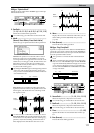
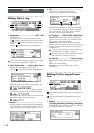
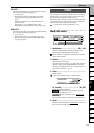
EditType: “NormalizeTrack”
If an audio source was recorded at an inappropriately low
level, you can use this operation to raise the level of the data
in the specified region (IN–OUT) to the maximum level pos-
sible without clipping.
This operation will overwrite the data of the destination
track.
2. DestTrack .......................... [1...12, 1–2...11–12]
Selects the track in which the audio data will be normal-
ized.
For a 24-bit song, you will be able to select tracks 1–6.
3. Exec.(Execute) ...................................................
Executes the track editing operation.
4. Wave................................................................
Displays the waveform of the track audio. Here you can
set the editing locations (IN, OUT) more precisely.
(→p.108)
Import: Import WAV files
A WAV file that was saved on a CD-ROM/R/RW or on the
USB drive can be pasted into a track of the D1200. You can
also use the clipboard to paste the WAV file at a location oth-
er than the beginning of the song. The D1200 lets you import
WAV files of the following formats.
Sampling frequency: 44.1 kHz
Bit depth: 8-bit, 16-bit, 24-bit
Number of channels: 1 (monaural), 2 (stereo)
If you want to import a WAV file from your computer,
use a USB cable to connect your computer to the D1200,
and save the WAV file on the D1200’s USB drive. Then
continue with the procedure described below.
The D1200 can import WAV files from an ISO9660 level
1 format CD-ROM, CD-R, or CD-RW.
Executing this operation will overwrite the import-des-
tination track.
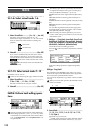
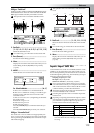
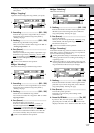
Importing or exporting a WAV file will require a certain
amount of time. The following table shows some exam-
ples of the time required to import or export a five-
minute 16-bit 44.1 kHz monaural WAV file.
* The processing time will also depend on the for-
mat of the WAV file and on the type of disc you
are using.
IN OUT
IN OUT
1 4
3
2
5
5a
CD USB drive
Import 1 minute 40 seconds 1 minute 20 seconds
Export 2x 6 minutes 10 seconds 1 minute 20 seconds
4x 5 minutes 20 seconds
8x 4 minutes 10 seconds
IN OUT
Max Level
IN OUT
Max Level
1
3
4
2
TRACK