


190 Chapter 16—Automix
DM1000 Version 2—Owner’s Manual
Recording an Automix
This section describes a general procedure for Automix recording, including creating a new
Automix, as well as recording the fader, [ON] button, and other controller events real-time.
Creating a New Automix
Follow the steps below to create a new Automix and select the parameters you want to
record.
1 Connect a timecode source to the DM1000.
2 Select the timecode source on the Setup | Time Ref page (see page 188).
If you selected MIDI CLOCK timecode, create a time signature map (see page 189).
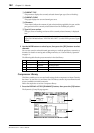
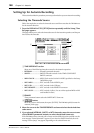
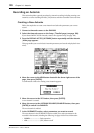
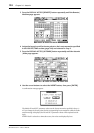
3 Press the DISPLAY ACCESS [AUTOMIX] button repeatedly until the Automix
| Main page appears.
This page enables you to set the basic Automix parameters, and record and play back Auto-
mixes.
4 Move the cursor to the NEW button located in the lower-right corner of the
page, then press [ENTER].
A confirmation window for creating a new Automix appears.
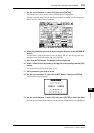
5 Move the cursor to the YES button, then press [ENTER].
A new Automix is created.
6 Move the cursor to the AUTOMIX DISABLED/ENABLED button, then press
[ENTER] to switch it to ENABLED.
The new Automix is enabled.
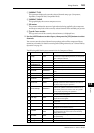
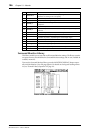
7 In the OVERWRITE section, select parameters you want to record.
The seven buttons in the OVERWRITE section enable you to select parameters to be
recorded in the Automix, including the following. See page 196 for more information.
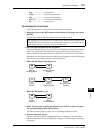
• FADER...........................Fader operation
• ON.................................. [ON] button on/off