


Pro Tools Remote Layer 223
DM1000 Version 2—Owner’s Manual
Remote Control
17
■ AUX SELECT Section
• [AUX 1]–[AUX 5] buttons
These buttons select Sends A–E so that you can adjust the corresponding Pro Tools channel
send level.
• [AUX 6] button
Press and hold down this button and press the desired [SEL] button to reset the correspond-
ing channel fader level.
Press and hold down this button and press the desired Encoder push-switch to reset the cor-
responding channel panpot to center. While you are holding down the [AUX 6] button, the
SELECT ASSIGN parameter indicates “DFLT.”
• [AUX 8] button
Use this button along with the desired [SEL] button to assign a plug-in to the corresponding
Pro Tools channel.
■ ENCODER MODE section
•[PAN] button
When you turn on this button, the Encoders function as Pro Tools channel panpots.
• [AUX] button
When you turn on this button, the Encoders function as Send A–E level controls. AUX Send
destination is selected in the AUX SELECT section. When you press this button, Send A is
selected as the destination automatically.
If the Encoders are currently set to control the Send A–E levels, the button indicator lights
up.
■ FADER MODE section
•[FADER/AUX] button
This button selects Flip mode (see page 228) for faders, Encoders, and [ON] buttons.
■ DISPLAY ACCESS section
• [AUTOMIX] button
To display channel Automation mode, press this button while a Channel Display mode or
Meter Display mode page is selected.
•[PAIR/GROUP] button
Press this button while a Channel Display mode or Meter Display mode page is selected to
display a Group ID to which each channel belongs.
• [EFFECT] button
Press this button to display or hide the Inserts window in Pro Tools.
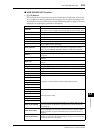
■ Display section
•Tab Scroll buttons
These buttons switch the INSERT ASSIGN/EDIT parameter settings on Insert Display
mode pages.
• [F1] button
Press this button to turn off the Peak Hold indicator on Meter Display mode pages.