


Setting the Input Channels from the Control Surface 75
DM1000 Version 2—Owner’s Manual
6
Input Channels
Setting the Input Channels from the Control Surface
You can use the faders, Encoders, [SEL] buttons, and various buttons and controls in the
SELECTED CHANNEL section on the top panel to directly control most parameters for
Input Channels.
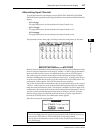
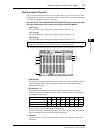
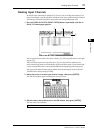
Setting Input Channel Levels and Panning the Channels
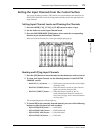
1 Press the LAYER [1-16], [17-32], or [33-48] button to select a Layer.
2 Use the faders to set the Input Channel levels.
3 Press the ENCODER MODE [PAN] button, then rotate the corresponding
Encoder to pan the desired Input Channel.
When you rotate the Encoder, the current pan setting display pops up.
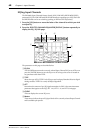
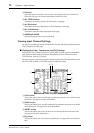
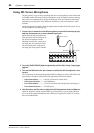
Routing and EQ’ing Input Channels
1 Press the [SEL] button or move the fader for the channel you wish to control.
2To route each Input Channel, use the following buttons in the SELECTED
CHANNEL section:
• ROUTING [1]–[8] buttons ............... These buttons route the currently-selected Input
Channel to a Bus.
• ROUTING [STEREO] button........... When this button is turned on, Input Channel
signals are routed to the Stereo Bus.
• ROUTING [DIRECT] button ........... When this button is turned on, the cur-
rently-selected Input Channel is routed to its
Direct Out. (See page 115 for more information
on Direct Out.)
The corresponding button indicator lights up.
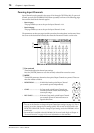
3To control EQ for the currently-selected channel, press one of the following
buttons to select the band you wish to adjust:
• EQUALIZER [HIGH] button............ HIGH band
• EQUALIZER [H-MID] button.......... HIGH-MID band
• EQUALIZER [L-MID] button........... LOW-MID band
• EQUALIZER [LOW] button.............. LOW band