


Chapter 1
DA7 Users’ Guide
1
-
7
1
Introduction
1-3 Making the DA7 Work For You
Although the DA7 has some analog inputs, it should really be thought of as a
digital mixer. Like most equipment, the DA7 comes set with factory defaults,
some of which may or may not provide the kind of operational preferences
you would like. Please refer to Appendix D, Default Settings for a complete
listing of these presets. You can’t change the factory default presets, but
when you have created mixer settings that you like, they can be saved by
making a snapshot of the setup and recording it in SCENE MEMORY. See
Chapter 15, Scene Memory for more information.
As with any new piece of equipment, it may take you a little time to figure it
out. Here are a few things you WILL need to know about the DA7. Please
take a few minutes now to read them. It could save you time in the long run.
BULK BACKUP
One of the first things to think about is saving data. If you’ve already started
using the DA7 straight out of the box for a major recording session, all of the
mixer data for your new million selling CD stored in the DA7 memory, BACK
IT UP!
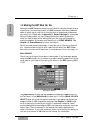
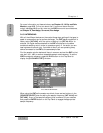
The [MIDI>BULK] window can be accessed by pressing the MIDI button on
the Top Panel. In the [MIDI>BULK] window, you’ll find the [BULK I/O DATA
SELECT] area. All of the information recorded in the system can be sent en
masse to a Mac or IBM compatible computer. See Chapter 11, MIDI, page
11-2, for setting up the serial port output to a personal computer. Some
previous background knowledge of MIDI and a personal computer would be
helpful here. There is software on the market that readily captures bulk
dump information. If you have questions, either visit a local music retailer, or
visit one of a number of Web sites on the Internet for information.
MIDI>BULK Window