


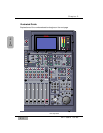
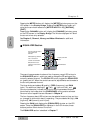

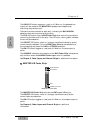

Pressing the METER button will display the [METER] window group on the
LCD screen in the Display Bridge. Pressing the METER button again will
cycle the three window selections: [METER INPUTS 1-32], [BUS/AUX],
[SLOT].
Pressing the CHANNEL button will display the [CHANNEL] window group
on the LCD screen in the Display Bridge. The window displayed will show
the current mixer strip selected.
See Chapter 5, Channel, Library, and Meter Windows for additional
information.
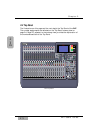
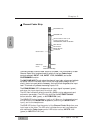
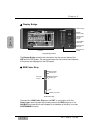
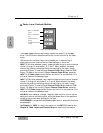
EQUALIZER Section
There are three parameter knobs and four frequency range LED buttons in
the EQUALIZER section, which are used to change the EQ settings of the
currently selected channel. The EQ ON LED button toggles the EQUALIZER
on (green) and off. When the controls are active, adjustments can be made to
the currently selected channel.
The three knobs are labeled Q (quality), FREQ (frequency), and GAIN
(gain). The additional labeling of (left), (surround left), and
(surround subwoofer) indicate the surround sound parameters that are
controlled by the knobs when the [SURROUND] mixing area is activated.
Surround sound capabilities are discussed in Chapter 8.
The four frequency band LED buttons can be selected one at a time, and turn
on (orange) to show which band is operating. They are labeled H (high), HM
(high-mid), LM (low-mid), and L (low).
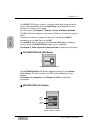
Pressing the GAIN knob displays the [EQUALIZER] window on the LCD
screen. Once the [EQUALIZER] is displayed in the LCD window, these
buttons perform other shortcut functions.
The EQUALIZER section is detailed in Chapter 7.
SUB
SL
L
Chapter 2
DA7 Users’ Guide
2
-
8
2
DA7 Tour
EQUALIZER
H
HM
LM
ON
L
EQ
Q
FREQ
GAIN
+-
+-
+-
SUB
SL
L
4
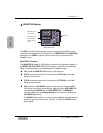
EQUALIZER Section
Q (quality) parameter knob or
left surround sound
attenuator
FREQ (frequency) parameter
knob or surround left
surround sound attenuator
GAIN parameter knob or
subwoofer surround sound
attenuator
Frequency band LED
buttons
EQ ON LED button