


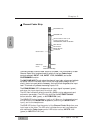
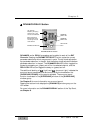

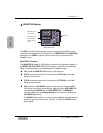
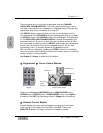

Fader Layer Controls Section
The Fader Layer controls significantly expand the flexibility of the DA7
mixer. The LED button selections define the current function for the fader
strips.
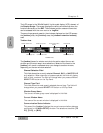
LED buttons for the Fader Layer controls assist you in determining or
checking the current channel and bus fader settings on the mixer.
INPUT 1-16, when selected (green), resets the fader strips to control channel
inputs 1 through 16, and buses 1, 3, 5, and 7. When selected, the faders
move to the positions reflecting the current settings for the layer, unless
previously flipped. To reset a flipped Channel Fader Strip, press the FLIP
button. To reset all the currently flipped Channel Fader Strips, press the
INPUT 1-16 Fader Layer control button and hold it for two seconds. This
will set all faders to the selected layer.
INPUT 17-32, when selected (red), resets the fader strips to control channel
inputs 17 through 32, and buses 2, 4, 6, and 8. When selected, the faders
move to the positions reflecting the current settings for the layer, unless
previously flipped. To reset a flipped Channel Fader Strip, press the FLIP
button. To reset all the currently flipped Channel Fader Strips, press the
INPUT 17-32 Fader Layer control button and hold it for two seconds. This
will set all faders to the selected layer.
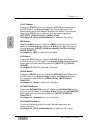
AUX/BUS, when selected (orange), resets the fader strips to control the aux
sends, aux returns, and bus outputs, while the faders move to the positions
reflecting the current fader settings for the layer.
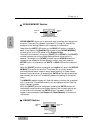
CUSTOM/MIDI is a user-definable Fader Layer control, where the functions
are selectable.
See Chapter 11, MIDI for more information on the DA7 MIDI feature, and
Chapter 6, Fader Layers and Channel Strips for additional information.
Chapter 2
DA7 Users’ Guide
2
-
14
2
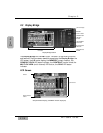
DA7 Tour
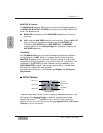
INPUT 1-16 LED button
(green)
INPUT 17-32 LED button
(red)
AUX/BUS LED button
(orange)
CUSTOM/MIDI LED button
(orange)
11
Fader Layer Controls Section