106
4 In “Resolution,” select the desired resolution for the
grid. The grid that appears will be determined by this
setting and by the “Grid” (1–1c, 2–1c) setting in the page.
5 To execute the settings, press the OK button. To cancel,
press the Cancel button.
1-1N: Link
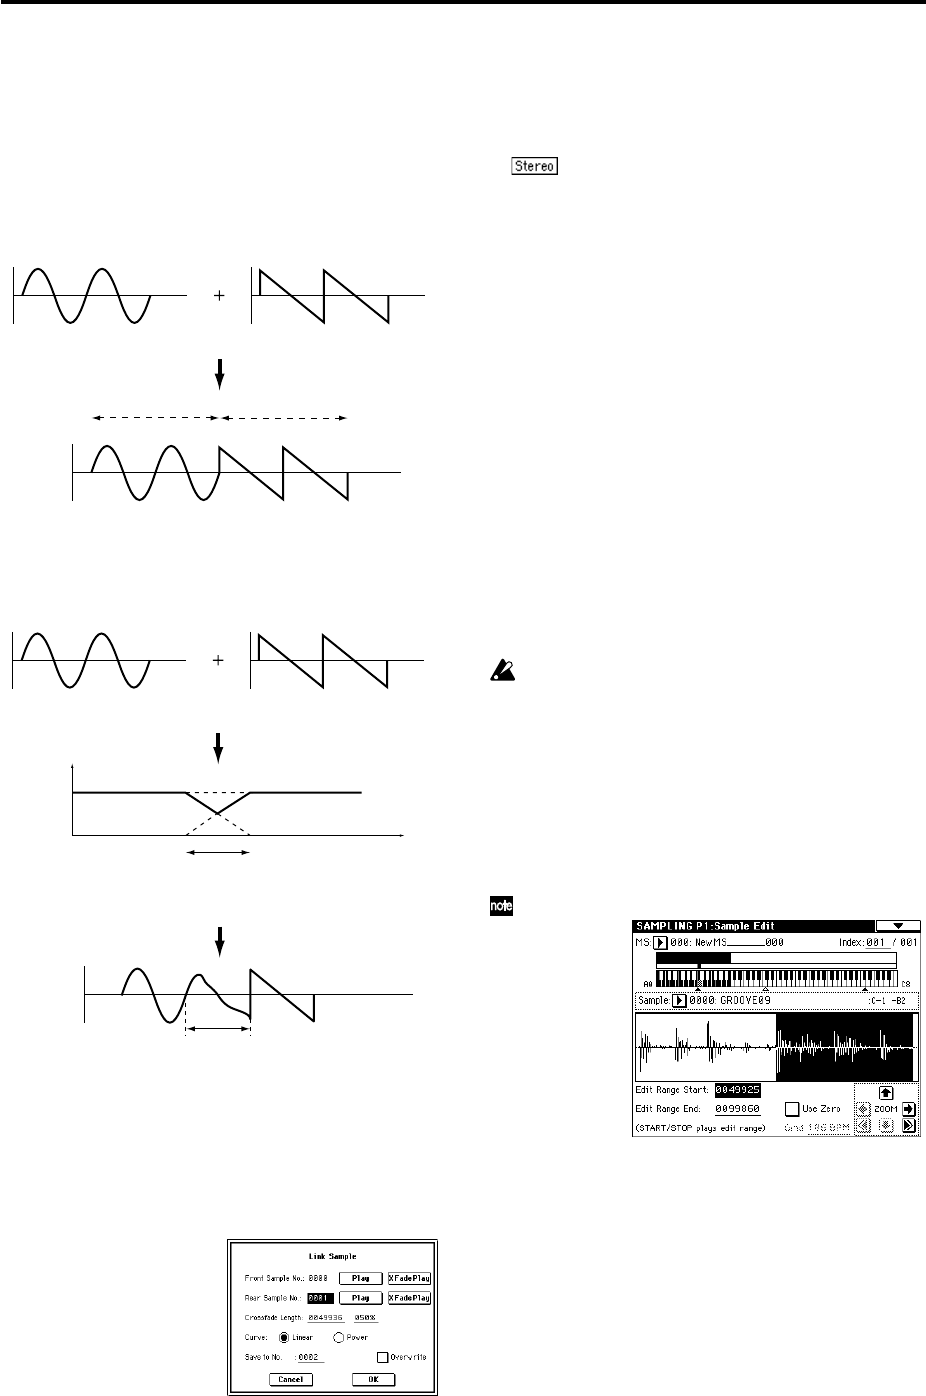
This command connects the currently selected sample with
another sample.
The volume of the two samples can be changed gradually at
the transition to gradually mix the samples with each other.
This is called crossfade, and can be used to produce a natu-
ral-sounding transition between the two sounds.
“Link” will be executed for all of the selected sample data,
regardless of the “Edit Range Start” and “Edit Range End”
settings.
1 Use “Sample Select” (1–1b) to select the sample that will
be placed in front by the Link command.
2 Select “Link” to access the dialog box.
3 The sample number selected for “Front Sample No. ” -
Sound A in the above example - will be displayed. When
the command is executed, this sample will be placed in
front.
When you press the Play button located beside this
parameter, the entire sample will be played. When the
sample has played to the end, playback will stop auto-
matically. If you want to stop playback mid-way through
the sample, press the Play button once again.
If you select one side of a stereo sample, it will
automatically be detected as a stereo sample, and the
other side of the sample will also be processed by the
Link command.
If the “Front” Sample is mono and the Rear Sample is ste-
reo, the L and R of the “Rear” Sample will be mixed to
mono before linking.
If the “Front” Sample is stereo and the “Rear” Sample is
mono, the identical sample will be placed in L and R of
the “Rear” Sample before linking.
4 Use “Rear Sample No.”- Sound B in the above example -
to select the sample number that will be linked.
When the command is executed, this sample will be
placed in back.
When you press the Play button located beside this
parameter, the entire sample will be played. When the
sample has played to the end, playback will stop auto-
matically. If you want to stop playback mid-way through
the sample, press the Play button once again.
5 In “Crossfade Length,” specify the length over which the
crossfade will occur. If you specify a % value, the propor-
tion in relation to the entire “Front” Sample will be calcu-
lated automatically. If you specify 50%, the last half of the
“Front” Sample will crossfaded.
If the rear sample is short, the “Crossfade Length” can-
not be set any longer than the length of the “Rear ”sam-
ple. In this case, it will not be possible to specify a value
up to 100%.
If you set “Crossfade Length” to other than 0, XFade-
Play button will be displayed. By holding down one of
these buttons, you can play back just the crossfaded
portion of the front or rear sample. Playback will stop
after the length specified by “Crossfade Length.” To
stop playback, press the XFadePlay button once again.
If you do not want to cross-fade, set this to 0.
After selecting a sample in step
1, you can set “Edit
Range Start” and specify the beginning of the crossfade
while viewing the waveform. Set “Edit Range End” to
the end of the sample. If you specify these, “Crossfade
Length” will indicate the length determined by “Edit
Range Start” and “Edit Range End.”
6 In “Curve,” specify how you want the volume to change
in the crossfaded portion.
Linear: The volume will change linearly.
Power: The volume will change non-linearly. In some
cases, “Linear” may sound as though the volume dimin-
ishes in the middle of the curve. If this occurs, use
“Power.”
7 In “Save to No.,” specify the save destination sample
number. An unused sample number will be selected by
default.
SOUND A
SOUND B
LINK
SOUND A SOUND B
SOUND A SOUND B
SOUND A
SOUND B
CROSSFADE LINK
Volume
Time
Crossfaded portion
(Sound A gradually diminishes,
and sound B gradually increases)
Crossfaded portion
(This is called the “Crossfade
Length”)


