116
Sample waveform display: This displays the waveform
of the selected sample. If the “Index” is other than
Result, the locations at which the sample is sliced will be
indicated by a dotted line (vertical). If “Index” is set to
xxx/yyy, the sample of the selected index will be high-
lighted. If “Index” is other than xxx/yyy, the Start, Loop
Start, and End addresses will be indicated by solid lines
(vertical).
In the case of a stereo sample, the L channel sam-
ple data will be displayed above, and the R channel sam-
ple data will be displayed below.
ZOOM: Here you can zoom in/out vertically and hori-
zontally on the waveform displayed in the “sample
waveform display.” (☞1–1c)
9 If the slice locations are not appropriate, use “Sensitivity”
to modify the sensitivity at which the attacks are
detected, thus changing the slice locations.
Sensitivity [00...30]:
Start:
End:
Use Zero:
Divide:
Link:
Refer to “2–1B: Time Slice” steps
6 and 7. (☞2–1B)
0 When you press the Stretch button, the Time Stretch dia-
log box will appear, and you can re-do the time stretch.
Execute Time Stretch using the same procedure as in step
5. If the sample slice locations are not appropriate, this
will also affect the result of Time Stretch. For details on
setting the slice locations, refer to “2–1B: Time Slice,”
steps
6 and 7. (☞2–1B)
A Save the sample you created. Press the Save button, and
the Save dialog box will appear.
In “To Sample No.,” specify the save destination sample
number. By default, an unused sample number will be
selected. If “Overwrite” is checked, this cannot be set.
If you wish to delete the original sample data and over-
write it with the edited sample, check “Overwrite.”
If you execute this command with “Overwrite”
checked, the original sample data will be deleted, and
overwritten by the edited sample data. Thus, in the
Time Stretch dialog box that appears after execution,
the edited sample data will automatically have its
attacks detected and sliced, and displayed in “Index”
Source.
For stereo samples, use “Save to No.(L)” and
“(R)” to specify the save-destination of the L and R chan-
nels.
To execute the Save, press the OK button. To cancel with-
out executing, press the Cancel button.
B By repeating steps 0–A you can create more samples as
desired.
C Press the Exit button to end the Time Stretch operation.
The last-saved sample number will be set for the index.
If you wish to use the saved sample in Program mode
or Sequencer mode, you must either execute “Convert
MS to Program” (0–1G), or use Program mode “High
Multisample,” “Low Multisample” (Program P1: 1–2a/
2b) to select the multisample and create a program.
Be aware that if you exit Time Stretch without using the
Save button then press the OK button to save the sam-
ple, the sample(s) you created will be lost.
Before executing the Slice on a long sample, you should
first divide the sample into measures. In some cases, it
may not be possible to assign the sample to the key-
board or edit the slice locations.
Time Stretch requires vacant samples, multisamples,
and relative parameters in order to execute. Before you
execute, make sure that there is sufficient free space. If
there is not, an error will occur.
If you open the time slice (Slice) dialog box on the same
sample, it will be sliced in the same way it previously
was. These slice locations will also be used if you exe-
cute “Time Slice” (2–1B), so that you can execute time
stretch without having to make the settings again.
If you wish to detect the attacks again or to re-do the
operation, change the “Sensitivity” after you open the
dialog box.
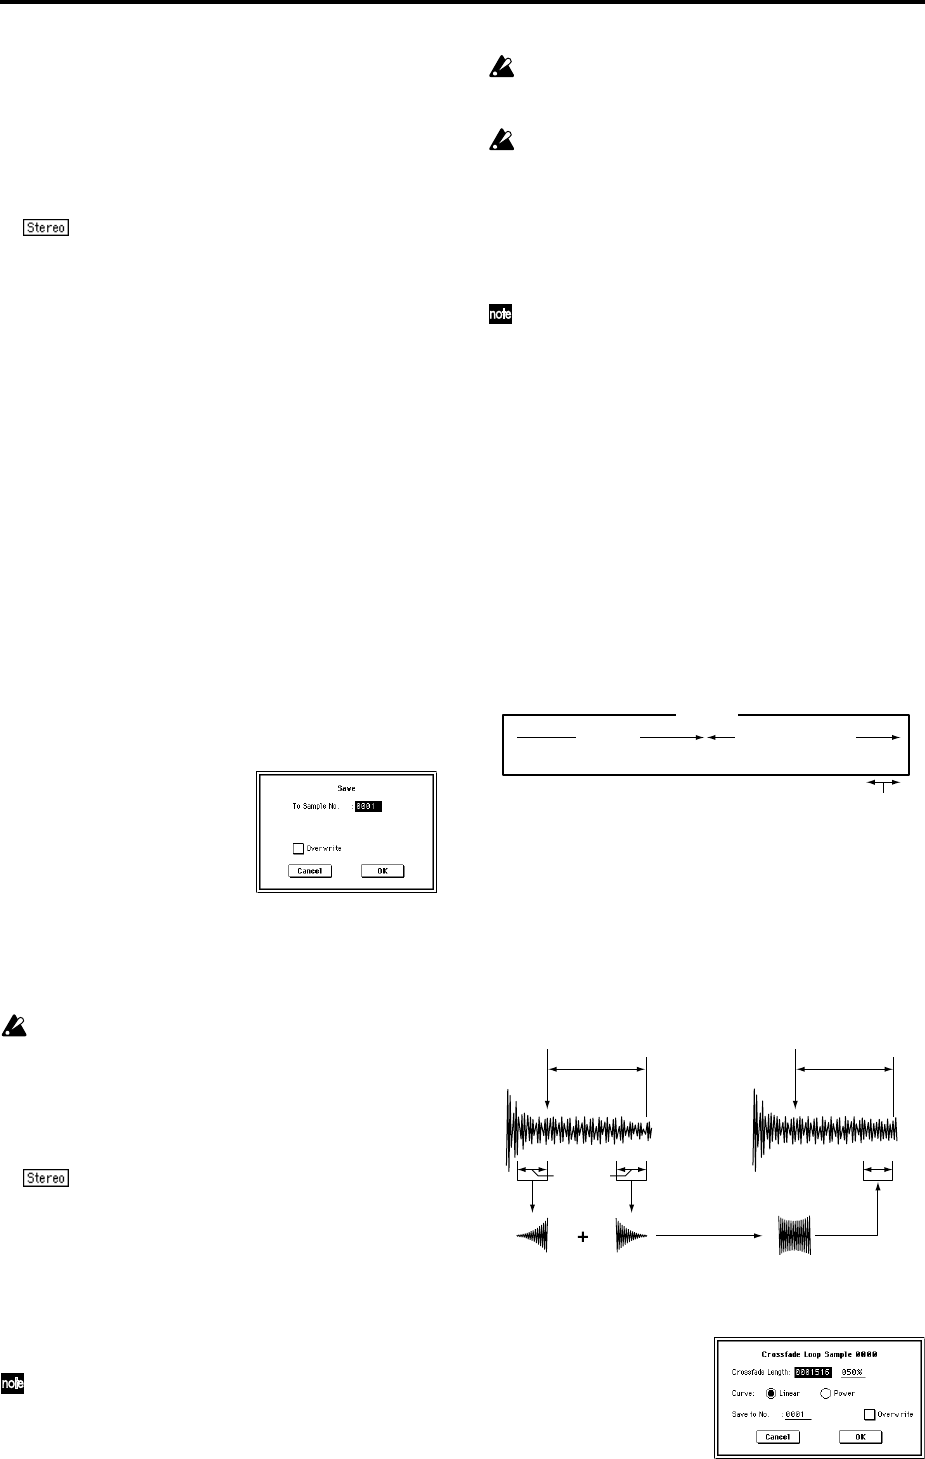
2–1D: Crossfade Loop
When looping a pitched instrument sample of a complex
sound such as strings or woodwinds to make the sound sus-
tain, it is necessary to create a long loop to preserve the rich
character of the sound. Crossfade Loop can be used to mini-
mize the difference in sound between the two regions to cre-
ate a natural-sounding loop.
In order to solve such problems, Crossfade Loop causes the
sound to change gradually from the end to the beginning of
the loop.
In actuality, the sample data is created as follows. A specific
length (the “Crossfade Length”) of the waveform immedi-
ately before the beginning of the loop is taken and mixed
with the end portion.
At this time, the waveform level of the portion immediately
before the end (the length specified by “Crossfade Length”)
will gradually decrease, and the waveform level immedi-
ately before the beginning of the loop will gradually
increase as the two are mixed.
1 Select the sample that you wish to Crossfade Loop.
2 Select “Crossfade Loop” to access the dialog box.
Sound
Playback Repeated playback
(first half of loop)
(second half of loop)
Gradually changes to first half
Loop
Start
Loop
End
Crossfade
Length
Loop
Start
Loop
End


