71
Sequencer
P0
P1 P2 P3 P4 P5 P6 P7 P8 P9
5 If you check “All Tracks,” the specified type of data will
be erased from all tracks.
6 To execute the Erase Measure command, press the OK
button. To cancel, press the Cancel button.
If control data extends across measures that were
erased and measures that were not erased, only the
data within the range being erased will be erased. How-
ever if note data extends across two or more measures,
deleting any of the intervening measures will delete
that note data from the following measures as well.
Note data can also be erased using “Shift/Erase Note”
(5–1O). Use this command when you wish to erase a
specific range of notes, or to erase notes from a specific
“Beat.Tick.”
Control Change data can also be erased using “Erase
Control Data” (5–1M). Use this when you wish to erase
a specific type of control change, or to erase control
change data from a specific “Beat.Tick” range.
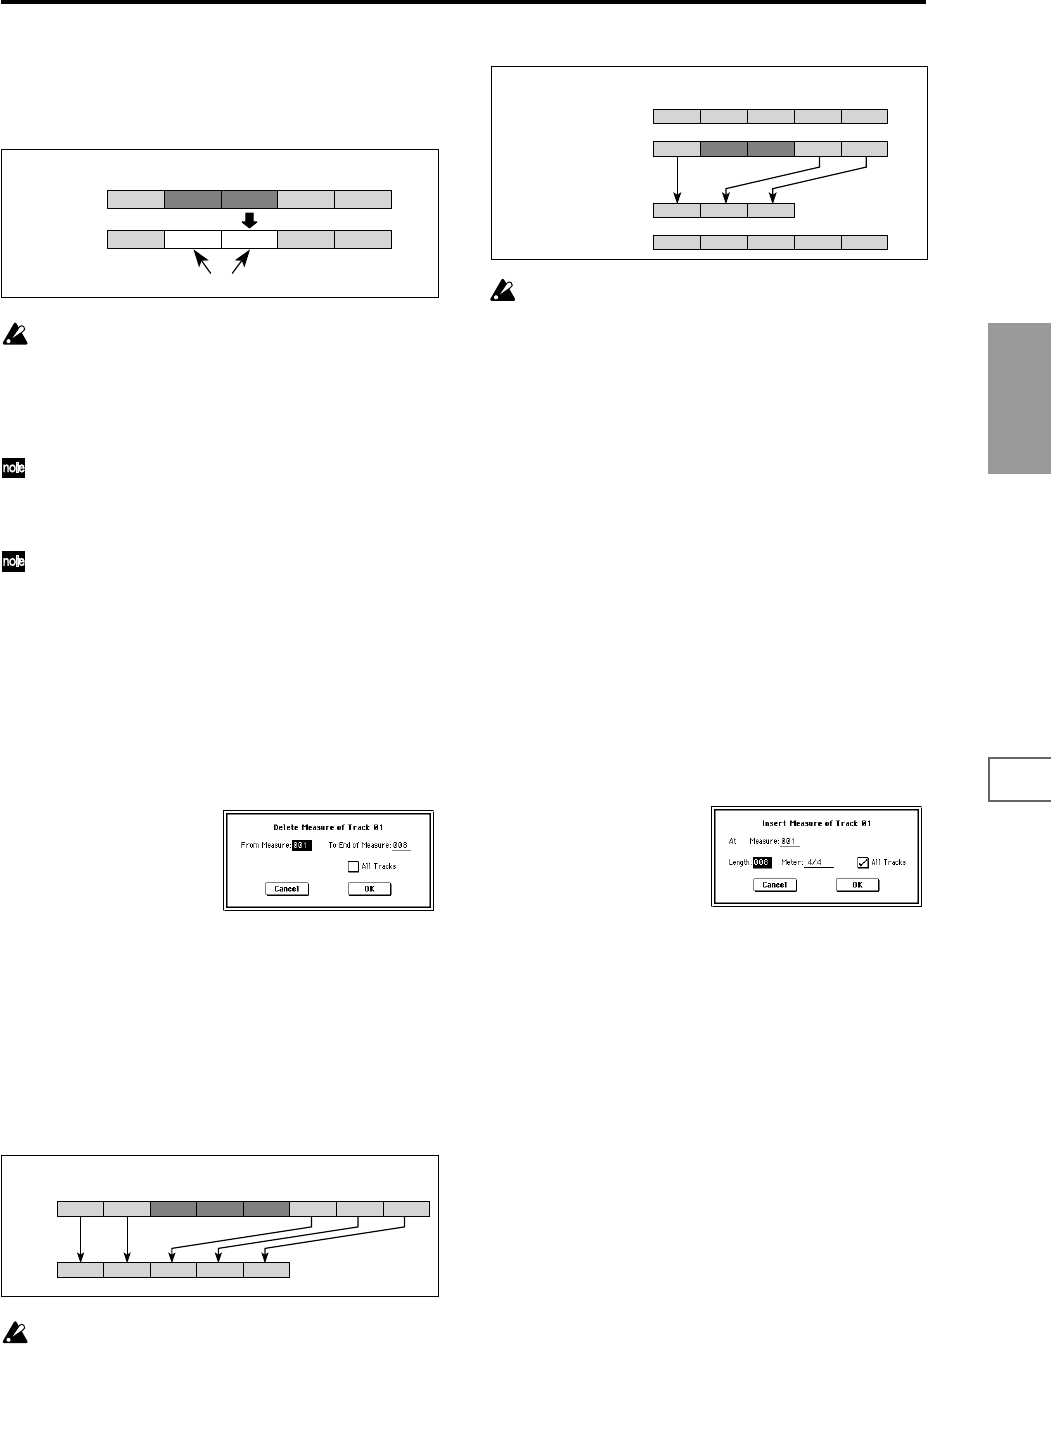
5–1G: Delete Measure
This command deletes the specified measures.
When the Delete Measure command is executed, the musi-
cal data following the deleted measures will be moved
towards the begining of the sequence.
1 Use “Track Select” to select the track.
2 Select “Delete Measure” to access the dialog box.
3 In “From Measure” select the first measure that you wish
to delete, and in “To End of Measure” select the last mea-
sure that you wish to delete. (By default, “From Mea-
sure” and “To End of Measure” will be the range that you
specified in the Track Edit page.)
4 If you wish to delete musical data from all tracks includ-
ing the master track, check “All Tracks.”
If this is not checked, data will be deleted only from the
track that was selected by “Track Select.”
5 To execute the Delete Measure command, press the OK
button. To cancel, press the Cancel button.
If in
4 you uncheck “All Tracks” and execute this oper-
ation, the measures will not be deleted from the master
track. Time signature and tempo data will remain
unchanged, and the time signature and tempo of the
measures that were moved forward as a result of the
Delete operation will change.
If in
4 you check “All Tracks” and execute this opera-
tion, the specified measures of musical data will be
deleted from all tracks including the master track, and
the time signature and tempo will also move forward
by the number of measures that were deleted.
If control data extends across a line between measures
that were deleted and measures that were not deleted,
only the data within the range being deleted will be
erased. However if note data extends across two or
more measures, deleting any of the intervening mea-
sures will delete that note data from the following mea-
sures as well.
5–1H: Insert Measure
This command inserts the specified number of measures
into the specified track. When you execute the Insert Mea-
sure command, the musical data following the insert loca-
tion will be moved backward.
If musical data is inserted into a range of measure across
which note data has been tied, a note-off will be created
immediately before the inserted measure, and the subse-
quent portion of the note will be deleted.
1 In “Track Select,” specify the track into which you wish
to insert.
2 Select “Insert Measure” to access the dialog box.
3 In “At Measure,” specify the measure location at which
the data will be inserted. (The measure you specified in
Track Edit page “From Measure” will be set as a default.)
4 In “Length,” specify the number of measures that will be
inserted.
5 In “Meter,” specify the time signature of the measures
that will be inserted.
If you want the inserted measures to match the existing
time signature, specify **/**. With any setting other than
**/**, the time signature of the inserted measures will
change, and the specified time signature will apply to all
tracks for those measures.
6 If you wish to insert measures into all tracks including
the master track, check “All Tracks.” The musical data
following the inserted measures will playback in the
same way it did before the measures were inserted.
If “All Tracks” is unchecked, the measures will be
inserted only into the specified track. At this time, the
musical data following the inserted location will be
moved toward the end of the sequence by the number of
measures that were inserted. However, the time signa-
ture and tempo recorded in the master track and will not
change.
7 To execute the Insert Measure command, press the OK
button. To cancel, press the Cancel button.
21 543
21 543
Before Erase
After Erase
No data
Example: If measures 2–3 are erased, measures 2–3 will be blank.
1 2 3 4 5 6
21
7 8
543
Before
Delete
After
Delete
Example: When measures 3–5 are deleted, measures 6–8 are moved forward.
2 (3/4)1 (4/4) 3 (3/4)
2 (3/4)1 (4/4) 3 (3/4) 4 (4/4) 5 (4/4)
1 (4/4) 3 (3/4) 5 (4/4)2 (3/4) 4 (4/4)
1 (4/4) 3 (3/4) 5 (4/4)2 (3/4) 4 (4/4)
Track 2
Track 1
Track 2
Track 1
Before Delete
After Delete
Example: When measures 2 and 3 (3/4 time) of track 2 are deleted, the measures that were
at 4 and 5 are moved forward, and their time signature will change to 3/4.
