57
Sequencer
P0
P1 P2 P3 P4 P5 P6 P7 P8 P9
2 In “Bank,” specify the bank of sample memory (RAM)
into which sampling will be performed.
3 In “Sample No.,” choose a sample number where the
sampling will be performed. By default, this will be the
lowest-numbered of the vacant sample numbers. If you
select ----:---No Assign--- or a sample number that
already contains data, the sample will automatically be
sampled into the lowest-numbered vacant sample num-
ber. If you are sampling in stereo, “Sample No.(L)” and
“Sample No.(R)” will be created.
4 Set “Auto +12 dB On.”
On (checked): “+12 dB” (Sampling P2: 2–1c) will auto-
matically be turned on for samples you record. Samples
for which “+12 dB” is on will play back approximately
+12 dB louder than if this setting were off.
When you resample a performance in Program, Combi-
nation, or Sequencer modes, you should normally set
“Recording Level” to about –12.0 (dB) so that the record-
ing level will be as high as possible without clipping.
When you resample, the sound will be recorded at the
optimum level for sampled data, but the playback level
at playback will not be as loud as it was during the resa-
mpling process (if “+12 dB” (Sampling P2: 2–1c) is off). In
such cases, you can check the “Auto +12 dB On” check
box when you resample, so that “+12 dB” (Sampling P2:
2–1c) will automatically be on, making the sample play
back at the same level as when it was resampled.
In these modes, the power-on default settings are
“Recording Level” at –12.0 (dB) and “Auto +12 dB On.”
If you resample a performance in the respective mode
with these settings, the sample will play back at the same
level at which it was resampled.
If you want to monitor your performance in Program,
Combination, or Sequencer mode, while sampling only
the external audio signal from AUDIO INPUT etc. (with
the “Source BUS” Indiv.1/2 setting: 0–7b), we recom-
mend that you set “Recording Level” to about +0.0
(dB) and turn off “Auto +12 dB On” when you resam-
ple.
The “Auto +12 dB On” setting is made independently
for Program, Combination, Sequencer, and Sampling
modes.
5 “Convert to” lets you specify whether the sample will
automatically be converted to a program after sampling.
You can also specify whether a note event will be created
at the time of sampling.
If the “Program” check box is checked, the sample will
automatically be converted to a program. (☞Sampling
P0: 0–1a)
At the right, use “Program” and “MS” to specify the pro-
gram number and multisample number of the program
that will be created.
“Orig.Key” (Sampling P0: 0–1b) specifies the location of
the original key. The multisample will be created with an
“Index” (Sampling P0: 0–1a) having this key as its “Top
Key” (Sampling P0: 0–1b). “Orig.Key” will increment
after sampling, so that the next sample will be assigned
to the next higher key.
If you check the “Seq.Event” check box, a note event will
automatically be created in the track specified by
“Track.” Note-on will occur at the location at which sam-
pling began, and note-off will occur at the location at
which sampling ended. The note event will be created as
in “Recording Setup” Over Dub mode (i.e., it will be
added without erasing existing events). If you are sam-
pling repeatedly without stopping the song playback, the
event(s) will be automatically created when you stop
song playback. The “Program Select” (0–1c/2c) of the
“Track” you created will automatically will automatically
change to the program you specified in “Program.”
“Seq.Event” is available only if “Program” has been
checked.
6 Press the OK button to apply the settings you made, or
press the Cancel button to discard any settings you
made after accessing the dialog box.
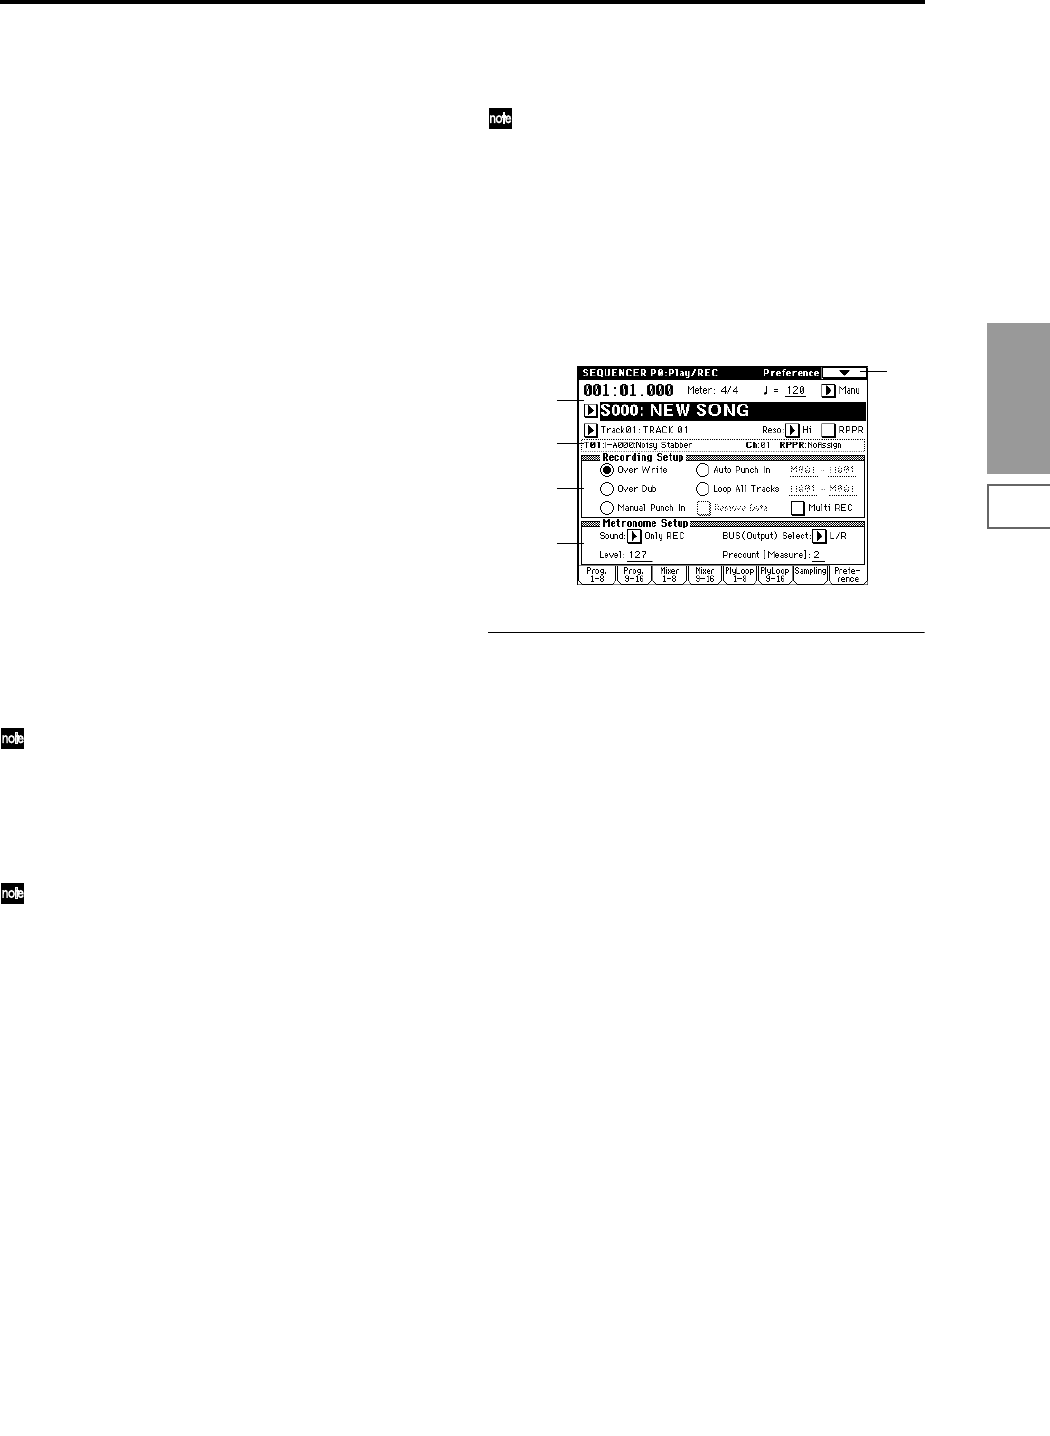
0–8: Preference
Here you can select the method of realtime recording, and
set the metronome.
0–8a: Recording Setup
Recording Mode [Over Write...Loop All Tracks]
Selects the method of realtime recording.
Refer to BG p.83 for the realtime recording.
Over Write
When recording for the first time, you will normally select
this method.
To begin recording, press the SEQUENCER [REC/WRITE]
key and then the SEQUENCER [START/STOP] key. To stop
recording, press the SEQUENCER [START/STOP] key once
again.
Be aware that when this method of recording is used to
record on a track that already contains data, any previously
existing data will be erased starting from the measure at
which you begin recording and from all subsequent mea-
sures.
Over Dub
Select this method when you wish to add data to a previ-
ously-recorded track.
To begin recording, press the SEQUENCER [REC/WRITE]
key and then the SEQUENCER [START/STOP] key. To stop
recording, press the SEQUENCER [START/STOP] key once
again.
The newly recorded data will be added to the previously
recorded data already residing in that track.
Manual Punch In
Select this method when you wish to use the SEQUENCER
[REC/WRITE] key or a foot switch to re-record selected por-
tions of a previously-recorded track.
Press the SEQUENCER [START/STOP] key to playback the
song. When you reach the measure at which you wish to
begin re-writing the data, press the SEQUENCER [REC/
WRITE] key or the foot switch, and recording will begin.
When you are finished recording, press the SEQUENCER
[REC/WRITE] key or the foot switch once again, and
recording will end.
0–1
0–1a
0–8a
0–1b
0–8b


