Sampling and editing in Sampling mode
139
indicates the zone determined by the “Top Key”
setting.
• Level adjusts the playback level of the sample. You
can use this to ensure that all samples in a
multisample have a consistent level.
• If you check “Constant Pitch,” all notes in the index
zone will sound the sample at its original pitch.
• “Pitch” adjusts the sample pitch for each index.
You can use the “Pitch BPM Adjust” page menu
command to set the loop interval to the desired
tempo. For more information, see “Pitch BPM
Adjust” on page 638 of the Parameter Guide.
EQ adjustments for a multisample –
P4: EQ/Controller
Here you can use a mid-sweepable three-band EQ to
adjust the output of the multisample. You can also use
the control surface to control the EQ.
Here you can also assign the functions of SW1/2, Real-
Time Knobs 5–8, and the note numbers and velocities
played by pads 1–8.
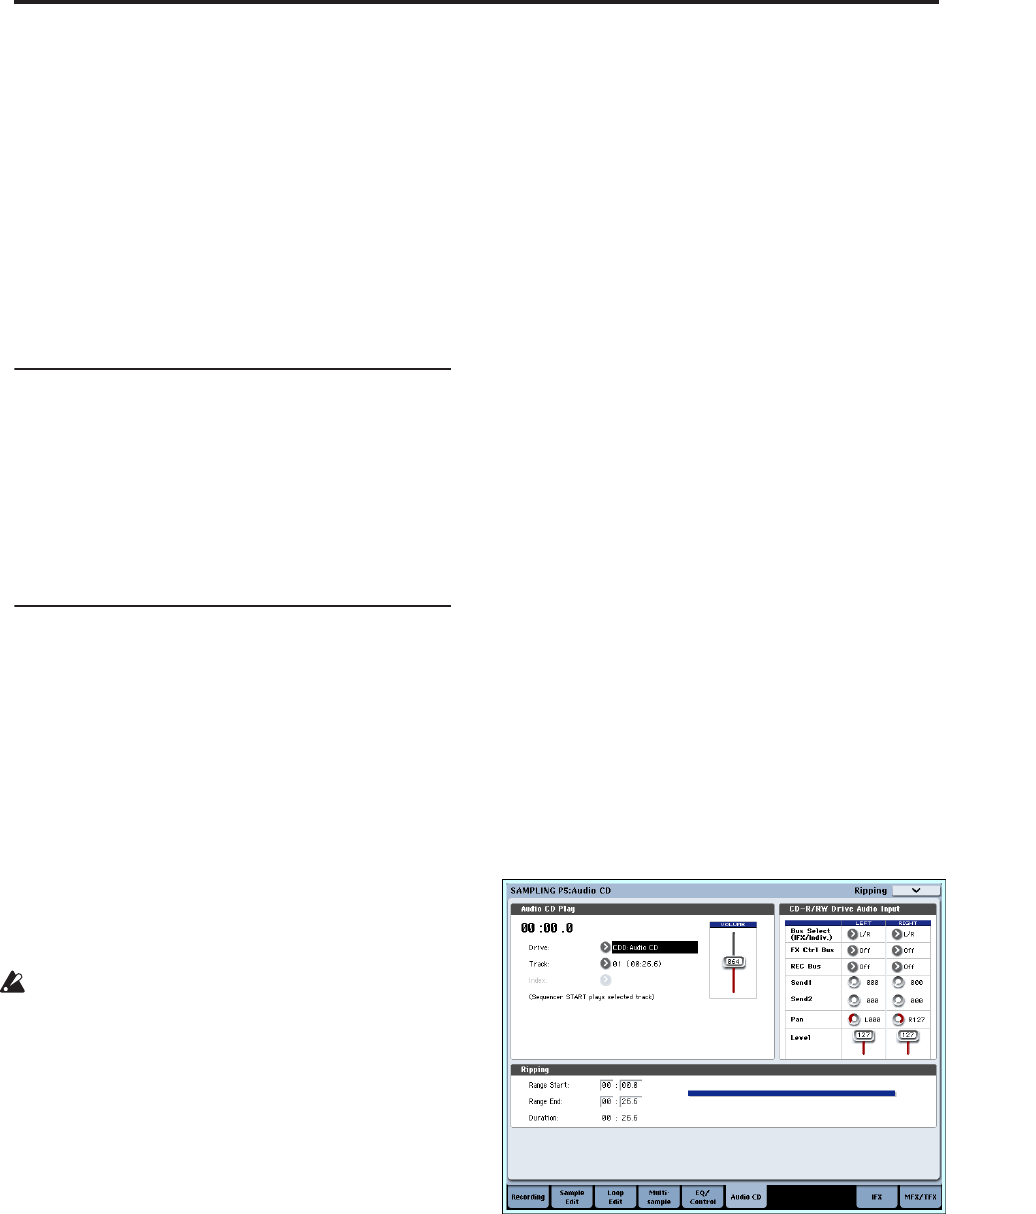
Ripping – P5: Audio CD
The OASYS allows you to “rip” digital audio data from
an audio CD inserted in the internal CD-R/RW drive
or in a USB-connected CD-ROM or CD-R/RW drive.
Ripping digital data from an audio CD
Here’s how digital data from an audio CD track can be
captured as a sample. In this example we’ll explain
how to rip using the internal CD-R/RW drive.
1. Access the Sampling P5: Audio CD page.
Press the MODE SAMPLING switch, and then press
the Audio CD tab in the LCD screen.
2. Insert an audio CD into the internal CD-R/RW
drive.
Use caution when handling the CD-R/RW drive.
For details on how to insert and remove discs, see
“Using the CD-R/RW drive” on page 41.
Next, make a few settings so that you can monitor
the CD-R/RW Drive Audio Input. These settings
don’t affect the ripping process itself.
3. For both the left and right channels, set Bus Select
(IFX/Indiv.) to L/R, and Level to 127.
4. Set the left channel’s Pan to L000, and the right
channel’s Pan to R127.
5. In “Drive” (Drive Select), choose the drive that
contains the audio CD.
6. Raise the Volume.
7. Use Track to select the track that you want to rip.
8. Press the SEQUENCER START/STOP switch to
play back the audio CD track.
9. During playback, press the ENTER switch at the
points where you want ripping to begin and end.
This will set Range Start and Range End.
If you press the ENTER switch three or more times,
Range Start and Range End will respectively be set
The method given above applies when something
other than Range Start or Range End is selected
(highlighted).
If Range Start or Range End are selected
(highlighted), the setting will be updated each time
you press the ENTER switch.
If Range Start or Range End are selected
(highlighted), this region will play back.
When you finish making settings, press the
SEQUENCER START/STOP switch to stop
playback of the audio CD.
10.Verify the region that will be ripped.
Select either “Region Start” or “Region End” (the
display will be highlighted), and press the
SEQUENCER START/STOP switch. The CD will
play from Range Start to Range End and then stop.
If you want to adjust the location, use the VALUE
controllers to modify the Range Start or Range End
settings, or move the cursor to a parameter other
than Range Start and Range End and repeat step 8
to make the setting once again.
If you want to move the track playback start
location to the beginning of the track, press the
LOCATE switch.
11.When you have finished setting Range Start and
Range End, select the page menu command
“Destination.”
A dialog box will appear.
Specify the destination to which the ripped sample
will be written.
Select RAM if you want to rip the sample into RAM
memory. In this case, you can also set Sample No.
(L), (R) to specify the sample number that will be
written. Normally you can leave this unchanged.
Select DISK if you want to rip the sample to media.
Use “Drive Select” to select the drive, and use the
Open and Up buttons to select the directory in
which the data will be saved. Also specify a name
for the WAVE file that will be saved.
12.Press the OK button to execute ripping, or press
the Cancel button to cancel without executing.
When you press the OK button, the “Obey
Copyright Rules” dialog box will appear.
13.Carefully read COPYRIGHT WARNING on v, and
if you consent to the terms, press the OK button to


