Loading & saving data, and creating CDs
170
The amount of time required will depend on the
amount of data being saved.
If a file with the same name already exists on the
media, you will be asked whether you want to
overwrite. If you wish to overwrite, press the OK
button. If you wish to save without overwriting, press
the Cancel button, re-do the operation from step 6, and
rename the data in step 7 before saving it.
Note: When using Save All, “Save PCG & SNG,” and
Save PCG to save combinations, you should also
remember to save the programs used by each timbre
(or the drum kits, and wave sequences used by the
programs) at the same time.
Similarly when saving programs, you should also
remember to save the drum kits and wave sequences
used by the programs.
Note: If your programs or drum kits use multisamples
and samples that were created in on OASYS, we
recommend that you use Save All to save the data.
When you use Save PCG or “Save Sampling Data” to
individually save a program or drum kit, or a
multisample or sample that you created, we
recommend that you save them under the same
filename in the same directory. When you use “Load
PCG” to load a .PCG file, the identically-named .KSC
file will also be loaded so that the correct
multisamples/samples will correspond automatically.
Using the OASYS as a data filer
The OASYS can receive MIDI System Exclusive data
sent by an external device, and save this data to media.
(This is sometimes referred to as “Data Filer”
functionality.) For more information, see “Save
Exclusive” on page 720 of the Parameter Guide)
Formatting media
Newly purchased media or media that has been used
by another device cannot be used “as is;” you must
format the media before you can use it with the
OASYS.
• The OASYS is shipped with the internal hard disk
already formatted.
• When creating audio CDs, you don’t need to format
the CD-R/RW media.
When you format, all data saved on that media will
be erased. If you had used a computer etc. to set up
that drive so that it can be used as multiple drives
(partitions), this data will also be erased. Be sure to
double-check before you format.
After formatting, it is not possible to press the
COMPARE switch to return to the previous state.
1. Make sure that the media you want to format is
inserted.
(See “Media setup” on page 168)
2. Press the MODE DISK switch to enter Disk mode.
3. Select the Disk–Utility page. Press the File tab,
and then the Utility tab.
4. Press Drive Select, and choose the drive that you
want to format.
5. Press the page menu button to access the page
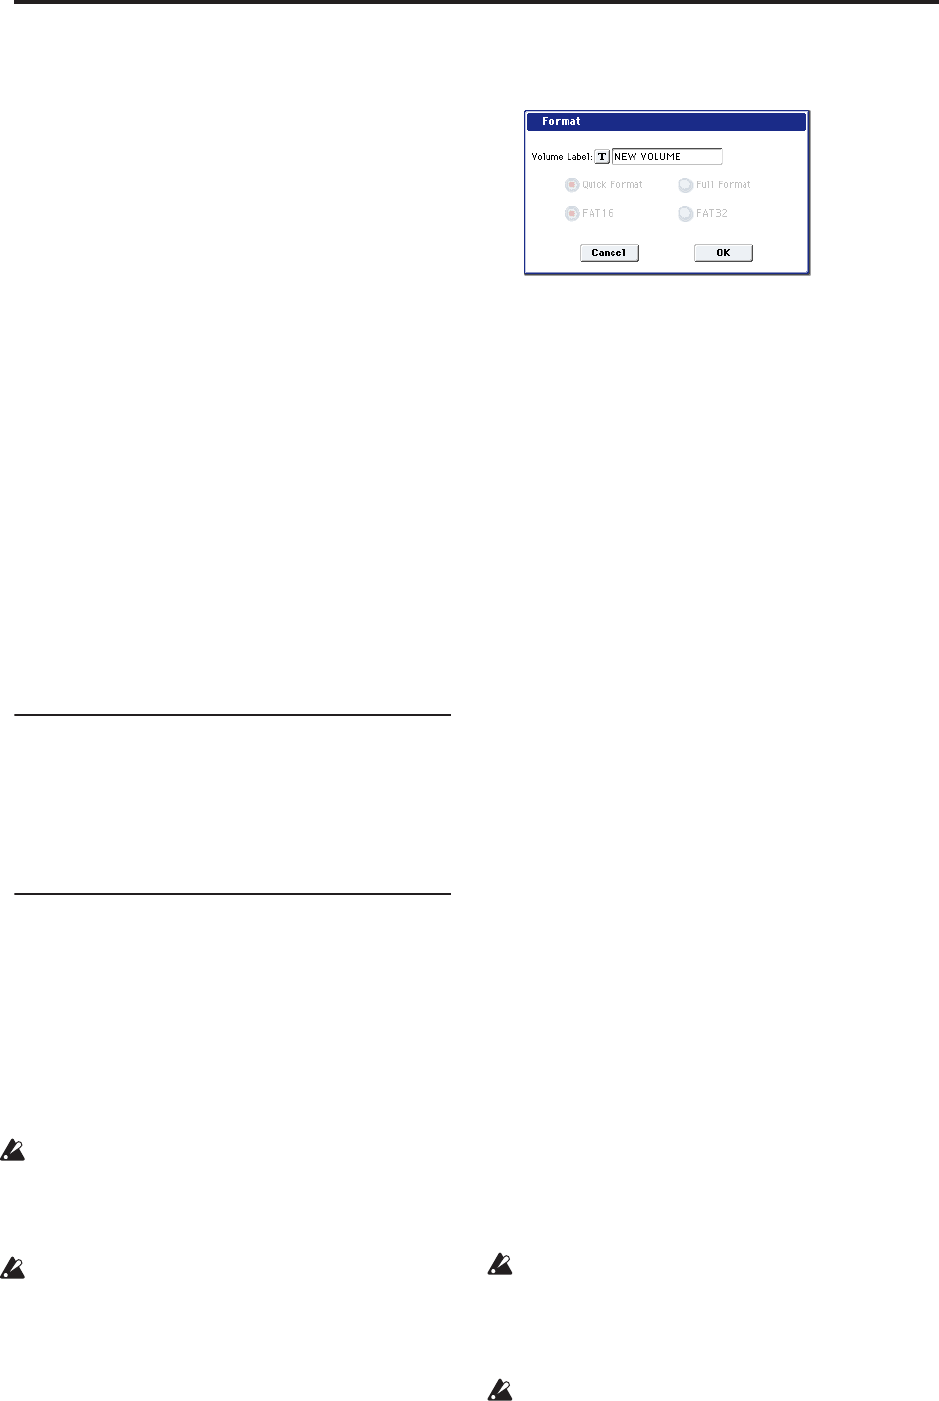
menu, and press “Format” to open the dialog box.
6. In “Volume Label,” use the text edit button to
access the text edit dialog box, and specify the
volume label.
The previously-specified volume label will be
displayed. If no volume label had been specified for
the media, or if a non-DOS media was inserted, this
will indicate “NEW VOLUME.”
7. Specify the initialization format.
Quick Format: Normally you should use Quick
Format to initialize the media.
Select this if the media has already been physically
formatted, or if you want to format media that has
been UDF-formatted by the OASYS. Since only the
system area of the media need be formatted, this will
require less time.
Note: For the internal hard disk you can only select
“Quick Format.”
Full Format: Select this when formatting media that
has not been physically formatted, or media (CD-RW)
that has not been UDF-formatted.
Note: Normally, it is not necessary to perform a Full
Format on media that has been physically formatted at
512 bytes/block. Execute the Quick Format for such
media.
Note: You will normally select Full Format for CD-RW
media etc. that has not been UDF-formatted. If an error
message of “Media not formatted” appears, execute
Full Format.
Depending on the capacity of the media, executing Full
Format may require a substantial length of time.
8. Specify the file system.
Use FAT16 to format media of 4 GB or less (such as
flash media), and use FAT32 to format larger media
(theoretically, up to 2 Terabytes).
9. Press the OK button to format, or press the Cancel
button if you decide to cancel.
When you press the OK button, a message will ask you
for confirmation. Press the OK button once again to
execute the Format operation.
You must format a CD-R/RW disc if you want to
use it for packet writing, or if it has previously been
used by another device.
You do not need to format a CD-R/RW disc that
you will use to create an audio CD.
You must use the OASYS to format the media. The
OASYS will not correctly recognize media that has
been formatted by another device.


