


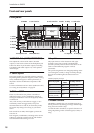

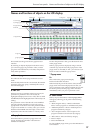

Introduction to OASYS
26
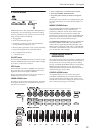
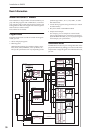
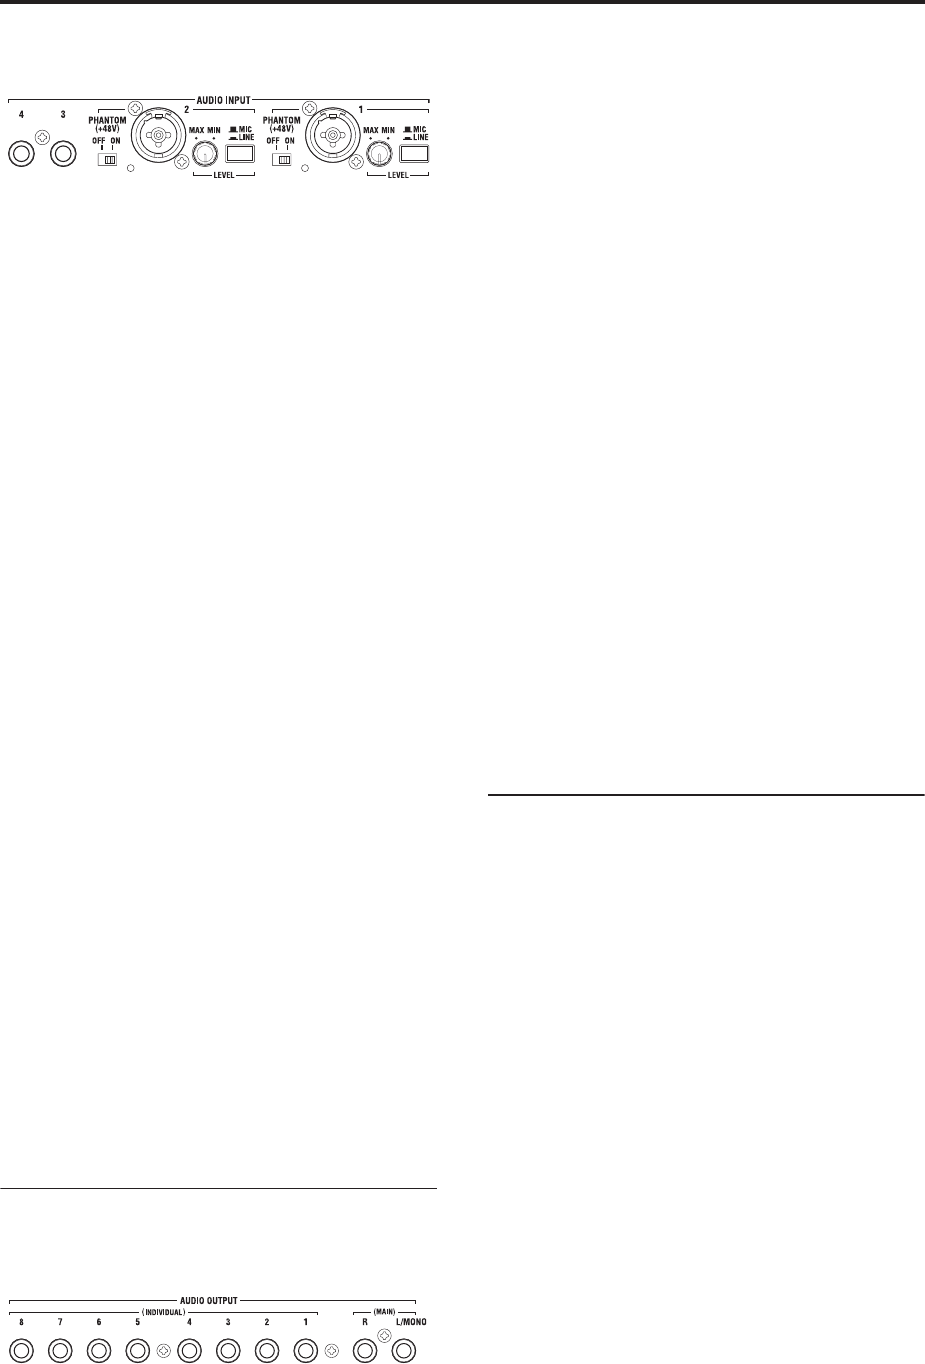
Mic/Line Inputs 1 and 2
Inputs 1 and 2 provide combined XLR and 1/4” TRS
balanced connectors. You can use these for either
microphone-level or line-level signals. The two inputs
have identical sets of controls, as described below.
MIC/LINE switches
These set the input’s nominal signal level. Set these
switches according to the type of device that you’re
connecting, and then use the LEVEL knobs (described
below) to optimize the gain.
Use the LINE setting (button pressed in) when
connecting to mixers, computer audio systems, signal
processors, or other synthesizers. The nominal level is
+4dBu, with 12dB of headroom.
Use the MIC setting (button popped out) only when
connecting a microphone.
LEVEL knobs
These knobs let you make more precise adjustments to
the input level, after setting the basic levels with the
MIC/LINE switches.
The MIN setting is unity gain; the MAX setting
provides about 40dB of gain above unity.
PHANTOM POWER switches
These switches enable 48 volt phantom power on the
XLR connectors only. This sends a small amount of
power to external microphones, using the same wires
that carry the audio signals back to the OASYS. Most
professional condenser microphones require phantom
power; see the microphone’s manual if you are unsure.
If you are not using a microphone which requires
phantom power, it’s best to turn these switches to the
OFF position.
WARNING: Never plug in unbalanced instruments
or microphones to the XLR connectors when
PHANTOM POWER is on.
Line Inputs 3 and 4
Inputs 3 and 4 are for line-level signals only. They use
unbalanced 1/4” phone jacks, referenced to a +4dBu
signal level with 12dB of headroom.
8. Analog AUDIO OUTPUTS
All of the analog audio outputs use unbalanced 1/4”
phone jacks, referenced to a +4dBu signal level.
Connect these outputs to the input jacks of your amp
or mixer. In addition to the L/MONO and R main
stereo audio outputs, the OASYS provides eight
individual audio outputs.
The sound from each oscillator, drum, timbre/track, or
insert effect can be freely routed to any output.
Additionally, you can route the metronome sound to
an individual output, to separate it from the stereo
mix. For more information, see “Routing effect
settings” on page 185.
(MAIN) L/MONO, R
These are the main stereo outputs; their volume is
controlled by the VOLUME slider. All of the factory
Programs and Combis are programmed to play
through these outputs.
When editing sounds, or when setting up a Song in
Sequencer mode, you can access the main outputs by
setting Bus Select to L/R.
If no cable is connected to the R output, L/MONO will
carry a mono summation of the stereo signal. So, if you
are connecting to a device which does not have stereo
inputs (such as a simple keyboard amp), use the
L/MONO output.
(INDIVIDUAL) 1…8
These 8 additional audio outputs let you isolate
sounds, audio inputs, or audio tracks for recording or
complex live sound setups.
These can be used as stereo or mono outputs, in any
combination. You can also use the Global Audio page
L/R Bus Indiv. Assign parameter to map the main
stereo outputs to any of these output pairs, if you like.
Note that the individual outputs are not affected by the
VOLUME slider.
9. AC Power connector
Connect the included power cable here.
We recommend that you first connect the power cable
to the OASYS, and then connect the other end of the
cable to an AC outlet (☞p.37).