


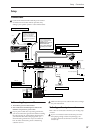


Setup Using the CD-R/RW drive
41
3. Raise the OASYS’s VOLUME slider to an
appropriate level, and adjust the volume of your
powered monitors or stereo amp.
After you’ve turned off the power, you must wait
approximately ten seconds before turning the
power on again.
Tip: You can set the “Power On Mode” (Global P0:
System Preference page) so that the mode and page
that had been selected when you turned the power off
will appear when the power is turned on.
For more information, see “Recalling the last-selected
mode and page at power-on” on page 148.
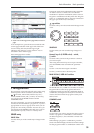
Leaving or deleting WAVE files in the TEMP
folder
If you record audio tracks in Sequencer mode and then
turn off the power without saving the song, the WAVE
files will remain in the TEMP folder of the internal
hard disk. If this occurs, the following dialog box will
appear the next time you power-on, asking you
whether you want to delete these WAVE files or save
them:
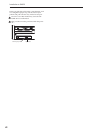
There are un-saved audio files from your previous
recording session.
Do you want to restore these files, or delete them
from the disk?
[Restore] [Delete]
If you don’t intend to use the WAVE files, we
recommend that you delete them so they don’t waste
space on the internal hard disk. To delete them, press
the Delete button.
If you want to use these files in a new song etc., press
the Restore button to keep them.
For more information, see “How audio data is stored
on the disk” on page 96.
LCD screen display when options are
installed
If you install the EXB-DI option in the OASYS, the
EXB-DI will be added to the indications in the
“Options” area of the screen. After installing the EXB-
DI, be sure to check this screen to see whether this
indication appears. If this indication does not appear
even though you’ve installed the EXB-DI, it was not
installed correctly. Turn off the power and reinstall the
EXB-DI.
For details, see “Option boards/Memory/Calendar
battery” on page 1035 of the Parameter Guide.
2. Turning the power off
1. Set the front panel VOLUME slider and the
volume of your powered monitor or stereo amp to
zero.
2. Turn off the power of your powered monitor or
stereo amp.
3. Press the OASYS’s POWER switch to turn off the
power.
Never turn off the power while data is being written
into internal memory.
While data is being written, the LCD screen will
indicate “Now writing into internal memory.” Data
is written into internal memory by the following
operations.
• Writing (updating) a Program, Combination,
Global Setting, Drum Kits, or Wave Sequences
• Loading Program, Combination, Global Setting,
Drum Kit, or Wave Sequences data in Disk mode
• Receiving a MIDI data dump for Program,
Combination, Global Setting, Drum Kit, or Wave
Sequences
• When using Sampling mode menu commands
(“Move Sample,” “Move MS,” “Convert MS To
Program,” “Time Slice,” etc.) to simultaneously
modify programs or drum kits.
• When sampling to RAM in Program, Combination,
or Sequencer mode, if you simultaneously convert
the sample to a program.
Never turn off the power while media such as the
hard disk is being accessed, such as while
recording or playing audio tracks, or sampling for
an extended time on the hard disk. Turning off the
power while disk access is occurring may render the
media unusable.
Using the CD-R/RW drive
Inserting a disc
Make sure that the OASYS is on.
1. Press the eject button of the CD-R/RW drive to
open the disc tray.
At this time, the tray will open only halfway. You
must manually pull the tray out completely before
placing a disc on it.
When opening the CD-R/RW drive for the first
time, remove the pickup stopper from the disc tray
before using the drive.
2. Place the disc accurately in the tray, label side up.
3. Push the disk tray in until it is completely closed.
Removing a disc
1. Press the eject button to open the disc tray.
The tray will open about halfway. Manually pull the
tray out far enough to remove the disc from the tray.
2. Gently remove the disc from the disc tray.
3. Push the disc tray in until it is completely closed.
Emergency disc removal
Normally you will be able to remove the disc as
described above. However, if this is not possible due to
a power failure or other problem, you can also remove
the disc as follows.