Quick Edits using the Sliders, Knobs and Switches
53
7. While holding RESET CONTROLS, move first
knob 1, and then knob 2.
As you move the knobs, their values will be reset to the
default, center positions.
8. Release the RESET CONTROLS button.
Now, you’re back to the original electric piano sound.
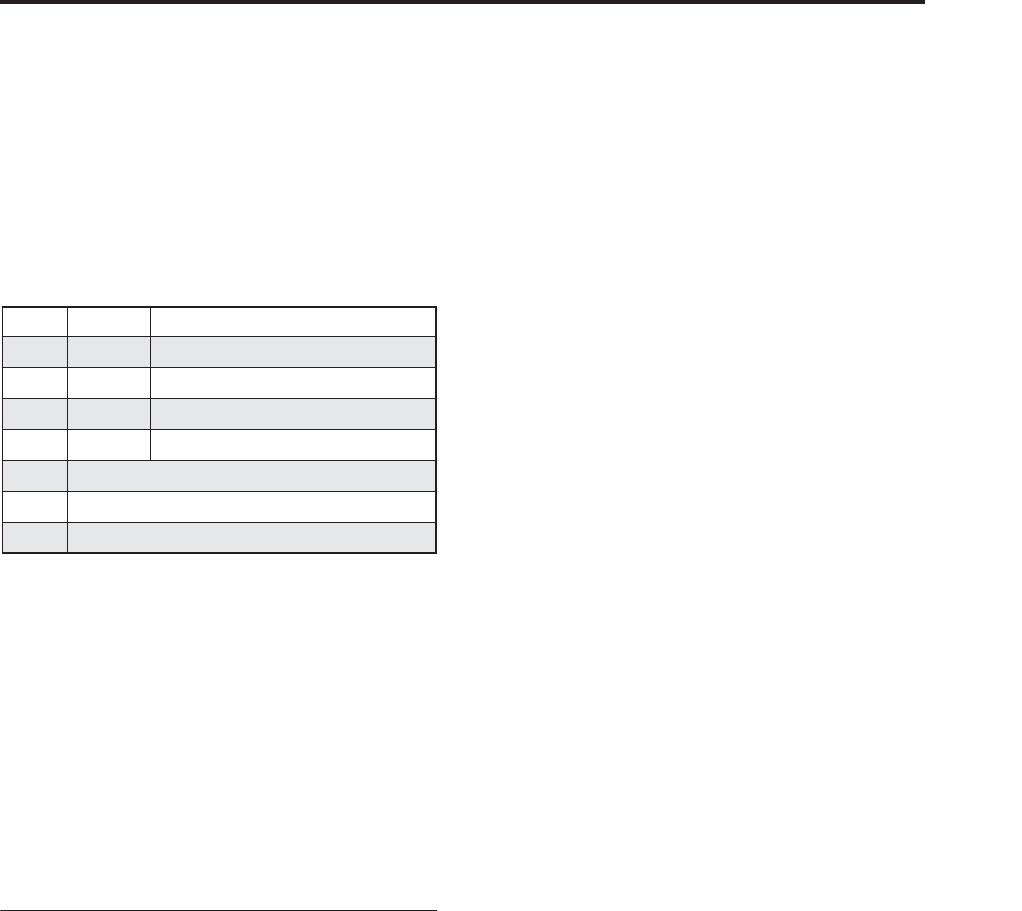
The table below shows the standard assignments of the
Real-Time knobs:
Real-Time Knob functions
Knob edits can be saved
The Real-Time Knobs are great for modulating sounds
in performance, or for recording. If you like, you can
also save the edited version of the sound, using the
normal Write Program command (see “Saving your
edits” on page 54).
Internally, a single knob usually affects several
different parameters. When you write a Program, the
edits are saved into the individual parameters, and not
to the knob itself. After writing the Program, you’ll
notice that the knobs have returned to their center
positions–since the old “edited” values are now the
new “saved” values.
Using Tone Adjust
Tone Adjust lets you use all of the sliders, knobs, and
switches on the Control Surface to edit Program
parameters, like the knobs on an analog synth. Each
physical control can be assigned to any one of a
number of Program parameters.
The specific parameters available through Tone Adjust
will vary depending on the type of Program. HD-1
Programs support a certain set of parameters; each EXi
also has its own set of parameters. For more
information, see:
“Common Tone Adjust Parameters,” on page 28 of the
Parameter Guide.
“HD-1 Tone Adjust Parameters,” on page 29 of the
Parameter Guide.
“AL-1 Tone Adjust parameters,” on page 210 of the
Parameter Guide.
“CX-3 Tone Adjust parameters,” on page 232.
Other EXi instruments will have their own set of
parameters, as described in their manuals.
Editing sounds
1. Select Program INT-C 115, “Smooth Operators.”
2. Press the TONE ADJUST button under
CONTROL ASSIGN.
The button’s LED will light up.
3. Go to the Control Surface tab of the Play page.
This page mirrors the Control Surface. It’s very useful
with Tone Adjust, since it shows you the parameter
assignments, exact values, and so on.
4. Look at the assignments for sliders 5, 6, and 8.
Slider 5 is assigned to Amp EG Attack; slider 6 is
assigned to Amp EG Decay; and slider 8 is assigned to
Amp EG Release.
5. Raise each of the three sliders so that they are
about 4/5 of the way to the top.
The LCD should show their values as between +60 and
+70. In other words, you’ve just edited the amp
envelope so that the attack, decay, and release are all
much longer than they were before.
6. Play a few notes.
Notice that the sound has changed from an electric
piano into a soft pad. Next, let’s add just a bit of pitch
modulation, to make the sound more rich.
7. Look at the assignments for knobs 2 and 5.
Knob 2 is assigned to Pitch LFO 1 Intensity–in other
words, the amount of pitch modulation from LFO1.
Knob 5 is assigned to LFO1 Speed.
8. Turn knob 2 ever so slightly to the right, so that the
LCD reads +01 or +02.
9. Turn knob 5 to the right, until about 2 o’clock, so
that the LCD reads about 40.
10.Play a few more notes.
The pitch modulation has added some shimmer to the
sound. Now, maybe it could use a bit more edge…
11.Look at the assignments for SELECT switches 1
and 2.
These are programmed to raise the Filter Frequency
and Filter Resonance, respectively. Switches are just
on/off, but you can set a specific value for the On
position; notice the +10 and +40 in the switch’s value
boxes.
12.Press the two switches, one by one.
The sound now has a more interesting character, due to
the filters. Since it’s brighter, we’ve also restored some
of the electric piano character.
Pretty easy, huh? Note - depending on the parameter,
you may sometimes hear glitches in the sound as you
move the control.
Changing parameter assignments
The factory Programs include default assignments of
Tone Adjust parameters to the knobs, sliders, and
switches. If you like, you can change any of the
assignments. To do so:
1. Go to the Control Surface tab of the Play page.
On this page, you can see the parameter assignments
for each controller, such as Filter EG Attack, Pitch
Stretch, Reverse, and so on.
2. Press the popup button next to one of the
parameter assignments.
Knob MIDI CC Normally controls…
1 74 Filter Cutoff Frequency
2 71 Filter Resonance
3 79 Filter EG Intensity
4 72 EG Release Time
5-6 Varies for each Program
7 Often Chorus Depth - but can vary per Program
8 Often Reverb Depth - but can vary per Program


