


Setup Connections
37
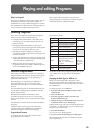
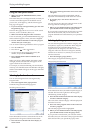
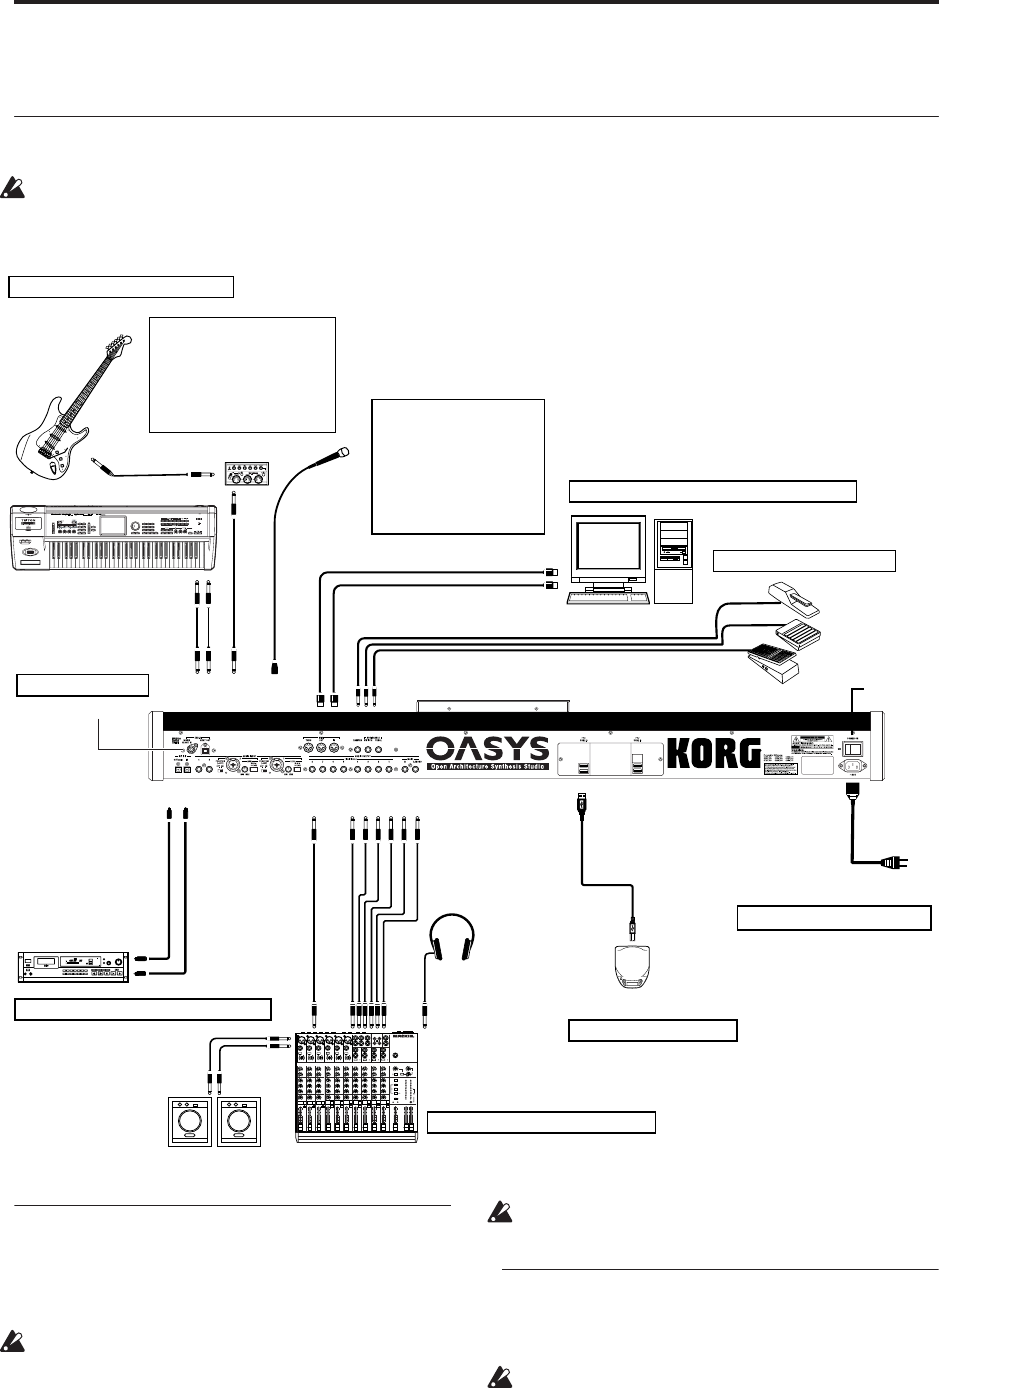
Setup
Connections
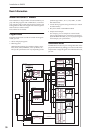
Connections must be made with the power turned
off. Please be aware that careless operation may
damage your speaker system or cause malfunctions.
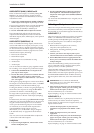
1. Connecting the power cable
1. Turn off the power of the OASYS.
2. First connect the included power cable to the
OASYS’ rear panel AC power inlet.
If your power cable uses a separate ground wire,
you must connect this ground wire before inserting
the plug into the AC outlet. When disconnecting,
you must first disconnect the plug before you
disconnect the ground wire. If you are unsure of
how to make connections, please contact Korg
customer service.
Make sure that your AC outlet is the correct voltage
for your instrument.
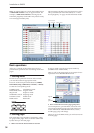
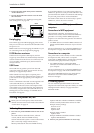
2. Analog audio output connections
Here’s how to connect the OASYS to your analog amp
or mixer.
If you’ve connected a stereo audio amp, be aware
that playing at high volume may damage your
speaker system. Be careful not to raise the volume
excessively.
AC power supply
to an AC outlet
Power cable (Included)
Power switch
1. Connecting the power cable
PHONES
MIC
1
BAL
OR
UNBAL
LINE IN 1
LOW CUT
75Hz
18dB/OCT
TRIM
+
10dB
-40dB
10
60
U
-
1
0
d
B
V
M
I
C
G
A
I
N
LINE IN 7-8
L
R
BAL
OR
UNBAL
MONO
+4
-10
LEVEL
LINE IN 9-10
L
R
BAL
OR
UNBAL
MONO
+4
-10
LEVEL
LINE IN 11-12
L
R
BAL
OR
UNBAL
MONO
+4
-10
LEVEL
LINE IN 13-14
L
R
BAL
OR
UNBAL
MONO
+4
-10
LEVEL
STEREO AUX RETURNS
1
2
1
2
AUX SEND
LEFT
(1/MONO)
RIGHT
ALL BAL/UNBAL
L
R
TAPE
INPUT
TAPE
OUTPUT
MAIN OUTS
L
R
BAL/UNBAL
PHONES
MICRO SERIES 1402-VLZ
14-CHANNEL MIC/LINE MIXER
MIC
2
BAL
OR
UNBAL
LINE IN 2
LOW CUT
75Hz
18dB/OCT
TRIM
+
10dB
-40dB
10
60
U
-
1
0
d
B
V
M
I
C
G
A
I
N
MIC
3
BAL
OR
UNBAL
LINE IN 3
LOW CUT
75Hz
18dB/OCT
TRIM
+
10dB
-40dB
10
60
U
-
1
0
d
B
V
M
I
C
G
A
I
N
MIC
4
BAL
OR
UNBAL
LINE IN 4
LOW CUT
75Hz
18dB/OCT
TRIM
+
10dB
-40dB
10
60
U
-
1
0
d
B
V
M
I
C
G
A
I
N
MIC
5
BAL
OR
UNBAL
LINE IN 5
LOW CUT
75Hz
18dB/OCT
TRIM
+
10dB
-40dB
10
60
U
-
1
0
d
B
V
M
I
C
G
A
I
N
MIC
6
BAL
OR
UNBAL
LINE IN 6
LOW CUT
75Hz
18dB/OCT
TRIM
+
10dB
-40dB
10
60
U
-
1
0
d
B
V
M
I
C
G
A
I
N
60
U
+15
U
+15
AUX
1
MON/
EFX
2
EFX
U
+15
U
+12
-15
-12
U
+15
-15
PAN
SOLO
1
MUTE
ALT 3–4
EQ
HI
12kHz
MID
2.5kHz
LOW
80Hz
L
R
dB
10
5
U
5
10
20
30
40
50
60
U
+15
U
+15
AUX
1
MON/
EFX
2
EFX
U
+15
U
+12
-15
-12
U
+15
-15
PAN
SOLO
2
MUTE
ALT 3–4
EQ
HI
12kHz
MID
2.5kHz
LOW
80Hz
L
R
dB
10
5
U
5
10
20
30
40
50
60
U
+15
U
+15
AUX
1
MON/
EFX
2
EFX
U
+15
U
+12
-15
-12
U
+15
-15
PAN
SOLO
3
MUTE
ALT 3–4
EQ
HI
12kHz
MID
2.5kHz
LOW
80Hz
L
R
dB
10
5
U
5
10
20
30
40
50
60
U
+15
U
+15
AUX
1
MON/
EFX
2
EFX
U
+15
U
+12
-15
-12
U
+15
-15
PAN
SOLO
4
MUTE
ALT 3–4
EQ
HI
12kHz
MID
2.5kHz
LOW
80Hz
L
R
dB
10
5
U
5
10
20
30
40
50
60
U
+15
U
+15
AUX
1
MON/
EFX
2
EFX
U
+15
U
+12
-15
-12
U
+15
-15
PAN
SOLO
5
MUTE
ALT 3–4
EQ
HI
12kHz
MID
2.5kHz
LOW
80Hz
L
R
dB
10
5
U
5
10
20
30
40
50
60
U
+15
U
+15
AUX
1
MON/
EFX
2
EFX
U
+15
U
+12
-15
-12
U
+15
-15
PAN
SOLO
6
MUTE
ALT 3–4
EQ
HI
12kHz
MID
2.5kHz
LOW
80Hz
L
R
dB
10
5
U
5
10
20
30
40
50
60
U
+15
U
+15
AUX
1
MON/
EFX
2
EFX
U
+15
U
+12
-15
-12
U
+15
-15
PAN
SOLO
7–8
MUTE
ALT 3–4
EQ
HI
12kHz
MID
2.5kHz
LOW
80Hz
L
R
dB
10
5
U
5
10
20
30
40
50
60
U
+15
U
+15
AUX
1
MON/
EFX
2
EFX
U
+15
U
+12
-15
-12
U
+15
-15
PAN
SOLO
9–10
MUTE
ALT 3–4
EQ
HI
12kHz
MID
2.5kHz
LOW
80Hz
L
R
dB
10
5
U
5
10
20
30
40
50
60
U
+15
U
+15
AUX
1
MON/
EFX
2
EFX
U
+15
U
+12
-15
-12
U
+15
-15
PAN
SOLO
11–12
MUTE
ALT 3–4
EQ
HI
12kHz
MID
2.5kHz
LOW
80Hz
L
R
dB
10
5
U
5
10
20
30
40
50
60
U
+15
U
+15
AUX
1
MON/
EFX
2
EFX
U
+15
U
+12
-15
-12
U
+15
-15
PAN
SOLO
13–14
MUTE
ALT 3–4
EQ
HI
12kHz
MID
2.5kHz
LOW
80Hz
L
R
dB
10
5
U
5
10
20
30
40
50
60
dB
10
5
U
5
10
20
30
40
50
60
dB
10
5
U
5
10
20
30
40
50
U
+10
U
+20
U
+20
1
2
AUX 1 MASTER
PRE
POST
NORMALLED
AUX 1
SELECT
EFX TO
MONITOR
AUX
RETURNS
SOURCE
MAIN
MIX
LEFT RIGHT
CLIP+28
+10
+7
+4
+2
0
-2
-4
-7
-10
-20
-30
0dB
=
0dBu
RUDE SOLO LIGHT
ALT
3-4
TAPE
ASSIGN
TO MAIN MIX
NORMAL(AFL)
LEVEL SET(PFL)
SOLO
MODE
PHANTOM
POWER
CONTROL
ROOM
/ PHONES
MAIN MIX
Mixer
Powered
monitors,
etc.
INPUT
4 3 2 1 R L/MONO8 - - -
INPUT
Monitor
OUTPUT
AUDIO OUTPUT
AUDIO INPUT
4 3 2 1
(INDIVIDUAL) (MAIN)
2. Analog audio output connections
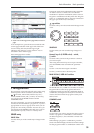
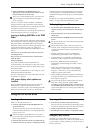
4. Digital audio input/output connections
DAT, etc.
DIGITAL OUT
S/P DIF
OUT IN
CD-R/RW, hard disk,
removable disks etc.
USB cable
USB
6. USB device connections
Mic
Guitar
Effect unit
Synthesizer
If a passive type guitar (a guitar
without an internal preamp) is
connected, it will not be possible
to sample at an appropriate
level due to the impedance
mismatch. Such instruments must
be connected via a preamp or
effect unit.
If you are using a condenser
mic that requires phantom
power, turn the PHANTOM
POWER switch ON.
WARNING: Never connect an
unbalanced instrument,
device, or mic to the XLR jack
if phantom power is turned
on.
3. Analog audio input connections
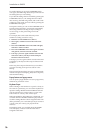
DAMPER
PEDAL
SWITCH
ASSIGNABLE
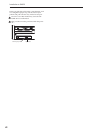
5. Pedal connections etc.
MIDI IN
MIDI
IN
MIDI
OUT
MIDI OUT
MIDI cable
Computer
7. Connections to MIDI equipment/computers
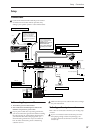
Option EXB-DI
8. Installing options