Creating songs (Sequencer mode)
84
Use “Program Select” (P0: Play/REC– MIDI Track
Prog Select/Mixer page) to assign a program to
each MIDI track.
At this time you can press the “Category” popup
and select programs by category.
You can copy various settings from Programs or
Combinations, including effects, KARMA settings,
Tone Adjust, and so on.
When assigning a program, you can use “Track
Select” to select the track for which you are making
assignments, and try playing the sound.
2. Set the pan and volume of each MIDI track.
Pan sets the pan of each track, and Volume sets the
volume of each track.
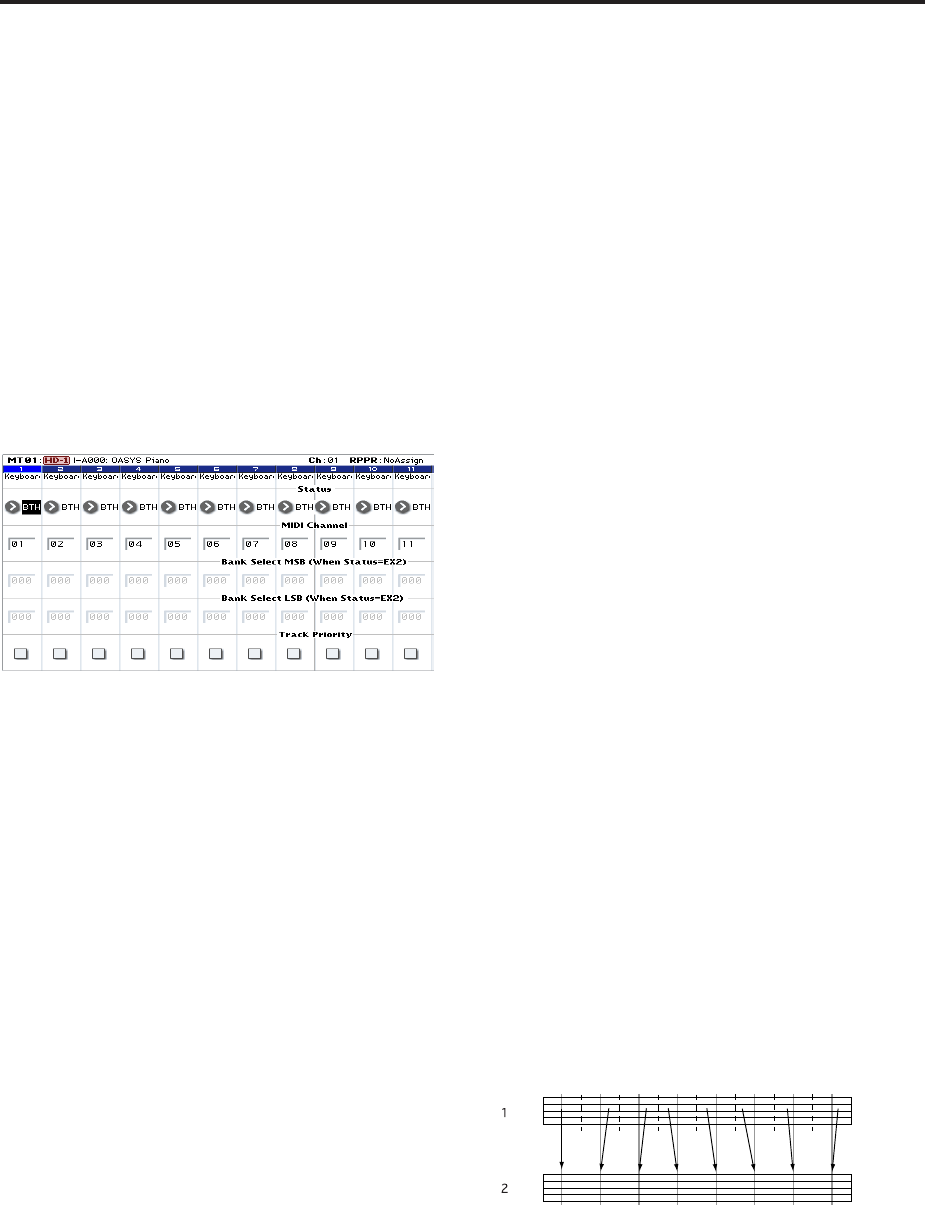
3. Specify the tone generator and MIDI channel that
will be played by each MIDI track.
In the P2: Track Parameters– MIDI page, Status
specifies whether each track will sound the internal
tone generator or an external tone generator. MIDI
Channel specifies the MIDI channel for each track.
Normally when using the OASYS as a 16-timbre
sound module, you will select INT or BTH.
In general, you should set MIDI Channel to
different channels 1–16 for each track. Tracks that
are sent to the same MIDI channel will sound
simultaneously when either is recorded or played.
Status INT: During playback, the OASYS’ internal
tone generator will play the MIDI data recorded on
that track. When you operate the OASYS’ keyboard
or controllers, you will be playing and controlling
the track selected by “Track Select.” MIDI data will
not be transmitted to an external device.
Status EXT, EX2, BTH: During playback, the MIDI
data recorded on that track will be transmitted from
MIDI OUT to play an external sound module. When
you operate the OASYS’ keyboard or controllers,
MIDI data will be transmitted to play and control
the external sound module selected by “Track
Select.” (The MIDI channel of the external tone
generator must be set to match the MIDI Channel
of OASYS tracks that are set to EXT, EX2 or BTH.)
If Status is set to BTH, both the external tone
generator and internal tone generator will be
sounded and controlled.
4. Adjust the effect settings.
Make settings for each effect in P8: Insert Effect and
P9: Master/Total Effect.
For more information, see “Using effects in
Combinations and Songs” on page 187, “Sequencer
P8: Insert Effect” on page 509 of the Parameter
Guide, and “Sequencer P9: Master/Total Effect” on
page 521 of the Parameter Guide.
5. Set the tempo and time signature.
To set the tempo, you can turn the TEMPO knob or
press the TAP TEMPO switch at the desired
interval. Alternatively, you can select “ (Tempo)” in
the P0: Play/REC– MIDI Track Prog Select/Mixer
page (or similar page), and use the VALUE
controllers to set the tempo. Set “Tempo Mode” to
Manual.
Next you will set the time signature. In this
example, we’ll explain how to set the time signature
using the “Meter” field. Normally, you specify the
time signature before recording the first track, and
then begin recording.
a) Press the SEQUENCER REC/WRITE switch, and
set “Meter” to **/**.
b) Press **/** to highlight it, and use the VALUE
controllers to set the time signature.
c) Press the SEQUENCER START/STOP switch to
begin recording. When the pre-count has ended and
Locate reaches 0001:01:000, press the SEQUENCER
START/STOP switch to stop recording. The time
signature you specified has been recorded on the
Master track.
If you press the SEQUENCER START/STOP switch
during the pre-count, the time signature won’t be
recorded.
6. Set the “REC Resolution” if necessary. When you
realtime-record on a MIDI track, this parameter
specifies how the timing of the recorded MIDI
data will be corrected. The timing will also be
corrected when you realtime-record automation
data on an audio track. (Already-recorded data
will not be corrected.)
For example, let’s suppose that you realtime-
recorded some eighth notes but your timing was not
quite perfect, as shown in part 1 of the illustration
below. If “REC Resolution” were set to when you
recorded, the timing would automatically be
corrected as shown in part 2 of the illustration. If
“REC Resolution” is set to Hi, the notes will be
recorded with the timing at which you play them.
7. Make other settings as necessary.
Make settings for the KARMA function (P7:
KARMA), MIDI filtering (P3: MIDI Filter/Zone),
etc.
You may also wish to use Tone Adjust to adjust the
sound. (See “TONE ADJUST” on page 81)
When you are finished making these settings, the basic
setup is complete. You can now record as described
under “Recording procedure” on page 100


