


Setup Connections
39
Note: Guitars with active pickups can be connected
directly to any of the inputs. Guitars with passive
pickups (i.e., guitars that do not have an internal
preamp) can be used with inputs 1 and 2, but the
impedance mismatch will cause both a change in tone
and a reduction in volume. For best results, route such
guitars through a pre-amp or effects unit before
connecting them.
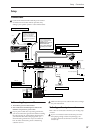
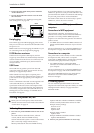
4. Digital audio input/output connections
Digital audio output
The same signal as the OASYS’ AUDIO OUTPUT
(MAIN) L/MONO and R jacks can be digitally output
to an audio system, digital mixer, DAT or MD recorder,
or other device that can accept a sampling rate of 48
kHz or 96 kHz.
• Use an optical cable to connect the S/P DIF OUT
(MAIN) jack to the optical digital input jack of your
device.
This will output the same audio signal as the AUDIO
OUTPUT (MAIN) L/MONO and R jacks.
Note: You can’t use the VOLUME slider to adjust the
volume of the digital output.
Digital audio input
An audio system, digital mixer, DAT or MD recorder,
or other device that can output audio at a sampling
rate of 48 kHz or 96 kHz can be input to the OASYS’ L
and R channels, and recorded or sampled to the hard
disk or routed through the internal effects and sent to
the OUTPUT jacks.
1. Use an optical cable to connect the optical digital
output of your DAT or other device to the S/P DIF
IN jack of the OASYS.
2. After turning the power on, set the “S/P DIF
Sample Rate” (Global P0: Global Setup– Basic
Setup page). Incoming data at a 96 kHz sampling
rate will be converted for 48 kHz for recording.
3. Set System Clock (Global P0: Global Setup– Basic
Setup page) to S/P DIF.
4. After turning on the power, use the Audio Input
page to set up the volume, pan, bus routing, and
send levels for the inputs, as desired.
For more information, see “0–8: Audio
Input/Sampling” on page 11 of the Parameter Guide.
You can use the S/P DIF inputs simultaneously with
the four analog inputs.
5. Connecting Foot Pedals and Switches
Connecting a damper pedal
The damper pedal is also sometimes called the sustain
pedal. It acts like the similarly-named pedal on an
acoustic piano; when you hold down the pedal, notes
will continue to sustain even when you lift your hands
off of the keyboard.
1. Connect an optional DS-1H damper pedal to the
DAMPER jack. If you’ve connected a DS-1H,
you’ll be able to obtain half-damper effects.
After turning the power on:
2. Go to the Global P2: Controllers/Scales page, and
use the Damper Polarity parameter to set the
damper polarity.
3. Go to the Global P0 page, and use the Half
Damper Calibration menu command to adjust the
sensitivity if desired.
For more information, see “Damper Pedal (Sustain)”
on page 48, and “Damper Polarity” on page 659 of the
Parameter Guide.
Connecting a foot switch
You can use a connected foot switch to perform
functions such as controlling sostenuto, soft pedal
on/off, KARMA function on/off, selecting programs
or combinations, starting/stopping the sequencer, and
controlling tap tempo.
1. Connect a foot switch such as the optional PS-1 to
the ASSIGNABLE SWITCH jack.
2. After turning the power on, use Global P2: “Foot
Switch Assign” and “Foot Switch Polarity” to
assign the function controlled by the foot switch
and to specify the polarity.
For more information, see “2–1a: Foot Switch &
Pedal/Damper” on page 659 of the Parameter Guide.
Connecting a foot pedal
You can use a connected foot pedal to control volume,
modulation, or other functions.
1. Connect an optional XVP-10 or EXP-2 etc. to the
ASSIGNABLE PEDAL jacks.
2. After turning the power on, use Global P2: “Foot
Pedal Assign” to assign the function controlled by
the foot pedal.
For more information, see “Foot Pedal Assign” on
page 659 of the Parameter Guide.
6. Connecting USB devices
OASYS supports high-speed USB 2.0 for connecting to
storage devices, such as hard drives, flash media, and
CD-R/RW drives. You can save and load samples,
sounds, sequences, and other data to and from USB 2.0
devices, for backup, transferring to computers, etc.
Note that HDR tracks must be played from and
recorded onto the internal hard drive. You can back
them up to USB devices, however.
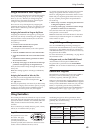
The maximum supported capacity depends upon the
format of the USB device. With FAT16 format, the
maximum capacity is 4 GB; with FAT32, the maximum
is 2 Terabytes (2,000 GB).
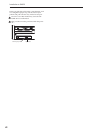
1. Use a USB cable to connect your external USB
device to one of the OASYS’s USB ports.
Standard USB cables have a different connector at each
end. Plug the flat, rectangular connector into the
OASYS, and plug the square-ish connector into the
external USB storage device.
Note: If the device you are using does not support hot-
plugging, make connections with the device powered-
off, and then turn on the power of your device.