


Introduction to OASYS
40
2. Execute the Disk mode Utility menu command
“Scan USB Device.”
3. Use the Disk mode Drive Select screen to check
the connection.
For more information, see “Loading & saving data,
and creating CDs” on page 163.
Hot-plugging
The OASYS supports USB hot-plugging. This means
that you can connect or disconnect the USB cable while
the power is on.
Note: In order to use hot-plugging, the USB device you
are connecting must also support hot-plugging.
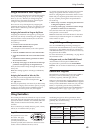
8 USB devices maximum
OASYS has four separate USB 2.0 ports, and can
support up to 8 USB devices simultaneously. Note that
it doesn’t matter how the devices are connected; even
if you use hubs or different ports, the maximum is
always 8 devices.
USB Power
Some USB devices get their power from the USB
connection. These are called “bus-powered” devices,
and they are supported by OASYS.
Other USB devices may require a separate power
source, in addition to the USB connection; in this case,
you’ll need to use an appropriate power adaptor for
the device.
There is a limitation to the total current supplied to all
connected USB devices, as defined by the USB
specification. If the total current consumption of the
connected devices exceeds this limit, the OASYS may
not correctly recognize the connected USB devices. If
this happens, an error message of “USB Hub Power
Exceeded!” will appear.
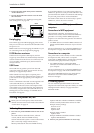
To avoid this problem, if you connect more than one
USB device, please use a self-powered USB hub in self-
powered mode. For details on connections and settings
for your hub, please refer to its documentation.
For details on the electrical current used by a specific
USB device, refer to its owner’s manual.
7. Connections to MIDI equipment &
computers
Connections to MIDI equipment
The keyboard, controllers, and sequencer etc. of
OASYS can be used to control an external MIDI tone
generator. Conversely, another MIDI keyboard or
sequencer can control the tone generator of OASYS to
produce sound.
• Use MIDI cables to connect the MIDI connectors of
OASYS with the MIDI connectors of your external
device.
For more information, see “Connecting MIDI devices
& computers” on page 1001 of the Parameter Guide.
Connections to a computer
Your performance on the OASYS, as well as controller
and sequencer data, can be sent to a computer
(connected via MIDI interface), and the tone generator
of OASYS can be played from the computer.
• Use a MIDI interface to connect the MIDI
connectors of OASYS to the MIDI connectors of
your computer.
For more information, see “Connecting MIDI devices
& computers” on page 1001 of the Parameter Guide.
Note: Some USB-MIDI interfaces may not be able to
transmit or receive the OASYS’s MIDI System
Exclusive messages.
8. Installing options
You can install the optional EXB-DI to add ADAT
outputs and a Word Clock input. For details, see “EXB-
DI (Digital interface board)” on page 1036 of the
Parameter Guide.
Turning the power on/off
Before you turn on the power, make sure that the
desired connections have been made as described in
“Connections” on page 37.
1. Turning the power on
1. Press the rear panel POWER switch to turn on the
power.
The LCD will show the model name, software
version, and the amount of RAM memory.
Version: Indicates the system version of the OASYS.
(The version may change without notice.)
Memory: Indicates the amount of RAM memory.
Options: Indicates whether an EXB-DI is installed,
and the currently-loaded status of EXs1 or EXs2.
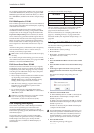
Example: Factory settings
Version: V1.0.0
Memory: 1GB
Options: EXs1
Example: EXs2 is loaded
Options: EXs2
Example: EXB-DI is installed and EXs2 is loaded
Options: EXB-DI/EXs2
2. Turn on your powered monitors or stereo amp.
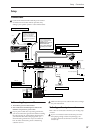
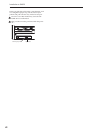
CD-R/RW,
hard disk,
removable disk, etc.
Type
A
Type
A
Type
B
Type
B
OASYS
USB cable
USB hub