Playing and editing Programs
64
Drive
The Drive circuit adds saturation and overdrive to the
sound, for everything from subtle fattening to drastic
distortion. Unlike an overdrive effect, Drive processes
each voice individually, so the timbre stays the same
regardless of how many voices are being played.
The two main parameters, Drive and Low Boost, work
together to create the overall effect.
Drive controls the amount of edge and bite in the
timbre. Low settings will produce mild saturation, and
higher settings create more obvious distortion.
Often, it’s useful to increase the Low Boost along with
the Drive.
Note: even when the Drive amount is set to 0, the
Drive circuit still affects the timbre. If your goal is a
completely pristine sound, use the Bypass control
instead.
Low Boost is a special low-frequency EQ which
controls the body character of the sound. The specific
EQ frequencies affected will change with the Drive
setting.
Higher amounts increase the bass boost, and will also
intensify the effect of the Drive parameter.
Using Vector Synthesis
Vector Synthesis lets you control Program and Effects
parameters by moving the Vector Joystick, by using the
programmable Vector Envelope, or by the combination
of the two.
What does Vector mean?
Modulation generally works by moving a single
control. like a slider, in a straight line. At one end of the
control, the modulation is at its minimum; at the other
end, it’s at its maximum.
Vector Synthesis is a little different. It works by moving
around a point on a two-dimensional plane, both left-
right and up-down.
You can think of this point as being positioned on two
different lines at once: a left-right line (the X axis), and
an up-down line (the Y axis).
In other words, instead of just having one value (like a
slider), each Vector point has two values: one for X,
and one for Y. See the graphic below for an example.
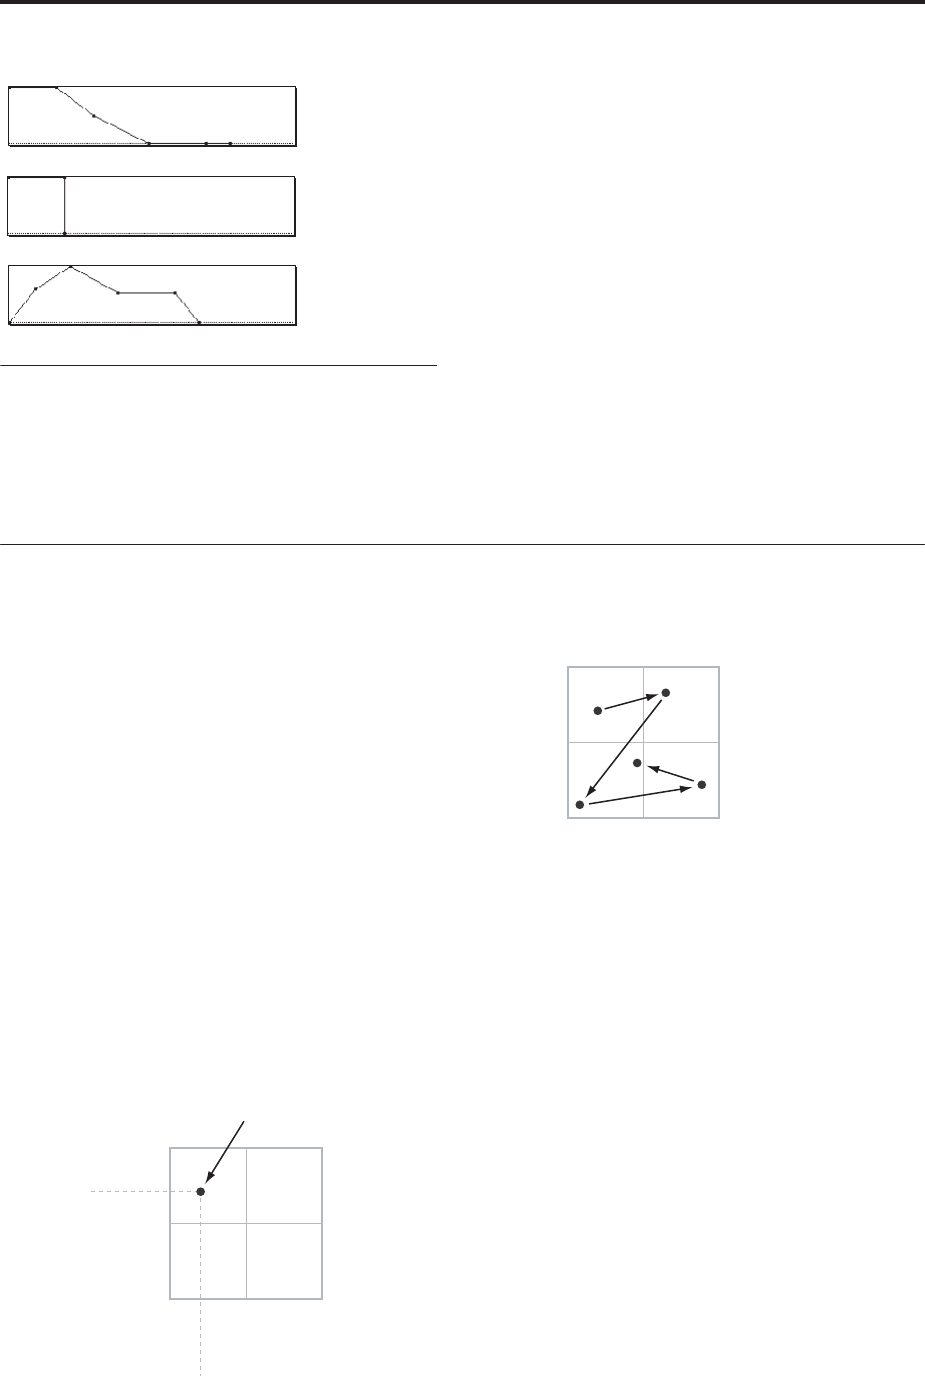
Vector Point and X and Y axis values
In addition to moving the point directly with the
Vector Joystick, you can also use the Vector Envelope
to move its position automatically over time, as shown
below.
Vector Envelope moving the Vector Point
Vector Joystick and Vector Envelope
You can move the Vector point using the combination
of the Vector Joystick and the Vector Envelope. The two
work together, although you don’t necessary have to
use them both at the same time.
When the Vector Joystick is in its center position, the
Vector Envelope has complete control over the point’s
position. Likewise, when the Vector Envelope is in the
center, the Vector Joystick has complete control.
When the Vector Envelope is in use, the Vector Joystick
offsets the position by up to halfway across either axis.
For instance, if the Envelope is all the way to the right
of the X axis, and the Joystick is all the way to the left,
the actual Vector position will be in the center of the X
axis.
Hint: to quickly reset the Vector Joystick to its center
value, hold down the front-panel Control Reset button
and move the joystick.
Vector Volume Control and CC Control
The Vector does two main things: it can control the
relative volume of the two Oscillators in Program
mode (or of up to 16 Programs at once in Combi
mode), and it can generate CCs for controlling
Program and Effects parameters.
Piano
Organ
Strings
+127
+127–127
Y-Axis
X-Axis
X value: –90
Vector Point
Y value: +50
0
0
+127
+127–127
Y-Axis
X-Axis
0
0


