114
Effects that can be used simultaneously
The effect programs used by the D3200’s effects are classified
as being different “sizes” according to the amount of DSP
processing power they consume.
Effect programs that allow up to eight insert effects to be
used are called “size-one” effects. Relative to these, some ef-
fect programs are “size-two” and others are “size-four.”
The size of an effect program is shown by the icon at the right
of the effect name.
One “size” corresponds to one of the on/off icons in each ef-
fect cell.
The maximum size that can be used simultaneously is 16.
Techniques for assigning effects
On the D3200, effects assigned to the upper rows of effect
cells will be given higher priority for being turned on. This
means that depending on how programs are assigned, you
may need to use the Restrct button or the On/Off buttons to
make adjustments while watching the DSP Power indicator,
in order to make the best use of the available effects.
The priority order also applies to the groupings of Insert, Master,
and Final effect. For example if you assign a size-four program to
insert effect 7, this will occupy insert effects 7 and 8 and master
effect 1, meaning that you will not be able to assign a program to
master effect 1.
To cancel an effect, cancel its channel assignment, and also select
NO EFFECT as the effect.
Using the Restrct button
Due to the priority scheme discussed above, if you make
many changes to your effect routings, it is possible to end
up with DSP power applied where it cannot be used. The
“Restructure” function can recover this DSP power so it
can be used for another effect. The following example
describes how this works.
First assign a size-one effect to insert effect 1, and a size-
two effect to insert effect 2.
Next, let’s suppose that you assign a size-two program to
insert effect 1.
When you do so, insert effect 2 (whose priority is lower)
will be masked by effect 1; you will unable to turn insert
effect 2 off, and insert effect 3 will be unavailable.
In this state, insert effect 2 is a “dead effect.” The on/off
icon of the effect will change to the dead effect icon “ ”.
In this case you can click the Restrct button to release the
dead effect so that insert effect 3 will again be available,
and the wasted DSP power will be recovered.
Using the On/Off button
If an effect that you actually what to use is turned off due
to lack of DSP power, you can turn off one or more effects
that are unintentionally on in order to allocate the neces-
sary size, and then turn the desired effect on. When doing
so, watch the DSP Power indicator as you choose the
effect(s) to turn on or off.
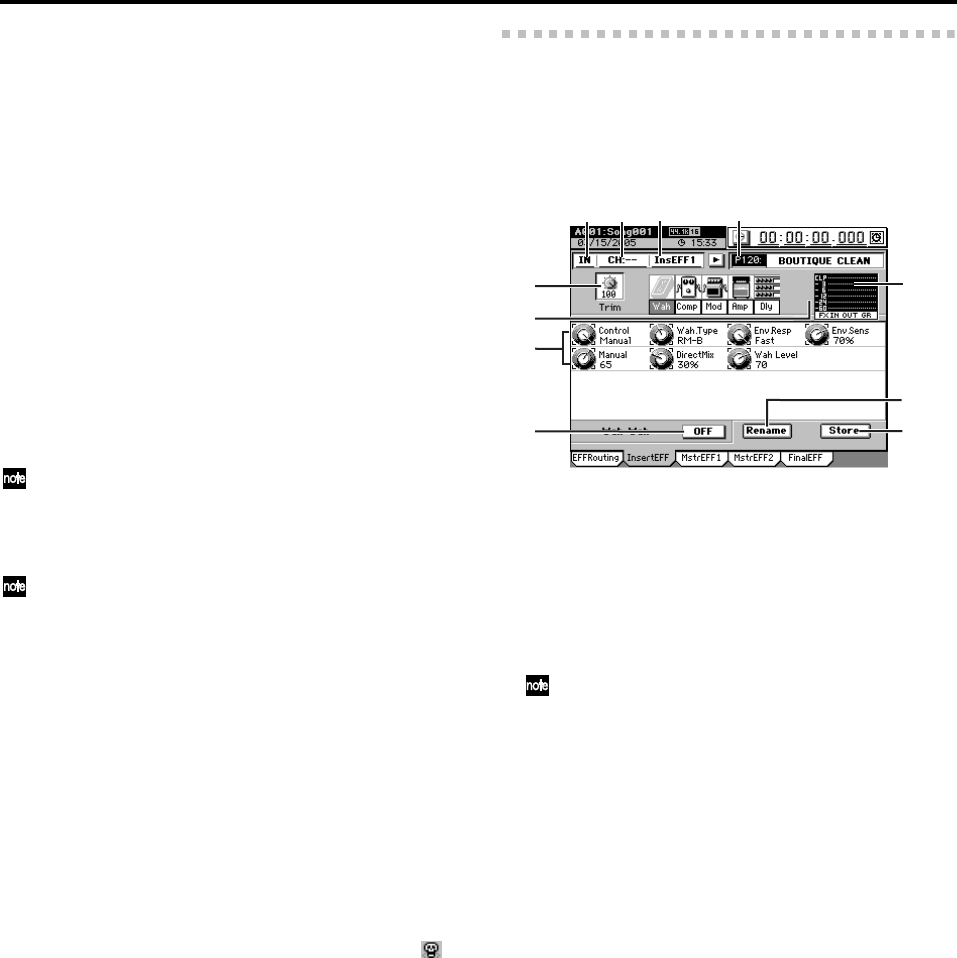
4-2. Insert EFF
You can apply insert effects to input sources during record-
ing, or to tracks during playback.
You can use a total of up to eight insert effects. You can use
the Knob Matrix located below the LCD screen to edit the pa-
rameters that are shown as knob icons.
1. Insert effect location [IN, TR]
Selects whether the insert effect will be applied to the
input (IN) or to the track playback (TR).
2. CH [1…32]
Selects the channel to which you will apply the insert
effect.
3. Insert effect select
Select the insert effect (1–8) that you want to edit.
Alternatively, you can press the CH SELECT key and then
press the Channel Key of the desired channel to select the in-
sert effect assigned to that channel. If you select a channel to
which no insert effect is assigned, the selection will not change.
4. Insert effect program
Use the value dial to select an effect program, or click the
popup button in the screen and choose from a category
list of effect programs.
If the selected program has been edited, the program
number’s P (preset), U (user), or S (song) indication will
change to “E,” indicating that the program has been
edited.
5. Trim knob [0…100]
With a setting of 100, the level will be the same as the
input level.
Lower this level if an excessive input level causes distor-
tion when an effect is applied.
6. Effect chain display
This shows the chain of effects that make up the effect
program. When you select (highlight) one of these effects,
the editable parameters will appear in “7. Knob icons.”
7. Knob icons
Use these knobs to edit the parameters of each effect.
The parameters and range of values will depend on the
effect and parameter. You can turn the Knob Matrix
(located below the LCD screen) to edit the value of the
corresponding parameter.
8. ON/OFF
This is an on/off switch for the selected effect within the
effect chain.
If the button is OFF, that effect will be bypassed.
9. Level meter
This shows the input/output level of the effect and the
GR (gain reduction) level.
12
3
4
5
6
7
8
9
10
11


