


82
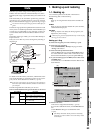
2-2. Creating a live CD
If you have recorded a single continuous performance, such
as a live concert performance that contains individual songs,
you can create a “live CD” recording. By inserting CD track
markers into the performance, the entire CD can be played
back as a continuous performance with no gaps between the
individual songs, just as it was recorded. However, the ben-
efit of creating a live CD using this method is that you can
also access the songs individually, just as you would on a
regular CD.
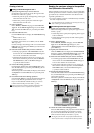
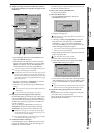
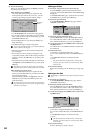
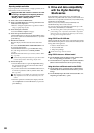
Assigning a track index to each of the individual songs re-
corded as part of one continuous live performance on
song A (figure A), to create a live CD in which there are
no gaps between tracks, and the song or dialog starts at
the beginning of each track
(1) Select the song that you want to make into a live CD
(→p.36). [Figure A]
Create a master track for this song.
(2) Assign marks at appropriate locations within the song
(→p.38). [Figure B]
(3) Assign “Use As CD Tr” marks. [Figure C]
• Access the MARK, “EditMark” tab page, assign a
mark at each location that you want to use as the
beginning of a track, and click the Use As CD Tr but-
ton to add a “Use As CD Tr” mark.
The “Use As CD Tr” mark will always be added to mark 001,
and this cannot be deleted. (The track at mark 001 can be de-
leted from the Album CD Project, if desired.)
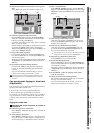
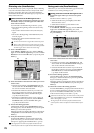
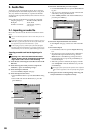
(4) Press the CD key, and click the Album CD button in
the screen to open the Album CD Project dialog box.
(5) In the track list, select the song that you want to write
[Figure D].
Click the Add button, select song A, and click the OK
button (or press the panel YES key).
The display will ask “Are You Sure?” Click the Yes but-
ton (or press the panel YES key).
If the selected song is 24-bit, click the Dither button to turn
it on if you want dithering to be performed.
The data will be written to CD as a 44.1 kHz song. If you se-
lect a song whose sampling rate is other than 44.1 kHz, the
data must be converted, and a certain amount of time will be
required for the conversion to be performed before the song ap-
pears in the track list.
The display will indicate “Completed.” Click the OK
button (or press the panel YES key) to return to the
Album CD Project screen.
The locations at which you assigned the “Use As CD Tr”
marks will divide the song into tracks in the track list.
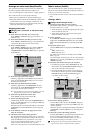
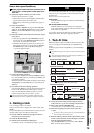
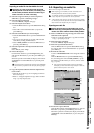
(6) Edit the album CD project. [Figure E]
• Delete unwanted tracks.
• The pre-gap and post-gap will both be zero between
tracks to which you assigned the “Use As CD Tr”
mark, but you may edit this if you wish.
(7) Play back the album CD project to check it.
(→p.80 “2-1. Album CD Project”, step (5))
(8) Perform steps (6)–(8) of “2-1. Album CD Project.”
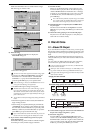
3. Ripping a CD
In addition to playing back an audio CD in its CD-R/RW
drive, the D3200 can “rip” digital audio data directly from an
audio CD.
Ripping (importing) digital audio data from track 3 of an
audio CD into the clipboard
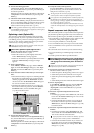
(1) Insert the audio CD into the CD-R/RW drive.
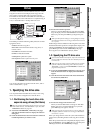
(2) Press the CD key, and then click the CD PLAYER but-
ton in the screen to access the CD PLAYER page.
(3) Click the skip button to make “TR3” appear in the CD
PLAYER display area.
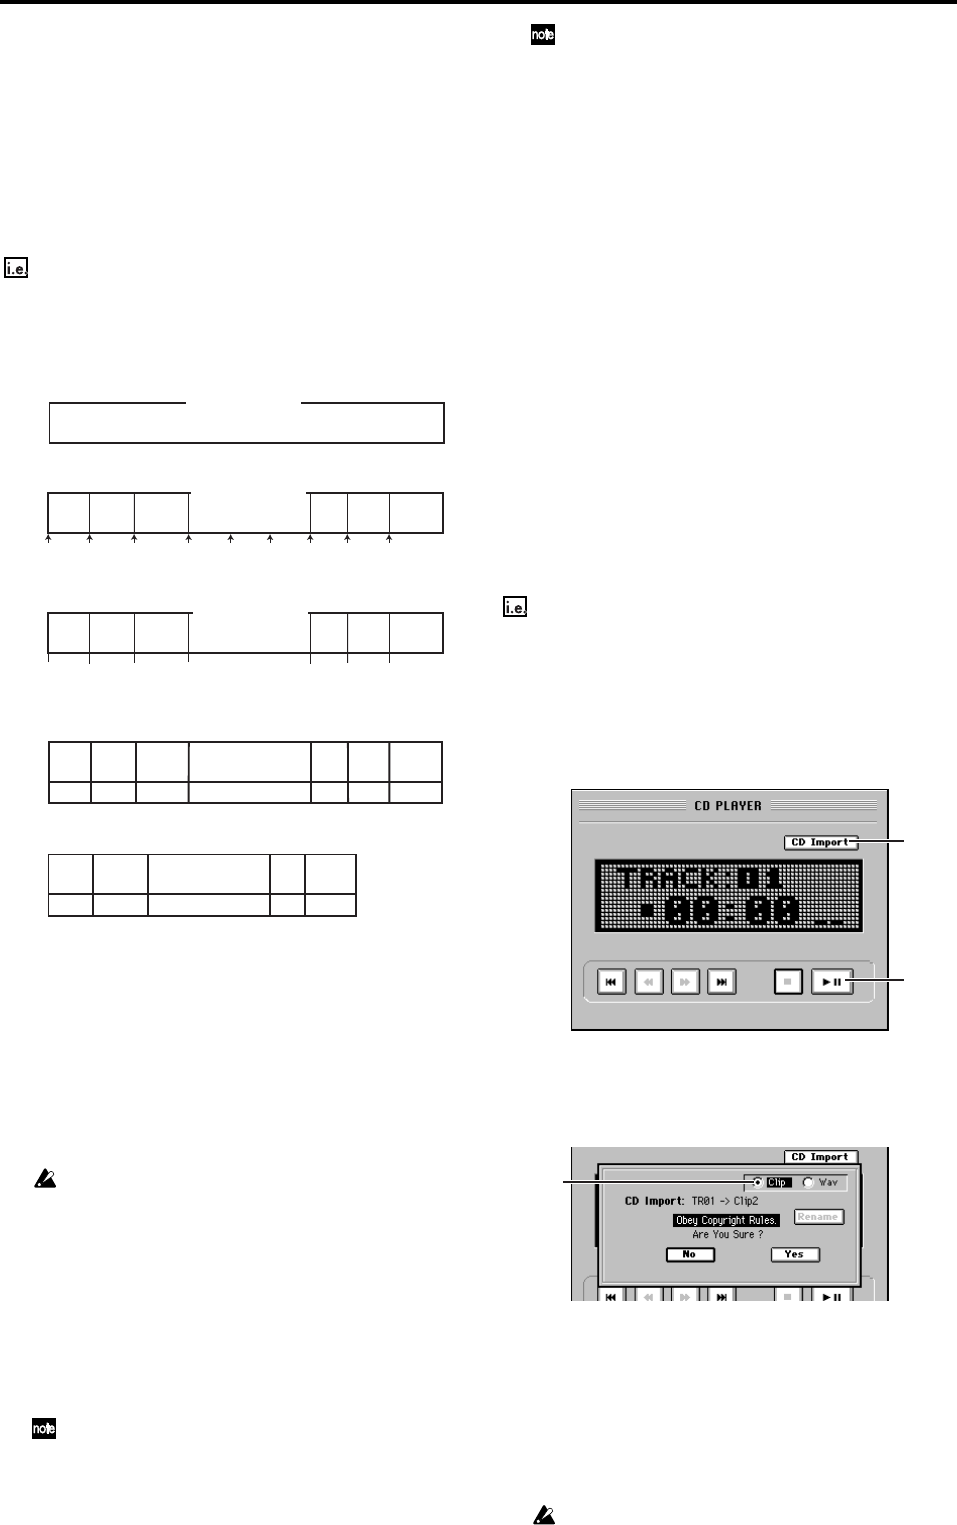
(4) Click the CD Import button to access the CD Import
dialog box.
Chose “Clip” as the ripping destination so that the dis-
play indicates “CD Import: TR3-> Clip2.”
(5) A message of “Obey Copyright Rules” will appear.
Carefully read the owner’s manual section entitled
“COPYRIGHT WARNING” (→p.iii), and if you accept
the terms, click the Yes button (or press the panel YES
key) to begin ripping.
(6) When ripping is completed, the display will indicate
“Completed”, click the OK button (or press the panel
YES key).
This process will take longer in proportion to the amount of
data you’re ripping.
Song you already created
Mark
1
Mark
2
Mark
3
Mark
4
Mark
5
Mark
6
Mark
7
Mark
8
Mark
9
Mark
1#
Mark
2#
Mark
3#
Mark
4#
Mark
7#
Mark
8#
Mark
9#
Assign marks
Load into the Album CD Project track list
TR01
First
song
Second
song
Third song MC1
Fourth
song
Introduction
MC2
First
song
Second
song
Third song
Third song
MC1
Fourth
song
Introduction
MC2
First
song
Second
song
Third song
First
song
Second
song
MC1
MC1
Fourth
song
Fourth
song
Introduction
MC2
Delete unwanted tracks (TR01, TR06), and write the song
Register Use As CD Tr (register marks with #)
TR02 TR03 TR04 TR05 TR06 TR07
TR01
TR02
TR03
TR04
TR05
Song A (Live)
Song A (Live)
Song A (Live)
#: Mark with “Use As CD Tr”
Figure
A
Figure
B
Figure
C
Figure
D
Figure
E
Master track already created
(4)
(3)
(4)