44
1-2. Digital input
The D3200 lets you input and record digital sources from the
S/P DIF inputs.
You can input a digital source only if its sampling frequency
matches the sampling frequency of the currently selected song.
If you input a 24-bit signal into a 16-bit song, the sound you mon-
itor will be 24-bit, but it will be converted to 16-bit data when it is
recorded.
When making digital input settings for S/P DIF, you may hear
noise due to synchronization difficulties. Please turn down the
faders or turn down the volume of your monitor speakers before
you adjust these settings.
Inputting the digital audio signal from a MD or DAT
Connecting the digital output of your external MD player
to the S/P DIF IN jack, and assigning it to channels 1 and
2.
(1) Connect your MD player.
Lower the D3200’s MASTER fader, and use an optical
digital cable to connect the digital output of your MD
player to the S/P DIF IN jack.
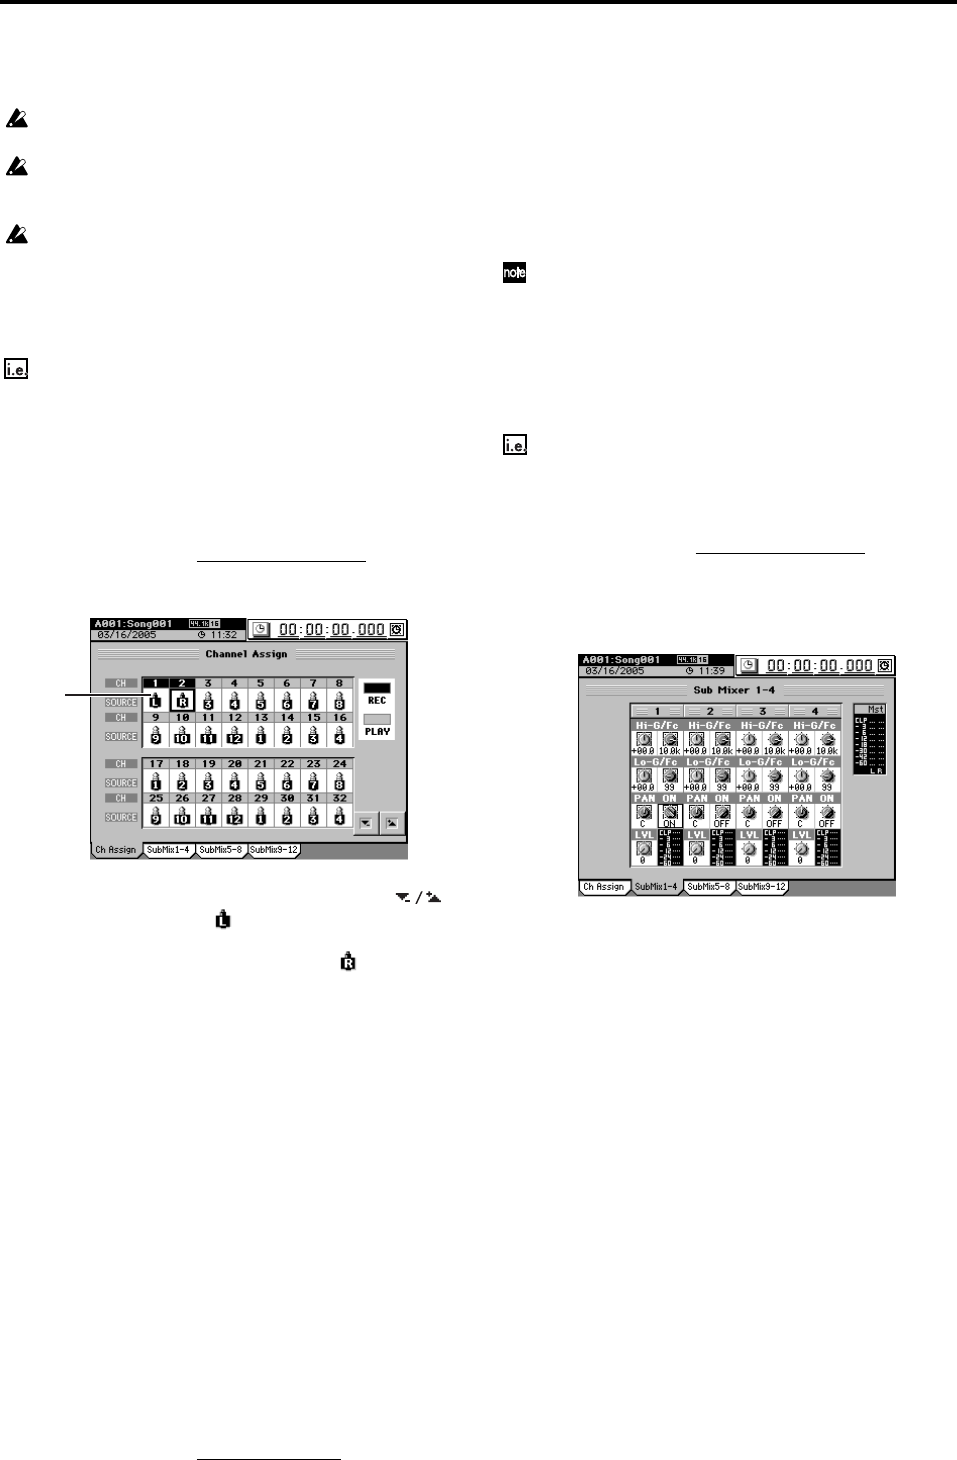
(2) Specify the S/P DIF inputs as the digital audio source.
• Access the MIXER, CH INPUT/SubMixer
, “Ch
Assign” tab page.
• Click the channel 1 “SOURCE,” and click the
buttons to select “L” ( ). You can also use the value
dial or the +/– keys to make your selection.
In the same way, set channel 2 to “R” ().
(3) Assign the input audio to mixer channels 1 and 2.
•Turn the CH ON key on, and turn the channel 1 and 2
channel keys on (key lit).
•Turn the REC/PLAY key on, and set the channel 1 and
2 channel keys to Record (key lit red). At this time,
CH 1 will be highlighted in the screen to indicate that
it is record-enabled.
(4) Adjust the input level settings.
•Press the METER key to display the Meter/Track
View screen.
• Click the Meter/Track Type button to display the
Meter/Track Type dialog box.
• In “Select Level Meter Position,” select “CH-Input”
as the level meter mode, and click the OK button (or
press the panel YES key) to return to the previous
screen.
• When you play back your MD player, the CH 1 and 2
level meters will move in response to the input.
(5) Check the audio.
• Set the channel 1 and 2 faders to unity gain (0 dB).
• Access the MIXER, SOLO/MONITOR
, “Monitor”
tab page.
• Select “Master LR,” and turn it on (highlighted).
• Gradually raise the MASTER fader and PHONES
LEVEL knob or MONITOR LEVEL knob, and verify
that you hear the sound from your headphones or
your monitor system connected to the MONITOR
OUT jacks.
1-3. Sub input
The audio sources from the INPUT 1–12 jacks can be sent to
the sub-mixer and output directly to the master bus, inde-
pendently of being input to the mixer.
Sub Mixer 1–12 corresponds to INPUT 1–12 jacks respectively.
Here are some ways in which you can use this:
•You can add external input sources to the recorded sounds
that are playing back.
•You can apply external effects to the audio signal sent
from the AUX jacks, and send the processed signal via the
sub-mixer to the master bus.
Inputting audio to the INPUT 1 jack, assigning it to sub-
mixer 1, and outputting the audio.
(1) Connect an audio signal to the INPUT 1 jack.
(2) Adjust the sub-mixer settings.
• Access the MIXER, CH INPUT/SubMixer
,
“SubMix1–4” tab page.
• Since you are inputting audio to the INPUT 1 jack, use
the Sub Mixer 1 ON knob (Knob Matrix 10) to turn on.
(3) Check the input to the sub-mixer.
• In the same way as for normal mixer settings, use the
Knob Matrix to adjust the level, pan, and EQ.
•Verify that you hear the input source through your
headphones or monitor system.
2. Audio outputs from the mixer
MASTER L, R
These outputs provide the audio signals from the master bus.
Use the MASTER fader to adjust the volume of the MASTER
L/R jacks and the level of the signal being recorded on the
master track.
MONITOR L, R
Refer to “3-7. Monitor settings” (→p.47).
AUX 1, 2
Refer to “2e-3. Aux1 Send” (→p.109).
S/P DIF OUT
This jack sends a digital audio version of the same audio sig-
nal as the MASTER L/R jacks, at the same sampling frequen-
cy and bit depth as the current song.
(2)


