


85
Operation
Song,
Locate
MixerEffects
Session
Drums™
Recorder
CDDataDriveUSBMIDIUpgrading
the system
Recovery
CD
ClickPoint
calibration
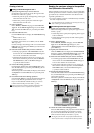
1-2. Restoring backed-up data
Here’s how to restore previously backed-up data.
When backed-up song data is restored into the D3200, it will
once again be playable.
(1) Select the restore-destination drive (→p.36).
If you are restoring song data or an album CD project,
select the restore-destination song drive.
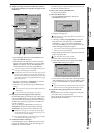
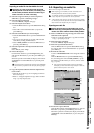
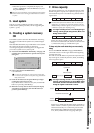
(2) Select “Restore.”
Access the SYSTEM/MIDI, “Restore” tab page.
(3) Select the restore-source drive.
Click the Drive button to open the Select Drive dialog
box, select either “CD” or “PC,” and click the Yes button
(or press the panel YES key).
If you selected “CD,” insert the backup disc into the CD-
R/RW drive.
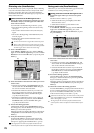
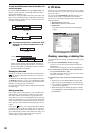
(4) Select the restore-source file.
Click the Select File button to open the Select Restore
Data File dialog box.
Folders will be created depending on the type of backup.
Open the folder and select the data file you want to
restore.
For details on the icons that are displayed, refer to
“Loading” (→p.173).
•From the file list, select the folder that contains the
data file you want to restore, and click the Open but-
ton. If you decide to select a different folder, click the
Close button to return to the next higher level.
•From the file list, select the data file that you want to
restore, and click the OK button (or press the panel
YES key).
• If you want to restore all files in the folder as a single
operation, click the Select All button.
(5) Select the restore-destination for the file(s) you are
restoring.
When restoring song data
• In the restore-destination cell, specify a song number.
• When you restore, the restored song will be inserted at
the specified song number of the current drive. The
song numbers of other songs currently in the D3200
that occur following the restore-destination song
number will be increased by one.
When restoring an album CD project
• Since the project will be restored to the current drive,
you do not need to specify the restore-destination.
• When you restore, the album CD project in the current
drive will be overwritten.
When restoring other data files
• Since these files are common to all song drives, you do
not need to specify the restore-destination.
• When you restore, the existing data files will be over-
written.
When restoring all data files in a folder at once
•You do not need to specify the restore-destination.
• When you restore, the song data will be written fol-
lowing the songs on the current drive, and other data
will be overwritten.
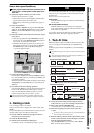
(6) Execute the restore.
Click the Exec. button. In the confirmation dialog box,
click the Yes button (or press the panel YES key) to exe-
cute. If you click the No button (or press the panel NO
key), the restore operation will be aborted.
If you are restoring a backup that spanned more than
one disc, the D3200 will ask you for the next disc when it
has finished reading one disc. Insert the next disc and
click the Yes button (or press the panel YES key). Insert
the discs in the order in which they were written during
the backup operation.
(7) When the restore operation is finished, the display will
indicate “Completed.” Click the OK button (or press
the panel YES key).
When restoring from the PC drive, the song effect program data
will not be restored unless it has the same name as the song that is
being restored.
(3)
(2)
(4)
(5)
(6)
(3)
(3)
(4)
(4)
(4)
Data