64
6-2. Pattern map tempo
If you don’t specify a tempo in the pattern map, the tempo
will be recorded according to the tempo track. However by
setting the RecMode to Pat&T or Tempo, you can record a
pattern map and manually record tempo changes.
When you’re recording the pattern map, tempo changes will
apply from the location where the change occurs (regardless
of the measure of the pattern), and this tempo will be main-
tained until the next tempo change that occurs.
If you want the tempo to change at the beginning of a meas-
ure (for example when you switch patterns), record with a
fixed tempo, and then edit the tempo of the appropriate pat-
tern map event. Subsequent events will also be automatically
changed to this tempo.
Even if you edit the tempo of a pattern map event where tem-
po changes have already been recorded during the measure,
the change will apply from the beginning of the measure.
The D3200 has 32 channel tracks for each song. For each
channel track, there are eight virtual tracks; A through H.
There is also a two-channel master track that is used for re-
cording the final stereo mix of your song. If you want to cre-
ate an audio CD, the data on the master track will be used.
The D3200 provides a separate master track for each song,
and this master also has eight virtual tracks; A through H.
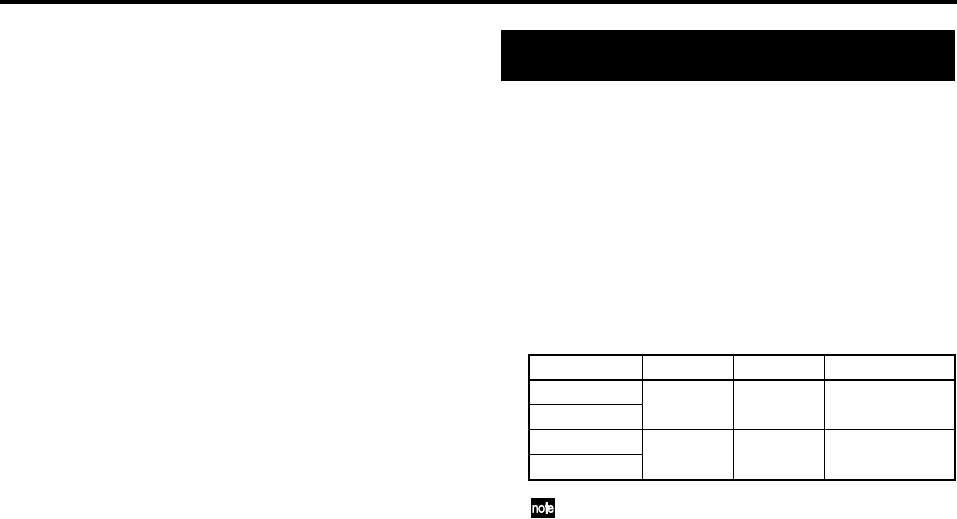
The following table shows the number of available tracks
and the number of tracks that can be used simultaneously.
Number of simultaneously usable tracks for each Song
Type
*16 channels is the maximum, combining 12 analog inputs,
+ 2 digital inputs (S/P DIF L, R), + 2 Session Drums (L, R).
**12 channels using any combination of analog inputs, digital
inputs and Session Drums.
1. Recording
The D3200’s recorder can record analog or digital audio in-
put sources assigned to mixer channels.
Then you’ll use the master track to combine the multiple re-
corded tracks into a two-track stereo mix.
Bounce recording
Bounce recording is a way to combine the data from multiple
tracks down to just one or two tracks.
The D3200 provides a stereo master track that is separate
from the channel tracks.
To perform bounce recording, just play back the tracks you
want to bounce, and record them onto the master track.
After listening to the Bounced data on the Master Track and
verifying that it is correct, simply copy (overwrite) the mas-
ter track to any of the real tracks or virtual tracks. (→p.132)
1-1. Basic recording
Here’s how to record the audio signal that you specified in
“1. Inputting audio to the mixer” (→p.42).
(1) Create a new song (→p.35 “1-1. Creating a new song”).
(2) Adjust the mixer settings (→p.42 “1. Inputting audio to
the mixer”).
(3) Apply effects to the audio input (→p.54 “Effects”).
(4) Apply EQ to the audio input (→p.45 “Applying EQ to
an audio input”).
(5) Adjust the pan (→p.45 “3-2. Adjusting the pan”).
(6) Check the recording mode.
Access the REC/PLAY MODE, “RecMode” tab page,
and click the “Normal” in the Rec Mode.
(7) Set the recording level.
You can set the recording level in one of two ways.
•You can record at the optimum level simply by record-
ing at the level you specified in steps (1) through (4).
Click the REC button to set it to “PRE” in the CH
VIEW, “Ch View” tab page.
• If you want to further adjust the channel fader and
record at the adjusted level, click the REC button to set
“PST” in the CH VIEW, “Ch View” tab page.
Song Type Recording Playback Punch recording
44.1 kHz/16-bit
16* 32 8
48 kHz/16-bit
44.1 kHz/24-bit
12** 16 4
48 kHz/24-bit
Recorder
