


90
5. Exchanging data with your
computer
Use USB Slave Mode to transfer data between your computer
and the PC drive.
For the procedure refer to “USB” (→p.92).
6. Erasing a CD-RW disc
This operation erases the data that was written on a CD-RW
disc.
Erasing a disc lets you use the entire capacity of the disc, just
as when it was unused (blank).
When you execute this operation all data will be erased from the
CD-RW disc.
This operation cannot be performed on any disc other than a CD-
RW disc.
(1) Insert the CD-RW disc into the CD-R/RW drive.
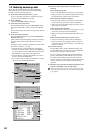
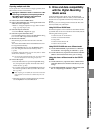
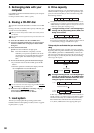
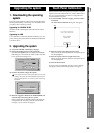
(2) Access the SYSTEM, “DiskUtility” tab page and press
the Erase CDRW button to display the Erase CDRW
dialog box.
(3) Select the desired method.
(4) To execute the erasure, press the Yes button to begin.
• If you decide not to erase the CD-RW, press the No
button.
• When the operation is finished, the display will indi-
cate “Completed.” Press the OK button.
You can erase a disc in the same way by using the CD, CD WRIT-
ER, “CD Utility” tab page Erase button.
(5) Access the CD, CD WRITER, “CD Utility” tab page
and press the Get Information button.
The CD Information will indicate “Blank.”
7. Load system
This lets you easily update the operating system of the
D32XD/D16XD. For the update procedure, refer to “Upgrad-
ing the system” (→p.95).
8. Drive capacity
This section explains how you can make the best use of the
D32XD/D16XD’s song drive capacity. For explanatory pur-
poses, we will assume that you have recorded a song with
the following structure.
The Optimize Track operation described here does not need to be
performed often. It is sufficient to perform this operation when the
“Disk too busy.” indication appears, or when you want to recov-
er disk drive capacity after completing a song.
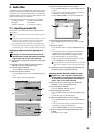
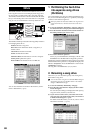
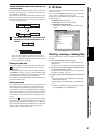
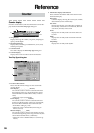
1. You began recording on track 1 from the beginning of
the song, and only played during the Intro, Break, and
Ending on the first take.
In this case, silence (actually, noise-level sound) will
have been recorded in the A, B, and Solo sections of track
1, unnecessarily using up valuable drive space.
To keep only the audio data that you are actually
using
Execute the Optimize Track operation on track 1, from the
beginning of the song to the end of the song. Set the Optimize
Track “Mode” parameter to “Erase Silence,” and execute.
This will cause audio data to be preserved only for the actu-
ally-used regions, so that only the intro, break, and ending
will occupy drive space.
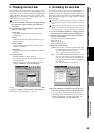
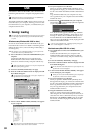
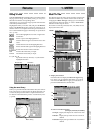
2. You began recording on track 1 from the beginning of
the song, and played the Intro, A, B, and Break during
the first take, and then recorded a second take, over-
writing the original A and B with A’ and B’.
In this case, A and B of the first take remain “beneath” A’
and B’ of track 1, in order to preserve the data for Undo
and also because they are a continuous piece of audio
data with the Intro and Break. This means that Intro,
A+A’, B+B’, and Break are all occupying disk space.
Quick: Erase the CD-RW disc at high speed.
Full: Erase the CD-RW disc completely. Use this
method if you experience problems such as the
disc failing to be recognized after being format-
ted by Quick. This method requires a longer
time.
Intro A B SoloBreak Ending
Intro Break EndingSilence
Silence
“OptimizeTrack”
IN OUT
Intro
Data exists
Data exists EndingBreak
Intro EndingBreak
Data erased
Data erased
After execution
1st take
1st take
2nd take
Recorded second take
Intro BA Break
Intro BA Break
B'A'