


123
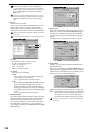
Reference
Counter
Rename
METER
CH
VIEW
MIXEREFFECTCDSYSTEMMIDI/
SYNC
TEMPOSONGTRACKUNDO
STORESCENEMARK
SCRUB
LOC1/IN
...LOC6
ENTERMARK
JUMP
REC/PLAY
MODE
Transport
keys
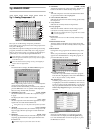
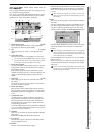
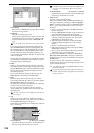
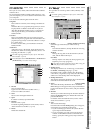
CD PLAYER
1. CD Monitor
When this is on (highlighted), the audio output of the
internal CD-R/RW drive will be sent to the monitor bus.
If this is off, the output will not be sent to the monitor
bus.
This setting is valid only in this page; it will automati-
cally be turned off when you switch pages.
If CD Monitor is on, other signals will not be output to the
monitor bus.
If the audio output of the internal CD-R/RW drive is assigned
in the MIXER, INPUT/OUTPUT/CH ASSIGN, “Ch As-
sign” tab page to a mixer channel, you will be able to listen to
the CD even if CD MONITOR is off. In this case, the sound
will be routed through the mixer (including EQ and effects).
2. Information window
The upper line displays the track number and messages.
The lower line shows the state (playing, stopped, etc.) of
the CD player, the elapsed time, and the level meter.
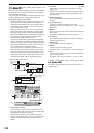
3. Control buttons
Use these buttons to access the playback controls and to
select tracks on the audio CD.
You cannot eject the CD while paused. If you switch to another
page while paused, the CD player will change from Pause to
Stop.
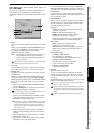
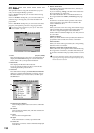
CD WRITER
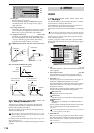
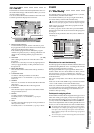
5-1. Album CD Project
Album CD Project lets you create an audio CD using Disc At
Once. The data will be written to the CD-R/RW as 16-bit/
44.1 kHz data in audio CD format.
The disc is written using the Disc At Once method, including fi-
nalization. No further data can be written to the disc afterward.
The CD-R/RW cannot be written if there is a track less than four
seconds long. Adjust your settings so that the PostGapTime and
the track time add up to at least four seconds.
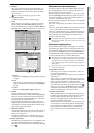
1. Track list
This displays a list of the songs that will be written to the
CD-R/RW disc as an album CD.
The list shows the track numbers, song name (mark
name), time, pre-gap, and post-gap of the tracks you reg-
istered for the album CD.
At the bottom of the window, the duration of the selected
(highlighted) track and the total time of the album are
displayed.
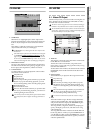
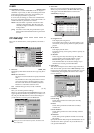
2. Preview player
These buttons let you play back the songs shown in the
list.
You cannot use these buttons if the list contains no songs.
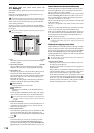
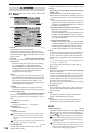
3. Add
This button adds a song to the list of songs that will be
written to the CD-R/RW disc. Select the track number
and press the button to display the Add TR dialog box.
Select the desired song from the song list.
The song number, song name, mark icon, sampling fre-
quency/bit-depth, protect icon, and date of each song
will be displayed.
The song data that will be written to the CD-R/RW will
be the song data as of when you pressed Add button. If
you edit that song after pressing the Add button, you will
need to add that song to this list once again if you want to
write the updated data.
:Plays the track.
: Stop the track.
: Pauses the track.
: Moves to the preceding track each time you press this
button. If you press this during playback, you will
move to the beginning of the currently-playing track.
: Rewinds the track.
: Fast-forwards the track.
: Moves to the next track each time you press this but-
ton. If you press this during playback, you will move
to the beginning of the next track.
1
3
2
: Plays the song.
: Stops the song.
: Moves to the preceding song each time you press
this button. If you press this during playback, you
will move to the beginning of the currently-playing
song.
: Moves to the next song each time you press this but-
ton. If you press this during playback, you will
move to the beginning of the next song.
1
2
3
4
5
6
7
CD