


109
Reference
Counter
Rename
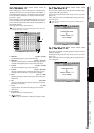
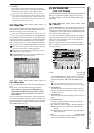
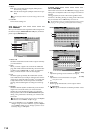
METER
CH
VIEW
MIXEREFFECTCDSYSTEMMIDI/
SYNC
TEMPOSONGTRACKUNDO
STORESCENEMARK
SCRUB
LOC1/IN
...LOC6
ENTERMARK
JUMP
REC/PLAY
MODE
Transport
keys
9. OverWrite
Overwrites the current mixer settings onto the selected
scene number. Use this when you want to make fine adjust-
ments to the scene or replace it with a different scene.
Even when scenes are disabled, selecting a song will recall the
mixer settings, meaning that the mixer may be operating with set-
tings that do not match the actual fader and knob positions. The
mixer settings that are recalled will be the values that were current
at the time the song was saved (→p.137).
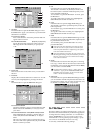
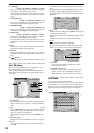
3c-3. Scene Filter
These settings specify the parameters that will be modified
when scenes are recalled. The enable/disable settings you
make here will apply to all scenes of the song.
If you want to enable/disable parameters for a specific scene of the
song, make settings in the “EditScene” tab page 3.Disable Prm.
Press the buttons to enable/disable the corresponding chan-
nels and/or parameters. A channel/parameter whose button
is turned on will not be affected by scene recall operations.
EFF 1/2 Return, Effect, Aux 1/2 Level, MasterEQ, and Master-
Fader parameters can be disabled independently of the channel.
Fader, CH ON, Pan, EQ, EFF 1/2, and AUX 1/2 filter settings are
valid only for channels that are disabled (highlighted).
The Effect button enables/disables and Trim the effect program
number and insert effect assignments.
The EFF 1/2 Return button enables/disables the Return Level
and Balance settings of the master effect 1/2.
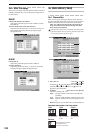
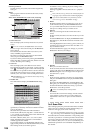
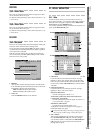
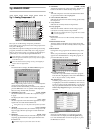
3c-4. Mixer View
You can use the Mixer View screen to check the settings of a
scene.
Here you can view and edit the following parameters.
Faders, CH ON, pan, EQ LOW Gain/EQ MID Gain/
HIGH_MID Gain/HIGH Gain, EFF1/2 Send, AUX 1/2
Send, AUX 1/2 LEVEL, EFF 1/2 Return Level, EFF 1/2
Return Balance
If you move the faders and pan knobs on the top panel, the
screen will be updated to change the value accordingly, and
the selection will move to that parameter. If you operate the
EQ and send knobs, the changes will show when you return
to the “Mixer View” tab page.
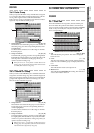
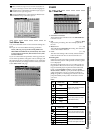
3d. EQ/PHASE/REC
[*EQ/ATT/PHASE]
Here you can adjust the equalizer, attenuator, EQ library,
and phase settings for each channel, and adjust the master
EQ settings.
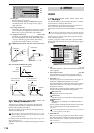
3d-1. EQ/ATT
Use the CH SELECT keys to select a channel and view its set-
tings. For each channel you can edit the settings of the four-
band equalizer and the attenuator. The equalizer is normally
a peaking type, however the LOW EQ and HIGH EQ bands
can be set to a shelving (Shlv) type.
You can use the switches located to the right of the display to
select the four equalizer bands. The Gain/Freq/Q knobs lo-
cated to the right of the display can be used to adjust the
equalizer G/F/Q parameters.
Equalizer settings used here can be loaded from the EQ li-
brary, or registered in the EQ library (see the section below,
“3d-2. EQ Library”).
1. CH
D32XD
[1…32]
D16XD
[1…16]
Use the CH SELECT keys (or this edit cell) to select the
channel whose equalizer settings you want to edit. This
channel is linked with “CH” in the “EQ Library” tab
page.
If the selected channel’s PLAY/REC status is PLAY, the
screen will show the PlayEQ. If REC, it will show the RecEQ.
2. IN/TR indicator
This indicates either IN or TR to show whether the cur-
rent EQ is the PlayEQ or the RecEQ, and also shows the
current input source.
3. EQ curve graph
The EQ curve produced by the settings is shown here as a
graph.
4. Level meter button
Each time you press the button, the position of the dis-
played level meter will change.
5. ATT [–63.5 dB…0 dB]
Here you can adjust the attenuator. Lowering this value
will lower the level that is input to the EQ.
IN: Input level. The level input to the EQ is displayed.
PRE:Pre-fader level. The output level of the EQ is dis-
played.
PST: Post-fader level. The level after passing through the
fader is displayed.
1
2
3
4
5
6
7
8
9
10
11
12
MIXER