


48
3. Mixer settings
Adjust the overall sound of your song by using the mixer sec-
tion to set the volume, tone, and pan settings for input or
playback.
For details on effect settings, refer to “Effects” (→p.56).
3-1. Adjusting the volume
Adjusting the volume level of each channel
Use the channel faders to adjust the input or playback vol-
ume. Raise or lower the fader to adjust the volume.
• If channels are paired, use the odd-numbered channel
fader (→p.49).
•You can store these settings in a scene (→p.52).
• On the D32XD you can record these adjustments as auto-
mation (→p.54).
The channel faders have a range from silence (–∞) – unity gain (0
dB) – +6 dB of gain.
Inputting a source at the maximum level
Ideally, an audio source you want to record should be input
at the highest possible volume that does not cause clipping.
To record at the ideal maximum level on the D32XD/D16XD,
make adjustments according to the signal flow described be-
low.
1. Analog input jack (INPUT 1–16) TRIM
This is the first adjustment that affects the level of the
input source.
• Channels to which an insert effect is not applied
Refer to 1-1. Analog input, step (4) (→p.42).
• Channels to which an insert effect is applied
• Access the EFFECT, “InsertEff” tab page, and select
the effect for the channel you are adjusting.
• Set “Trim” to “100.”
• Adjust the TRIM knob so that the “FX IN” level
meter does not reach “CLP” when the audio signal
is input.
For details, refer to “4-3. Insert EFF” (→p.119).
Since the signals from the S/P DIF or ADAT jacks are input
at unity gain (0 dB), you do not need to adjust the TRIM.
2. Insert effect TRIM
In some cases, applying effects to the input signal you
adjusted in step 1 may increase the volume, causing dis-
tortion. In this case, make the following adjustment.
• Access the EFFECT, “InsertEFF” tab page, and use the
InsEffect edit cell to select the effect whose level you
want to adjust.
• Adjust “Trim” so that the “FX OUT” level meter does
not reach “CLP” when the audio signal is input.
For details, refer to “4-3. Insert EFF” (→p.119).
3. Attenuator
Finally, applying EQ may increase the volume level,
causing the sound to distort. In this case, make the fol-
lowing adjustment.
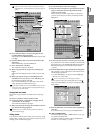
• Access the MIXER, EQ/PHASE/REC
[*EQ/ATT/
PHASE], “EQ/ATT” tab page, use the CH SELECT
keys to select the channel that you are inputting, and
set the REC/PLAY key to REC.
• Adjust “ATT” so that the “PRE” level meter does not
reach “CLP” when the audio signal is input.
For details, refer to “3d-1. EQ/ATT” (→p.109).
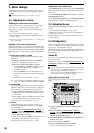
Adjusting the overall volume level
Use the MASTER fader to adjust the volume of the MASTER
OUT jacks and the level of the signal being recorded on the
master track.
Use the MONITOR VOLUME knob to adjust the volume of
the MONITOR OUT jacks.
Use the MONITOR VOLUME knob or PHONES VOLUME
knobs to adjust the volume of the headphone jacks.
3-2. Adjusting the pan
Use the PAN knobs to adjust the pan (stereo position) of each
channel.
•You can store these settings in a scene (→p.52).
• If channels are paired, you can select how the PAN knob
will operate. (→p.102)
• On the D32XD you can record these adjustments as auto-
mation (→p.54).
3-3. EQ (Equalizer)
The EQ can be used to cut unwanted frequency regions such
as hiss, or to shape the tonal character by boosting or cutting
a specific low- or high-frequency region.
The D32XD/D16XD provides channel EQ for adjusting the
tone of each channel, and master EQ for adjusting the tone of
the master bus.
Channel EQ
You can use four-channel full-parametric EQ to adjust the
tone of each channel.
Adjust the channel EQ in the MIXER, EQ/PHASE/REC
[*EQ/
ATT/PHASE], “EQ/ATT” tab page, or in the CH VIEW, “Ch
View” tab page.
When you operate one of the EQ knobs or keys located at the right
of the LCD screen, the “EQ/ATT” tab page will appear automati-
cally, allowing you to edit the EQ immediately.
However if you are in the CH VIEW “Ch Routing” tab page, you
will make adjustments in the “Ch View” tab page.
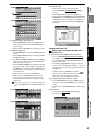
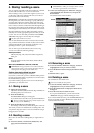
Applying EQ to an audio input
You can apply EQ to an audio input, and record the EQ’ed
sound.
(1) Input an audio signal. (→p.42 “1. Inputting audio to
the mixer”)
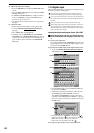
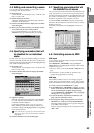
(2) Access the MIXER, EQ/PHASE/REC
[*EQ/ATT/
PHASE], “EQ/ATT” tab page, and make sure that the
REC/PLAY key of the channel whose EQ you want to
adjust is set to REC (key lit red).
(3) Press the appropriate CH SELECT key, and make sure
that it is set to “IN.”
(4) Set the level meter to “IN/PRE.”
(5) Use the ON/OFF button to turn on the EQ.
If this is off, the EQ will not be applied.
(3)
(6)
(4)
(5)