


13
Introduction
Before using the D32XD/
D16XD for the first time
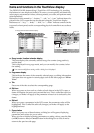
Main featuresParts and their functionItems and functions in the
TouchView display
Basic operation
Removing a disc
(1) Press the eject button to open the disc tray. The tray will open about halfway.
Manually pull the tray out far enough to remove the disc from the tray.
(2)Gently remove the disc from the disc tray.
(3)Push the disc tray in until it is completely closed.
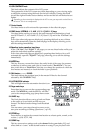
Emergency disc removal
Normally you will be able to remove the disc as described
above. However, if this is not possible due to a power failure or
other problem, you can also remove the disc as follows.
Insert a pin-like object of less than 1 mm diameter, such as a
straightened paper clip, into the manual eject pinhole and push.
The disc tray will be forced open.
Excessive use of this method may cause the CD-R/RW drives to malfunc-
tion.
This procedure must be performed with the power off.
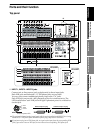
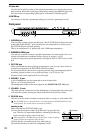
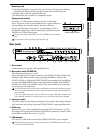
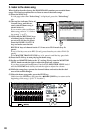
Rear panel
1 AC connector
Connect the power supply cable (included) here.
2 Main power switch (POWER ON)
This turns the main power on/off.
When the Main power switch is turned on, the D32XD/D16XD will be in the
standby mode. In the standby mode, pressing the ON key will turn the
D32XD/D16XD on. While the D32XD/D16XD is operating, hold the ON key
to access the Power Off dialog box and select Yes to shutdown the D32XD/
D16XD and return to the standby mode. Then use the main power switch to
turn the power off completely.
To turn off the power, you must first press the ON key to perform the shutdown operation.
Never turn off the Main power switch or disconnect the power cable until shutdown has
been completed.
If you turn off the Main power switch or disconnect the power cable before shutdown has
been completed, data and user settings may be lost, and the hard disk may be damaged.
3 Cooling fan outlet
This is the outlet for the internal cooling fan. Do not block this outlet; doing so
will cause heat to build up inside the D32XD/D16XD, causing malfunctions.
4 DIB-8 cover
Remove this cover when installing the optional ADAT I/O board (→p.178).
For details on the parts and functions of the DIB-8’s connectors, refer to “Parts
of the DIB-8 and their functions” (→p.178).
5 USB connector
You can use a USB cable to connect the D32XD/D16XD to your computer.
USB peripheral devices such as external hard disks and CD-R/RW drives cannot be con-
nected to the D32XD/D16XD.
Manual eject pinhole
1 2 3 4 5 6 7
8
9
10
11 12 13
Parts and their function